



This checklist covers a minimal set of practical measures to improve the security of your own VPS/VDS server running Ubuntu or Debian.
I strongly recommend a VPS from alfahost.io with 10-gigabit network speed and modern Ryzen/Xeon servers for any workload.
Everyone chooses security measures for their server based on how it is used and their own attitude to security, but I do not recommend ignoring the general rules in the first section.
This checklist will be gradually expanded with new security measures — share your suggestions in the comments or in the Telegram chat.
I also recommend visiting the Ubuntu/Debian server hardening discussion page on the opeNode.ru forum
General VPS/VDS security rules
VPS server configuration is not the most important part of security — the most important thing is the administrator’s common sense.
- Do not store your server control-panel password in online password managers (there have been many leaks) or in a TXT file on the desktop. Ideally, keep the password only in your head and update it periodically; as a last resort, use a paper notebook. You can also use an open-source password manager such as KeePassXC or Bitwarden — that approach is also relatively safe. If you store passwords in the browser and do not want to change your habits, make sure you use a master password.
- Use strong passwords with mixed case and special characters.
- Harden the email account linked to your server control panel as much as possible.
- Use two-factor authentication for email and the server admin panel. Prefer token-based 2FA apps such as Aegis, 2FA, Yandex Key, etc., because SMS can be intercepted via a SIM clone (rare, but it happens). In most cases I use Aegis
- Do not save passwords in FTP clients — malware often steals credentials from them.
- Never share the primary administrator account credentials. If you need to grant access, create a new account with limited privileges, then delete the temporary account afterward.
- Use trusted VPS/VDS providers. I personally use Fornex. Subscribers also recommend Melbicom. If you still decide to save money and use a dubious ultra-budget server, maximize security and preferably avoid using your personal data, real IP, and personal payment details when renting it.
Using an SSH key
Source: https://fornex.com/c/fir5fs/ru/help/authorization-ssh-key/
SSH keys are a simple and reliable way to secure your connection to the server. One clear advantage over traditional password authentication is that you can authenticate without regularly sending your password over the network.
If you decide to set up SSH key authentication on the server, the first step is to generate a private and public RSA key pair.
After generation, the public key is copied to the server, while the private key stays on your local computer.
To generate a key pair, run:
ssh-keygen -t rsa -b 2048The program will ask for a directory to store the key files and prompt you for a passphrase.
Press Enter to use the defaults; the program will then save the keys in the .ssh directory in the user’s home folder.
To enter the key directory, run:
cd ~/.sshThe directory will contain two files:
- id_rsa — the private key.
- id_rsa.pub — the public key.
Copy the private key file to a safe place and move the public key to the server. The easiest way to copy files between the server and your PC is Filezilla or any other SFTP file manager.
Add the generated public key to the server’s authorized keys. To do this, append the contents of id_rsa.pub to the end of authorized_keys:
cat id_rsa.pub >> ~/.ssh/authorized_keysConfigure SSH key authentication in the OpenSSH server config:
nano /etc/ssh/sshd_configAlign the current settings with the parameters below:
PubkeyAuthentication yes
AuthorizedKeysFile %h/.ssh/authorized_keys
RhostsRSAAuthentication no
HostbasedAuthentication no
PermitEmptyPasswords no
To disable password login, change the parameter in the same sshd_config file:
PasswordAuthentication noOn Ubuntu 24.04 LTS, the PasswordAuthentication setting is in /etc/ssh/sshd_config.d/50-cloud-init.conf. Changing that parameter only in /etc/ssh/sshd_config will have no effect.
nano /etc/ssh/sshd_config.d/50-cloud-init.confOn Ubuntu 22.04, also set
PubkeyAcceptedAlgorithms +ssh-rsaSet permissions with:
chmod 700 ~/.ssh/ &&
chmod 600 ~/.ssh/authorized_keys
Then restart the SSH server.
systemctl restart sshThat completes SSH key setup on the server.
Installing Fail2ban on Ubuntu/Debian
To reduce SSH password brute-force attempts, use Fail2ban. After failed password attempts, Fail2ban blocks the source IP. You can choose the attempt limit and ban duration yourself — for example, a one-hour ban after five failed SSH logins.
Installing Fail2ban on Ubuntu
Update the system:
apt update -y &&
apt upgrade -y
The Fail2ban package is included in the default Ubuntu repositories. To install it, run:
apt-get install fail2banTo start the Fail2ban service, run the following commands (for reference — fail2ban should start automatically):
systemctl enable fail2ban
systemctl start fail2ban
To check that the Fail2ban service is running:
systemctl status fail2banSections 3.2 and 3.3 describe Fail2ban configuration and are optional, because SSH protection is already enabled in Fail2ban by default after installation.
Fail2ban configuration basics
Source: https://homehosted.ru/ustanovka-i-nastrojka-fail2ban/
Fail2ban configuration does not depend on the Linux distribution. Fail2Ban config files live in /etc/fail2ban. The main file of interest is jail.conf, but you should not edit it because package updates may overwrite it. Instead, use drop-in files from the /etc/fail2ban/jail.d directory. It contains the main protection settings for services such as HTTP, FTP, SSH, Squid, Monit, Horde, Drupal, and others. The file is split into sections called “jails”. Each jail covers a specific service. To enable protection, add enabled = true in the relevant section.
To enable a rule from the main jail.conf file, create separate configs per service in /etc/fail2ban/jail.d/, similar to /etc/fail2ban/jail.d/defaults-debian.conf (which you also should not edit), or similar to the file in the next section.
[sshd]
enabled = true
Main configuration parameters:
- ignoreip — IP addresses that must never be banned. You can also set a subnet mask or DNS name. Add your own IP to avoid locking yourself out.
- bantime — ban duration in seconds. After that, the blocked address is removed from the service lists.
- maxretry — number of suspicious actions before a ban is triggered (for example, failed login attempts).
- port — the port(s) where the target service is running.
- filter — filter name used for matching. For example, the sshd filter uses /etc/fail2ban/filter.d/sshd.conf.
- logpath — path to the log file where successful and failed logins are recorded. By default this is /var/log/auth.log.
- action — the action executed when Fail2ban detects activity matching the search criteria;
Fail2ban reads configuration files in the following order. Each .local file overrides settings from the matching .conf file:
- /etc/fail2ban/jail.conf — default service settings
- /etc/fail2ban/jail.d/*.conf — admin custom service settings
- /etc/fail2ban/jail.local — admin custom service settings
- /etc/fail2ban/jail.d/*.local — admin custom service settings
There are also other config files:
- action.d/*.* — action configuration;
- fail2ban.conf — default configuration file;
- fail2ban.d/*.* — admin custom Fail2ban settings;
- filter.d/*.* — log analysis filters and templates;
The files paths-arch.conf, paths-common.conf, paths-debian.conf, and paths-opensuse.conf store path settings for different Linux distributions.
Configuring Fail2ban for SSH
Source: https://homehosted.ru/ustanovka-i-nastrojka-fail2ban
The SSH jail works in Fail2Ban by default right after installation. To change its behavior, create a new jail file. We will use the nano editor:
nano /etc/fail2ban/jail.d/ssh.confAdd the following lines to the new file:
[sshd]
enabled = true
port = ssh
filter = sshd
logpath = /var/log/auth.log
maxretry = 3
findtime = 300
backend = systemd
* where:
- sshd — is the rule name;
- enabled lets you quickly enable (true) or disable (false) the rule;
- port — is the target service port (letter or numeric form);
- filter — is the filter (match criteria) used to find suspicious activity. Essentially, it is the file name from /etc/fail2ban/filter.d without the .conf suffix;
- logpath — is the log file path where the filter looks for suspicious activity based on the defined criteria.
- maxretry — is the number of actions allowed before a ban.
- findtime — is the time window in seconds during which maxretry is counted;
To apply the changes, restart the service:
systemctl restart fail2banThis configuration bans IP addresses after 3 failed SSH logins. The ban lasts 300 seconds, and suspicious activity is logged in /var/log/auth.log.
You can adjust the parameters to fit your needs.
Adding an IP address to the whitelist
Source: https://homehosted.ru/ustanovka-i-nastrojka-fail2ban
To avoid locking yourself out, add trusted IPs to the whitelist before the main configuration. Edit jail.local:
nano /etc/fail2ban/jail.localAdd the following lines, replacing ip1 and ip2 with trusted addresses:
[DEFAULT]
ignoreip = ip1 ip2
ignoreip — IP addresses that must never be banned. You can also set a subnet mask or DNS name. Add your own IP to avoid locking yourself out.
Do not forget to reload the service to apply changes:
systemctl restart fail2banChanging the default SSH port on Ubuntu/Debian
Source: https://fornex.com/ru/help/ssh-port/
By default, the SSH server accepts incoming connections on TCP port 22, which creates a potential brute-force risk: once an attacker finds that open port, they may try to guess the remote password with automated tools.
The port in use is configured on your virtual server (VPS) in sshd_config, which is located in /etc/ssh/
To change the SSH port:
Connect to the server with an SSH client PuTTY
Install net-tools:
apt install net-toolsCheck the list of open ports with:
netstat -tupln | grep LISTENThis shows which ports are already in use so you do not reuse them.
After checking ports, open sshd_config. You can open it with any installed text editor.
With nano:
nano /etc/ssh/sshd_configIn the file, find the sshd_config entry:
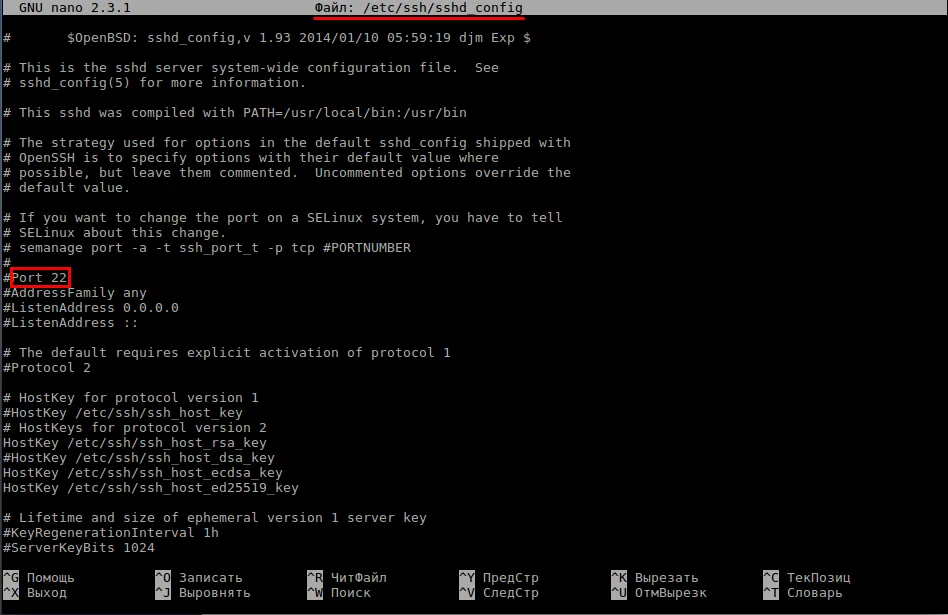
Uncomment the line by removing #, change the port number, and save with CTRL+O
Then confirm with Enter
To apply the changes, restart the SSH service:
service sshd restartAdding firewall rules
Use the UFW front-end for iptables to block unwanted connections by adding rules on top of the defaults.
Install UFW
apt install ufwBy default, UFW denies all incoming connections and allows all outgoing ones. That means anyone trying to reach your server cannot connect, while any application on the server can still reach the outside world.
Set the UFW default policies with the following commands:
ufw default deny incoming  &&
ufw default allow outgoing
Because these commands close all other ports and connections, you must add a firewall rule allowing your SSH port (otherwise you cannot use SSH and the only way back in is the provider control panel)
Run the following command specifying your SSH port number instead of SSH-PORT, you can open other ports such as 80, 443, etc. the same way:
ufw allow (ваш порт SSH, по умолчанию 22) !важно!

# к примеру ufw allow 44
Now that the firewall allows incoming SSH, enable it.
ufw enableRestart Fail2ban:
systemctl restart fail2banMore detailed UFW documentation is here https://www.digitalocean.com/community/tutorials/how-to-set-up-a-firewall-with-ufw-on-ubuntu-22-04
If UFW rules are needed for Docker container traffic, use ufw-docker — details here https://openode.ru/topic/38-ufw-docker-ufw-docker-delaem-konteynery-bezopasnymi/
No email, no trackers — just the update feed.
Russian feed
https://en.kiberlis.ru/feed/