



- What is Virtualmin?
- Virtualmin features
- Virtualmin system requirements
- Installing Virtualmin
- Installing Virtualmin with nginx
- Installing Virtualmin with Apache
- Virtualmin login credentials
- Virtualmin setup wizard
- Memory use
- Using ClamAV antivirus for email
- Spam filtering
- Database servers
- MariaDB password
- DNS configuration
- Virtualmin settings
- Changing the Webmin language
- Adding a site
- Deleting a site
- Changing the PHP version
- For Ubuntu
- For Debian
- Configuring a second PHP version in Virtualmin
- Installing phpMyAdmin
- Updating Virtualmin
- Webmin and phpMyAdmin security settings
- Changing the default Webmin port
- Changing the root user
- Installing Fail2Ban in Webmin
- Configuring the firewall in Webmin. Disabling FirewallD and installing UFW
- Access by IP
- Access from a WireGuard VPN network
What is Virtualmin?
Virtualmin is web hosting management software that provides a convenient and simple way to manage virtual hosts, domains, mailboxes, databases, SSL certificates, and other important web server components.
The panel is available as an open-source community-supported edition and as a more feature-rich edition with premium support. In addition, Virtualmin is one of the most popular and most complete open-source control panels, installed more than 150,000 times worldwide.
Virtualmin features
Key Virtualmin features include:
- Virtual host management: Virtualmin lets you create, delete, and modify virtual hosts with a simple and intuitive interface. Each virtual host has a separate directory for files, databases, and mailboxes.
- Domain management: Virtualmin lets you create, delete, and modify domains and subdomains. You can also manage DNS records and configure mail domains.
- Mailbox management: Virtualmin provides full control over mailboxes, allowing you to create, delete, and modify them. You can set limits on mailbox and message size, as well as configure spam filters and autoresponders.
- Database management: Virtualmin supports multiple DBMSs, including MySQL (MariaDB), PostgreSQL, and SQLite. You can create, delete, and modify databases, as well as manage database users.
- SSL certificate management: Virtualmin lets you install and configure SSL certificates for each virtual host and domain.
- Reporting and monitoring: Virtualmin provides detailed reporting on user activity, as well as monitoring of system resources such as CPU and memory usage.
- Backup system: Virtualmin lets you create backups of files, databases, and other web server components.
- FTP account management: Virtualmin lets you create, delete, and modify FTP accounts for each virtual host.
These and many other features make Virtualmin a powerful and flexible tool for web hosting management.
Virtualmin system requirements
- Ubuntu 20.04 LTS and 22.04 LTS with i386 or amd64 architecture
- Debian 10 and 11 with i386 or amd64 architecture
- CentOS 7 x86_64
- Alma and Rocky 8 and 9 x86_64
- Rhel 8 and 9 x86_64
Recommended server specs:
2 CPU cores and 2 GB of RAM.
Ideally 2 CPU cores and 4 GB of RAM
Virtualmin will run on a single core, but unstably. Also, 1 GB of RAM is theoretically enough, but a freshly configured out-of-the-box system will already use about 1 GB of RAM. That is why I consider the minimum server requirements to be 2 CPU cores and 2 GB of RAM (preferably 4 GB of RAM).
Hosting:
As hosting, I highly recommend a VPS from alfahost.io with a 10-gigabit connection and modern Ryzen and Xeon servers for any workload.
Installing Virtualmin
The recommended way to install Virtualmin is to use the virtualmin-install.sh automated install script, which you can find on the Virtualmin.com download page. To get a LEMP stack that includes nginx instead of Apache, use the –bundle LEMP flag during installation. It is also recommended to use the –minimal flag to exclude the full mail processing stack (IMAP/POP servers, SpamAssassin, and ClamAV). The install script should be run on a freshly installed supported OS with no prior configuration or third-party repositories enabled.
The LEMP stack installs Virtualmin with the nginx and nginx-ssl plugins, nginx, BIND, Postfix, MariaDB, PHP, etc., and configures them for use in a shared virtual hosting environment. The –minimal flag also works with a LEMP install.
Add the repository for the latest Nginx version:
add-apt-repository ppa:ondrej/nginx-mainline && apt update -yAdd the repository for the latest PHP version:
add-apt-repository ppa:ondrej/php && apt update -yUpdate repositories and packages:
apt update -y &&
apt upgrade -y
Installing Virtualmin with nginx
https://www.virtualmin.com/documentation/web/nginx/
https://github.com/virtualmin/virtualmin-nginx
Download the script
cd /tmp
wget https://software.virtualmin.com/gpl/scripts/virtualmin-install.sh
chmod +rx /tmp/virtualmin-install.sh
Run the install script and follow its prompts:
/tmp/virtualmin-install.sh --minimal --bundle LEMP
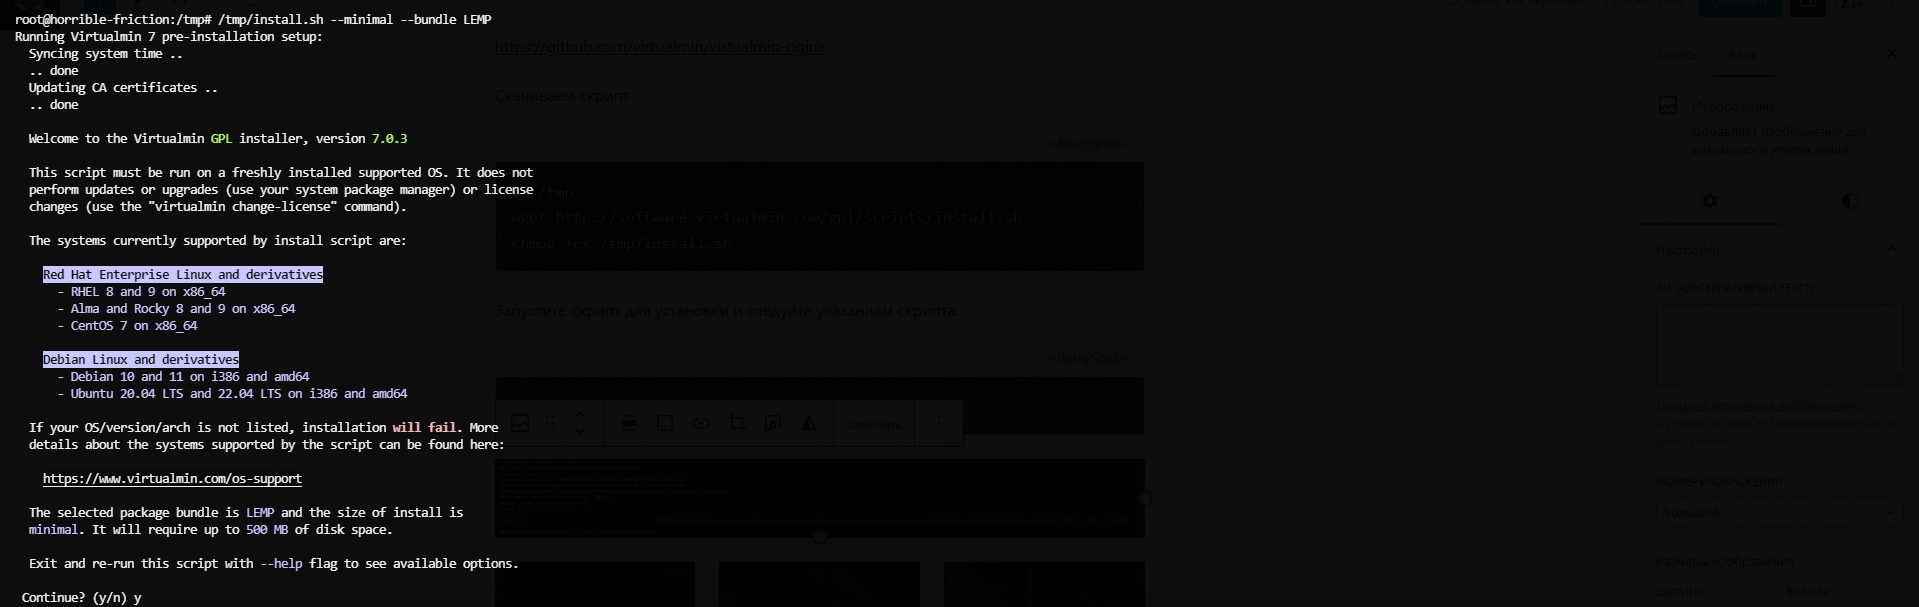
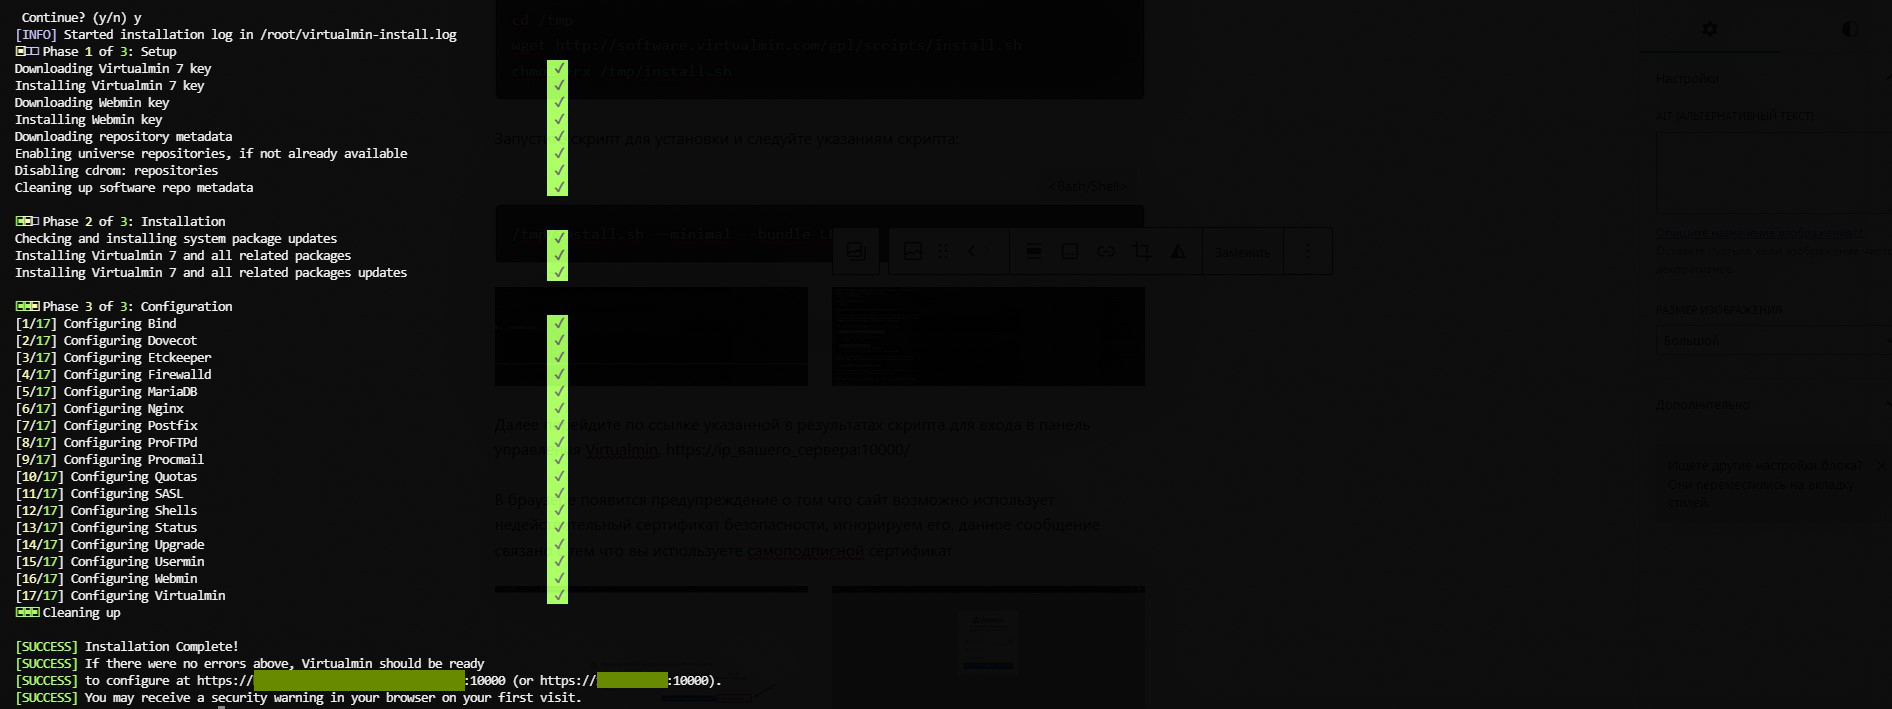
Next, follow the link shown in the script results to sign in to the Virtualmin control panel, https://your_server_ip:10000/
Your browser will show a warning that the site may be using an invalid security certificate — ignore it; this message appears because you are using a self-signed certificate
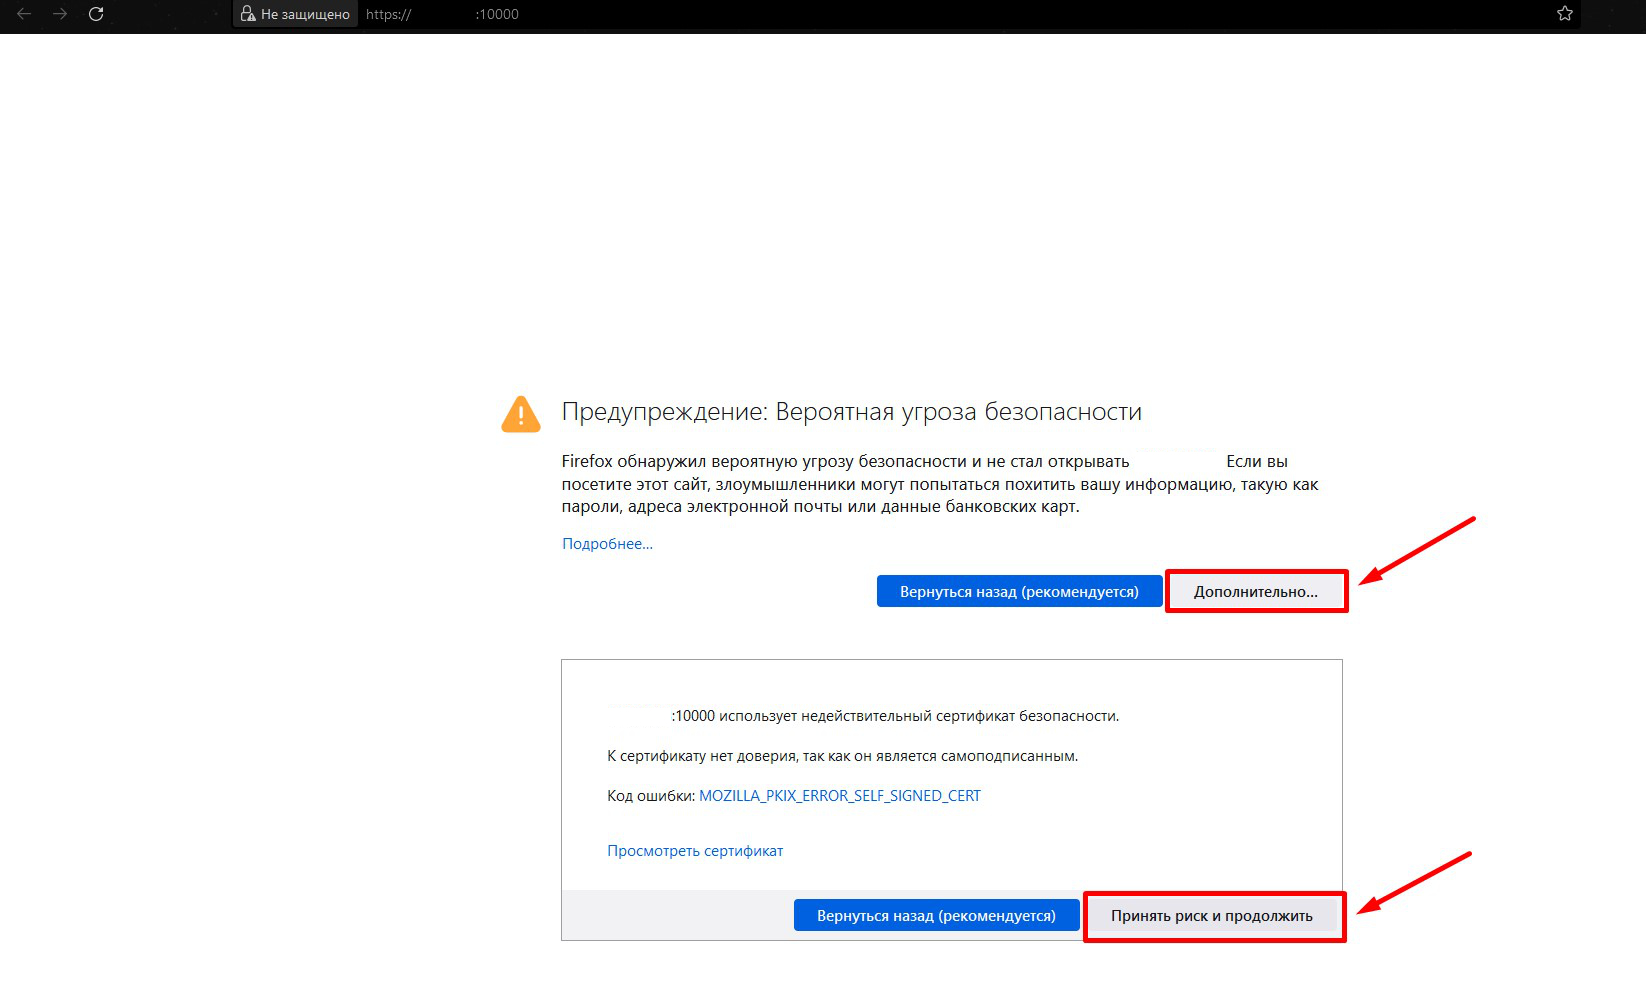
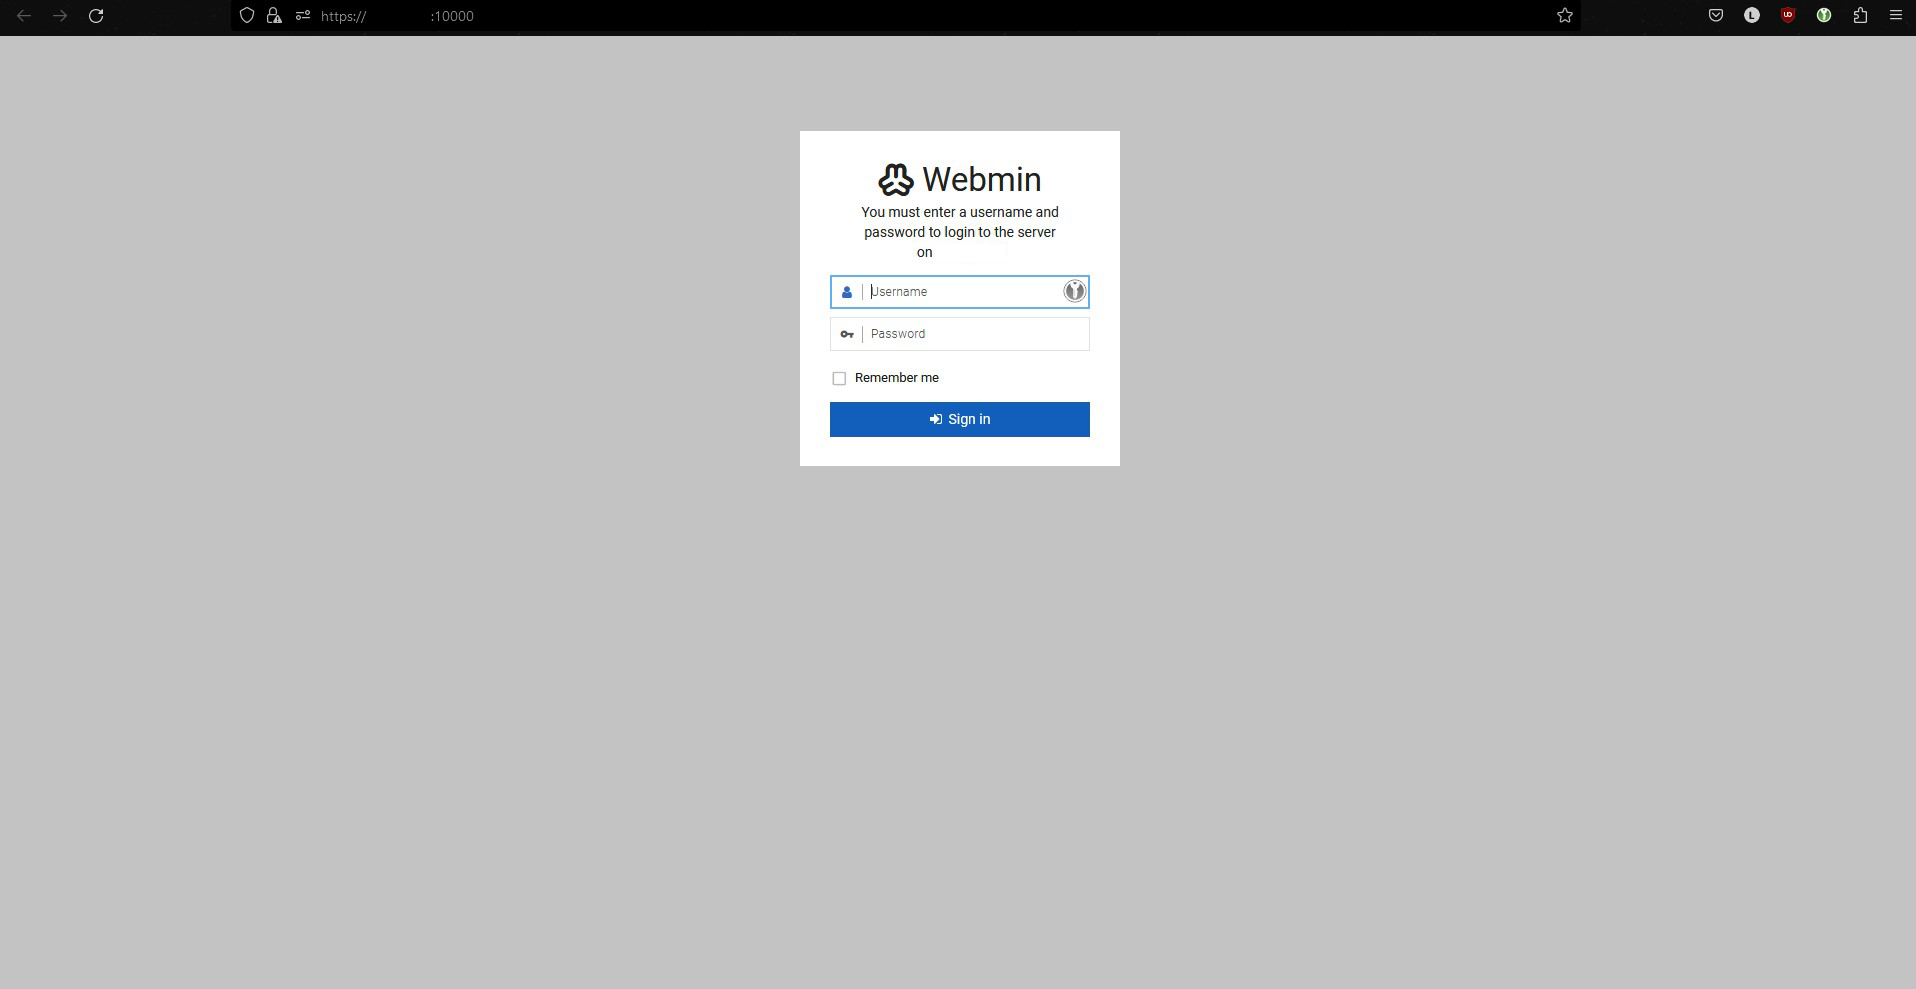
Installing Virtualmin with Apache
https://www.virtualmin.com/download/
https://github.com/virtualmin/virtualmin-nginx
You cannot install Apache and Nginx in Virtualmin at the same time. If you already completed the install in section 1.1, you do not need section 1.2.
Download the install script:
cd /tmp
wget https://software.virtualmin.com/gpl/scripts/virtualmin-install.sh
chmod +rx /tmp/virtualmin-install.sh
Run the install script and follow its prompts:
/tmp/virtualmin-install.sh --minimalThe remaining steps are the same as installing Virtualmin with nginx
After installation, follow the link shown in the script results to sign in to the Virtualmin control panel, https://your_server_ip:10000/
Virtualmin login credentials
After you finish installing Virtualmin, its control panel will be available at https://your_server_ip:10000/
The default login credentials will be as follows:
Username: root
Password: Your server root account password
Virtualmin setup wizard
After installing and signing in to the Virtualmin control panel, you will need to complete its basic setup in the setup wizard.
You can accept the default settings by clicking “Cancel”, or perform a detailed setup for your system with the “Next” button
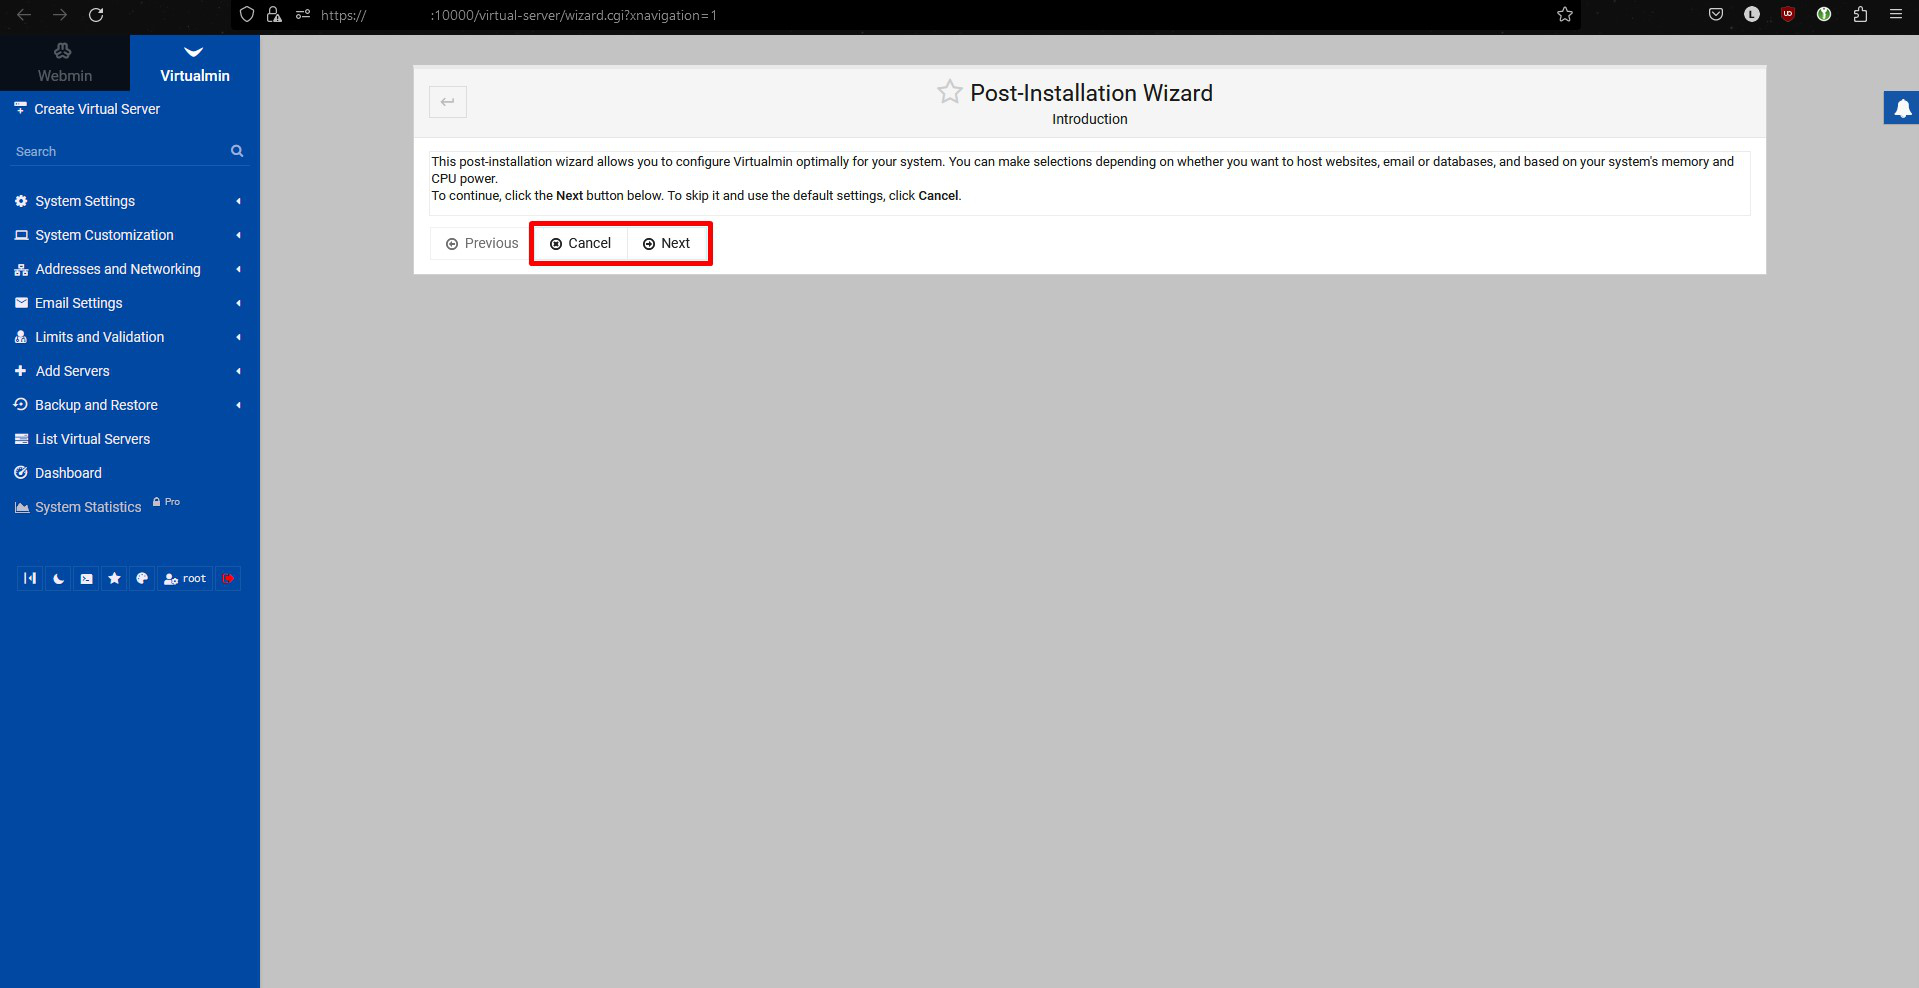
Below I will describe the setup after clicking “Next” and provide a translation of the install wizard interface with my comments.
The information on my screenshots is more detailed because the install was done without the –minimal flag
Memory use
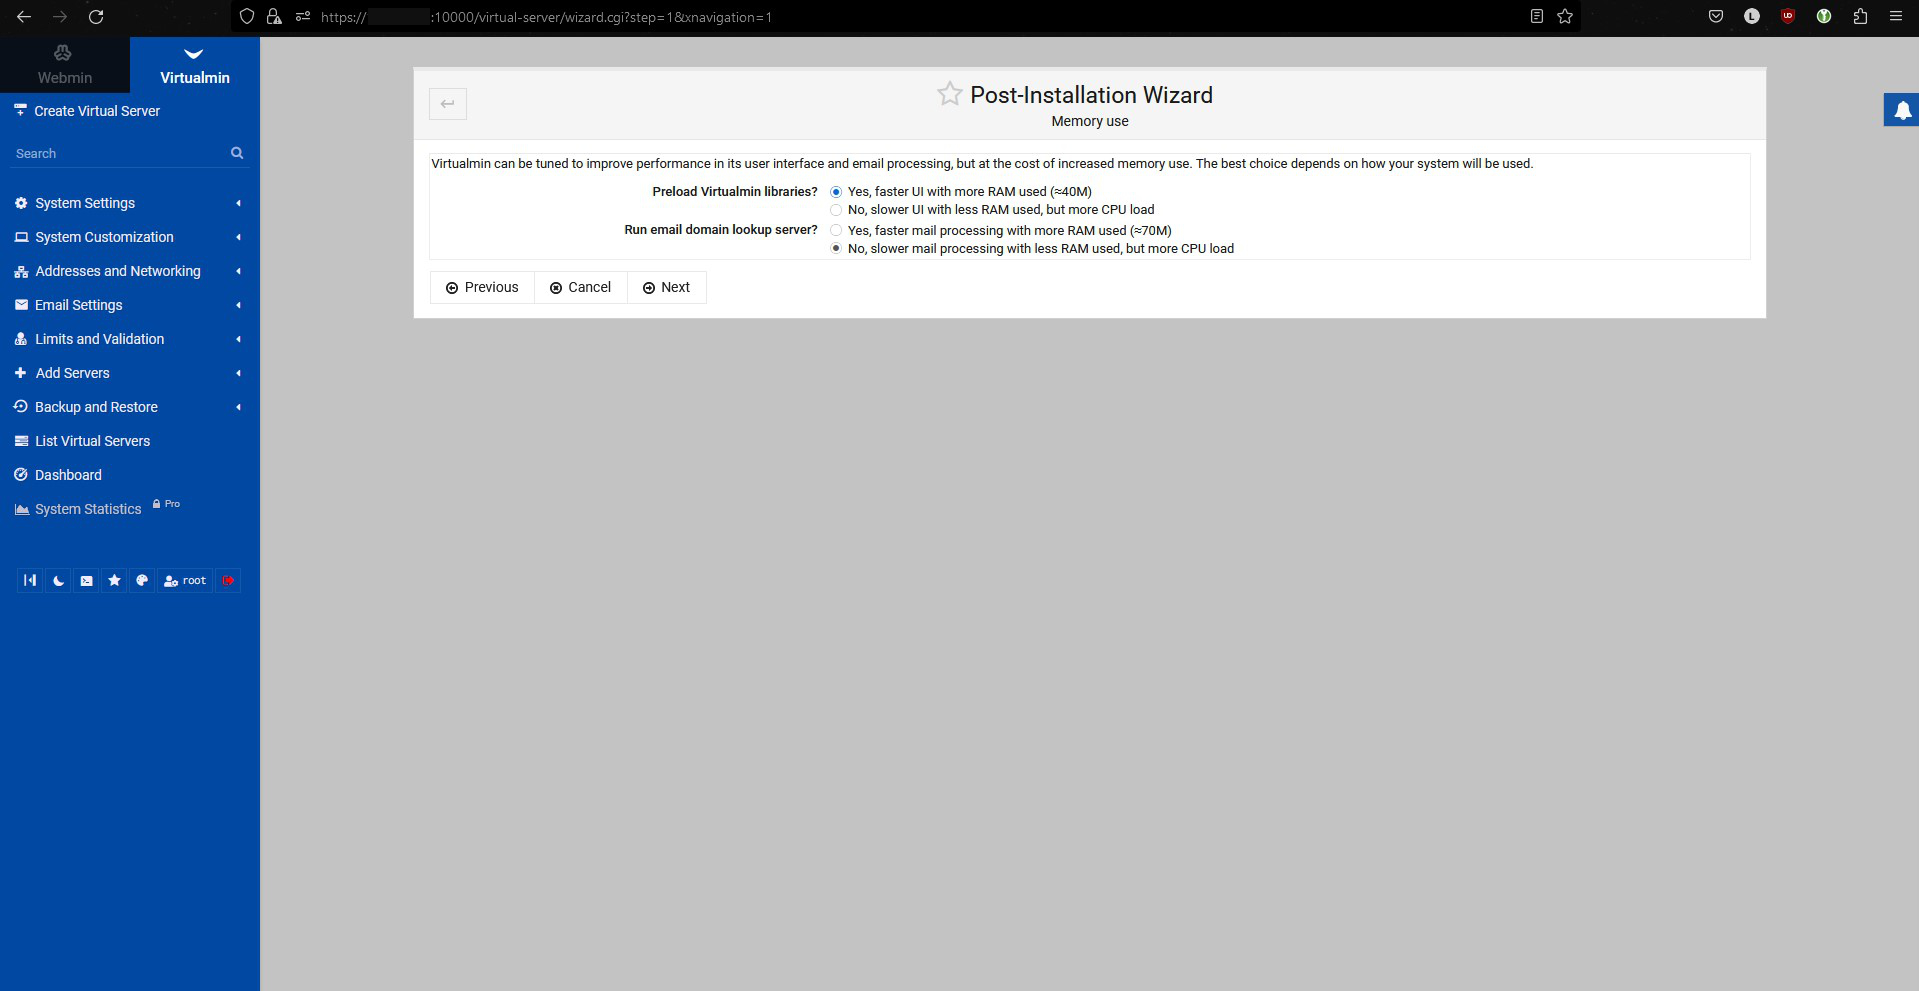
The first setting will be memory use,
Virtualmin can be configured to improve user interface performance and email processing, but at the cost of increased memory usage. The best choice depends on how your system will be used.
Preload Virtualmin libraries?
- Yes, faster user interface using more RAM (≈40 MB)
- No, slower user interface with less RAM usage, but higher CPU load
I always choose Yes for this question to get a faster control panel interface.
Run mail domain lookup server?
- Yes, faster mail processing using more RAM (≈70M)
- No, slower mail processing with less RAM usage, but higher CPU load
Choose based on whether you will use your own mail server on your VPS. I usually choose No, since I mostly use third-party mail services for sites.
Using ClamAV antivirus for email
If your system will host domains that receive a large volume of email, scanning incoming messages for viruses can cause high CPU load. Because scanning is done by the ClamAV scanning server, it will consume RAM even when it is not processing email. If your system will not host email, virus scanning can be disabled.
Enable virus scanning with ClamAV?
- Yes, uses up to 2 GB of RAM
- No, email will not be filtered
I choose No, since I do not use my own mail server in Virtualmin.
Spam filtering
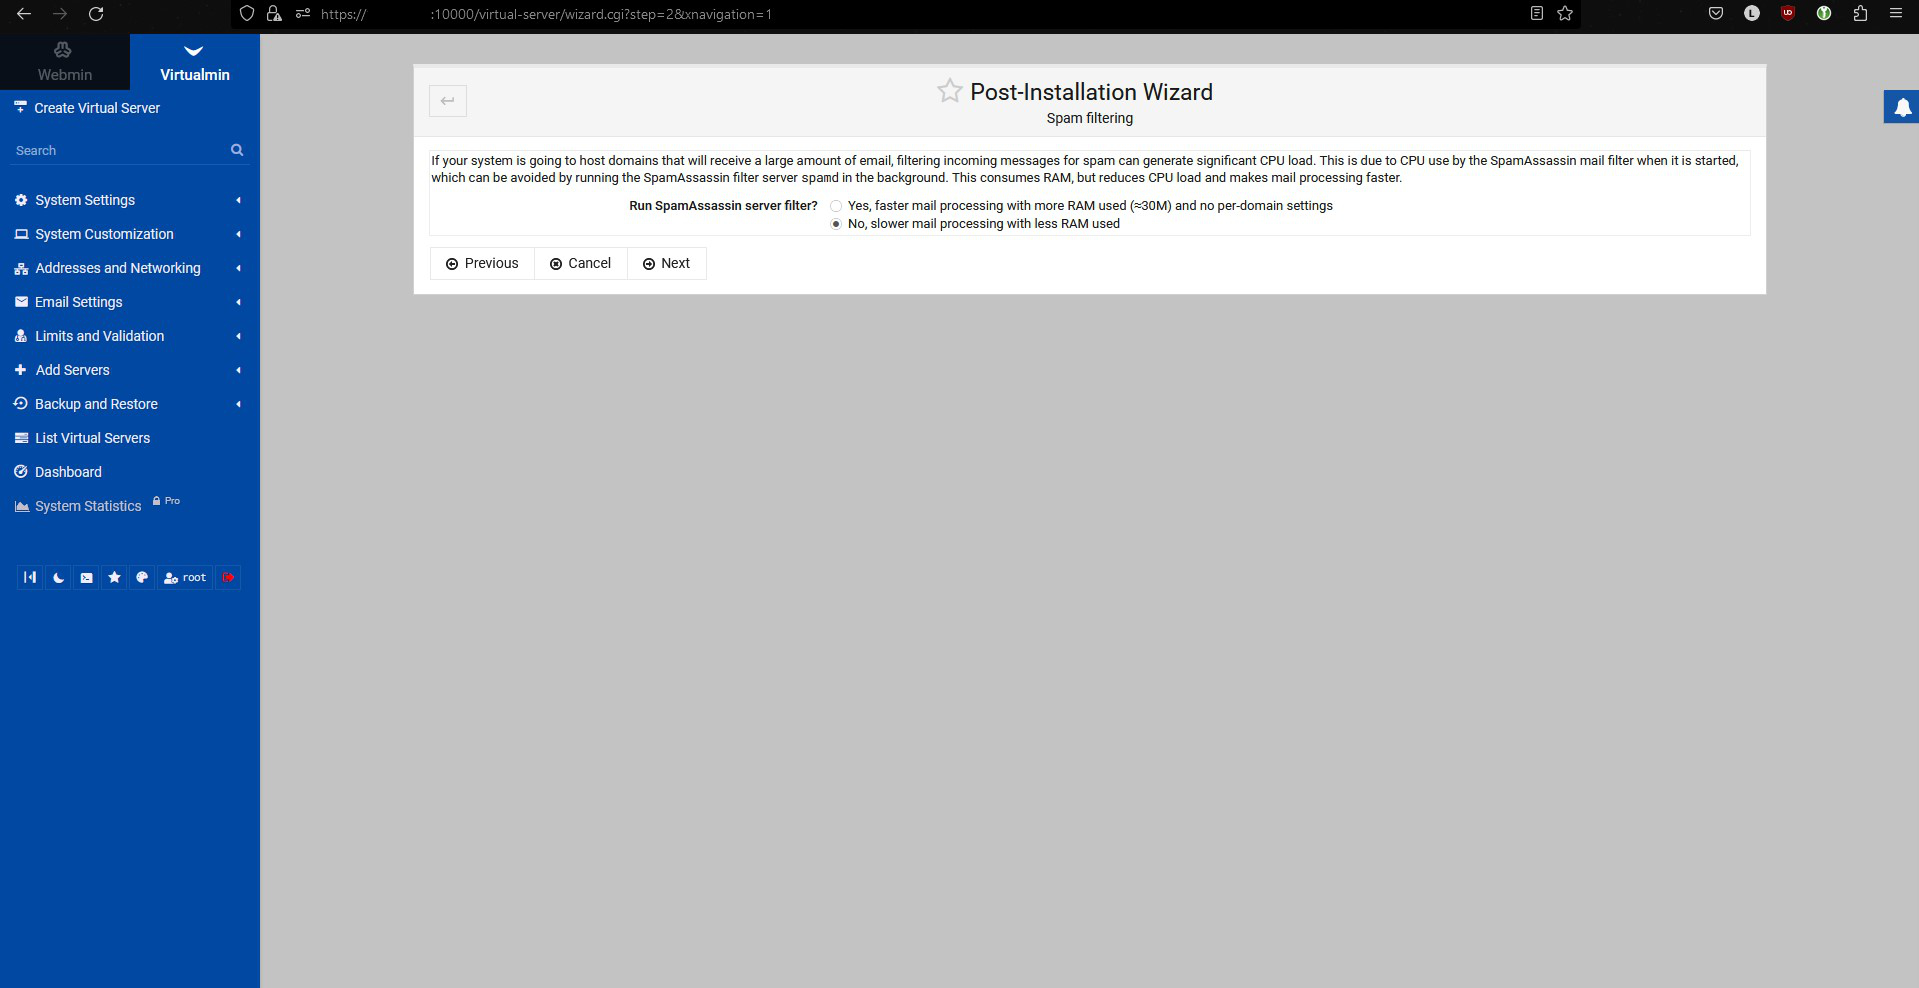
If your system will host domains that receive a large volume of email, filtering incoming messages for spam can cause significant CPU load. This is due to SpamAssassin’s CPU usage when it starts, which can be avoided by running the SpamAssassin filtering server spamd in the background. This consumes RAM, but reduces CPU load and speeds up mail processing.
Run SpamAssassin server filter?
- Yes, faster mail processing using more RAM (≈30M) and no per-domain settings
- No, slower mail processing with less RAM usage
I choose No, since I do not use my own mail server in Virtualmin.
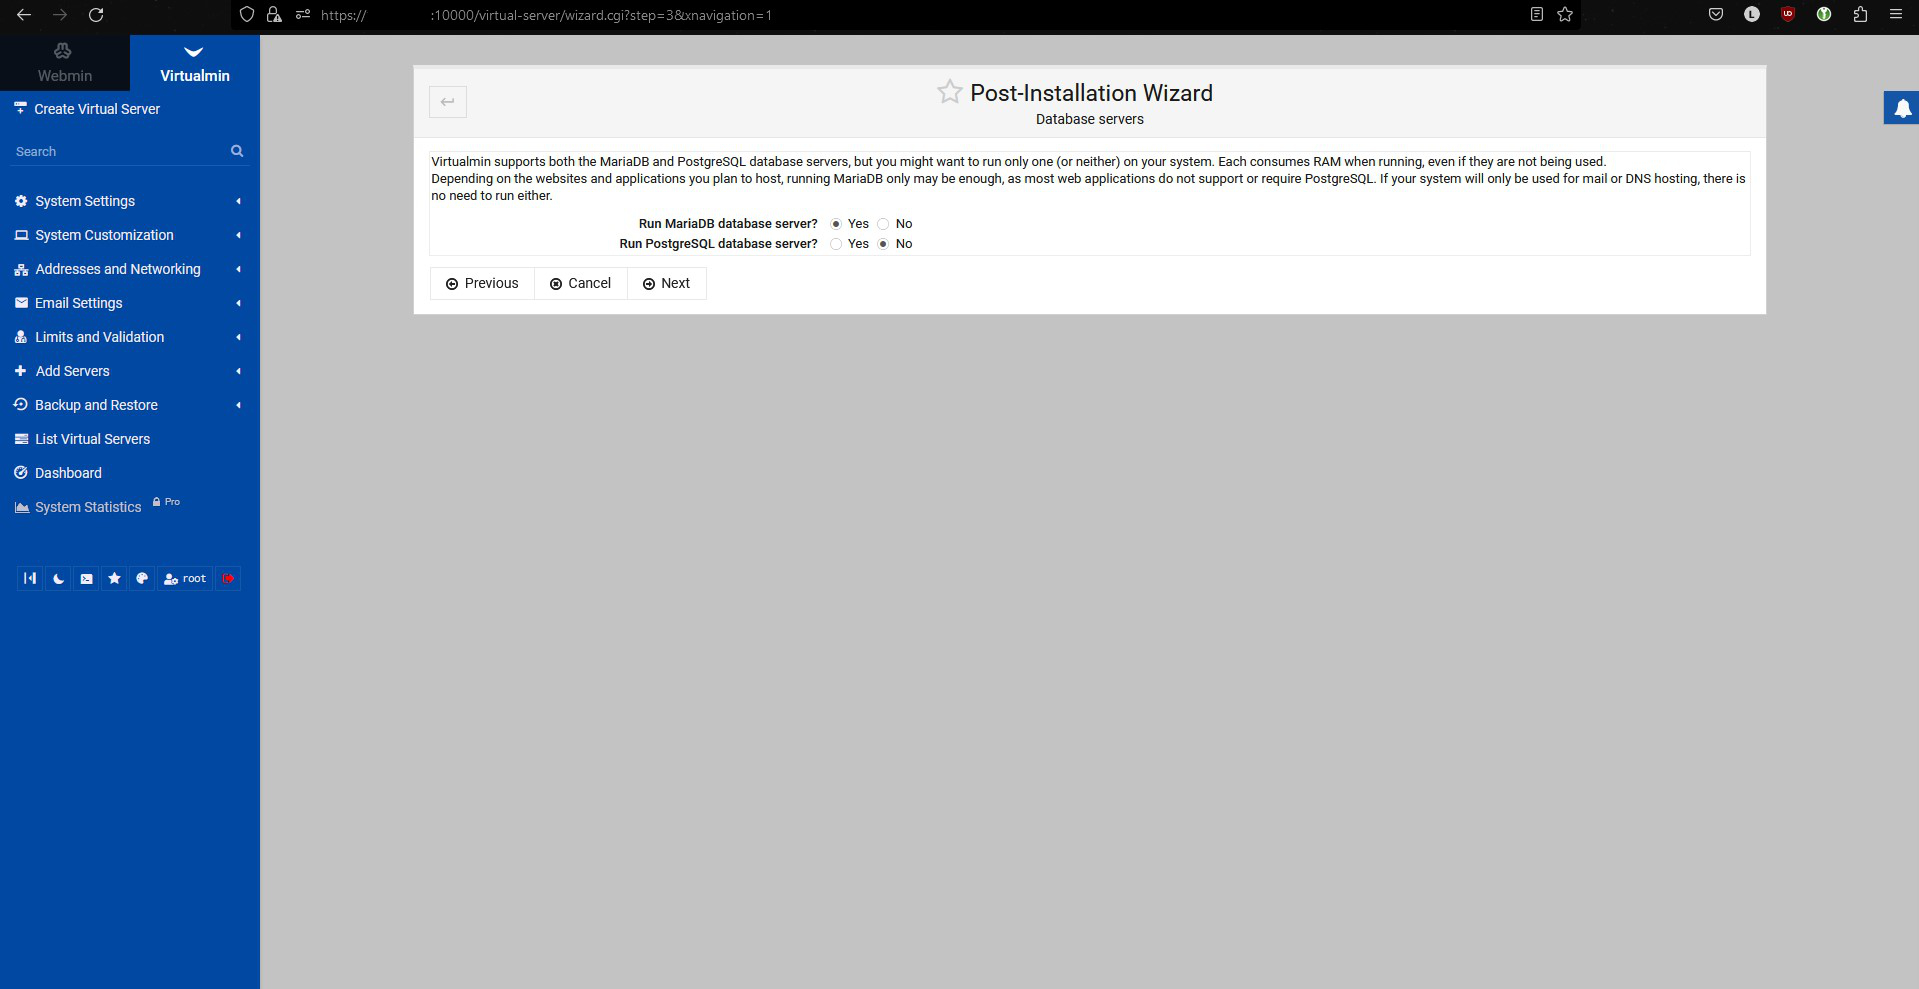
Database servers
Virtualmin supports both MariaDB and PostgreSQL database servers, but you can run only one server at a time (or neither) on your system. Each consumes RAM while running, even if they are not in use.
Depending on the websites and applications you plan to host, running only MariaDB may be enough, since most web applications do not support or require PostgreSQL. If your system will be used only for mail or DNS hosting, you do not need to run a database at all.
Run MariaDB database server?
- Yes
- No
Run PostgreSQL database server?
- Yes
- No
I usually run only the MariaDB database (a more performant fork than MySQL). I do not use PostgreSQL for website hosting
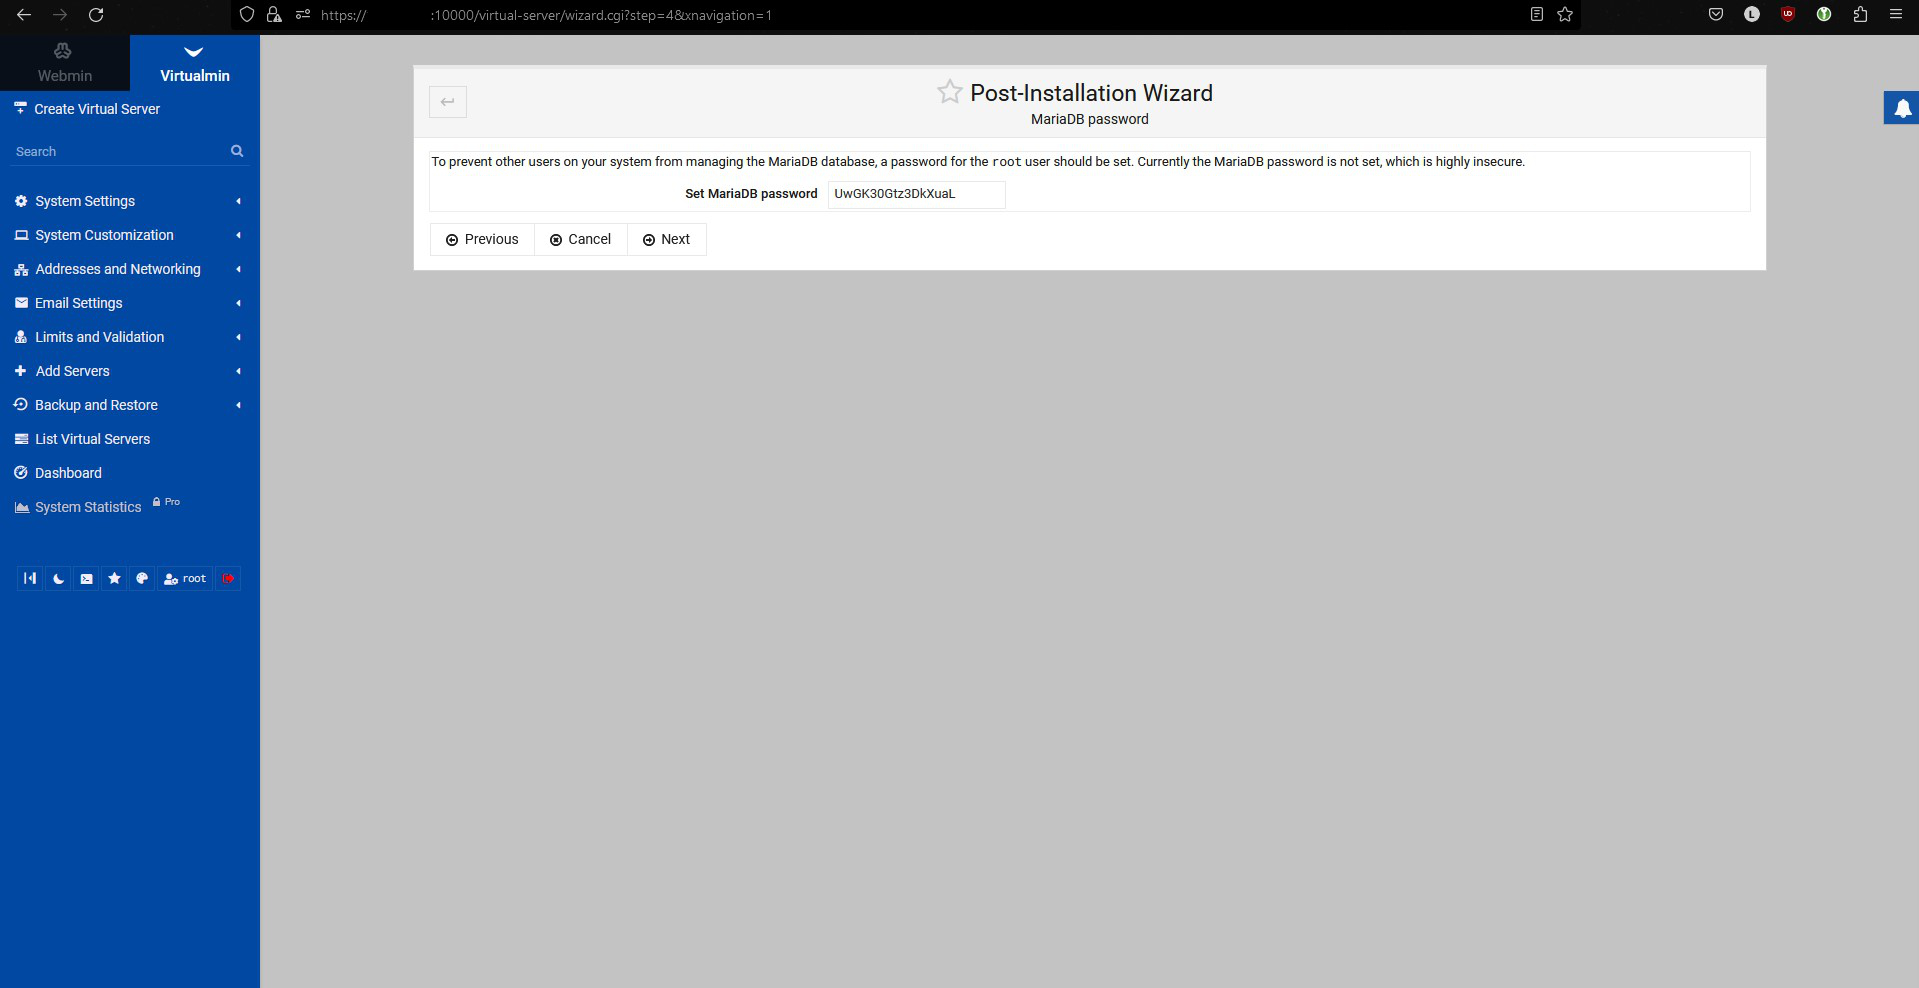
MariaDB password
To prevent other users on your system from managing the MariaDB database, you need to set a password for the root user when signing in to MariaDB. Currently the MariaDB password is not set, which is highly insecure.
Set MariaDB password (will be used when signing in to phpMyAdmin)
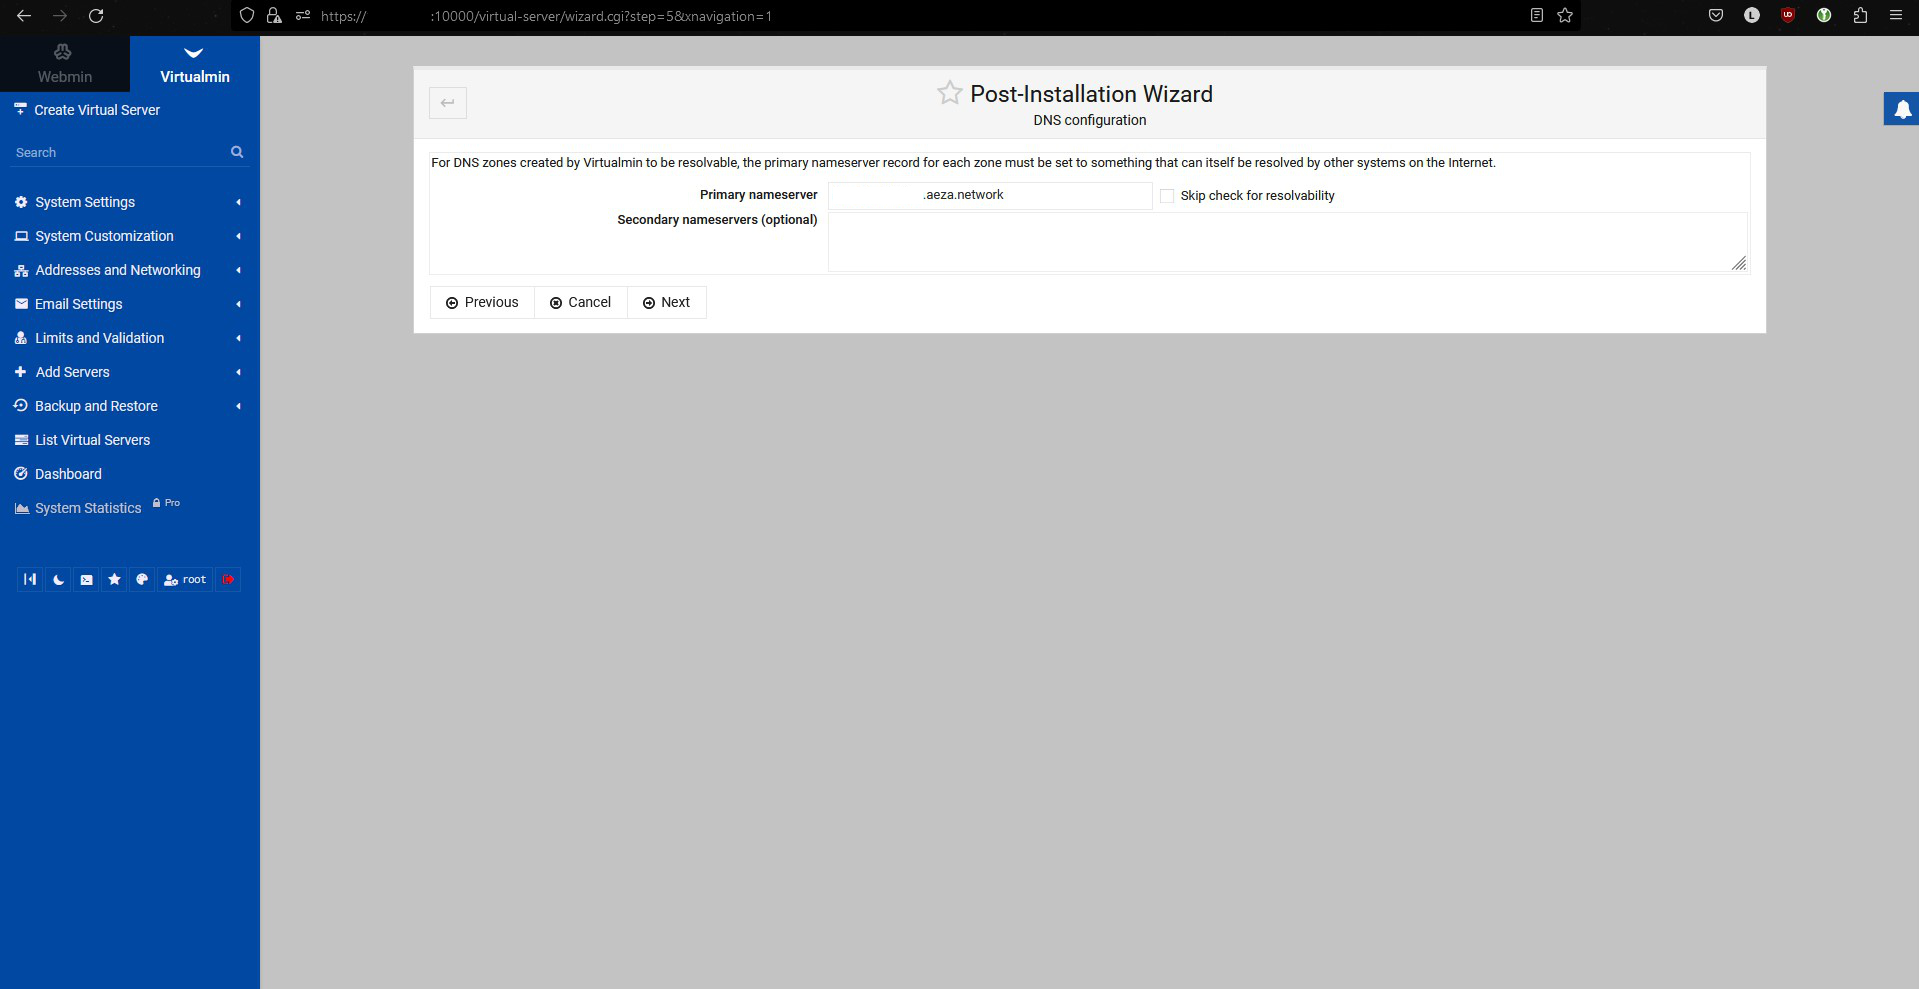
DNS configuration
For DNS zones created by Virtualmin to be resolvable, the primary nameserver record for each zone must be set to a value that can itself be resolved by other systems on the Internet.
Primary nameserver
Skip resolvability check
Secondary nameservers (optional)
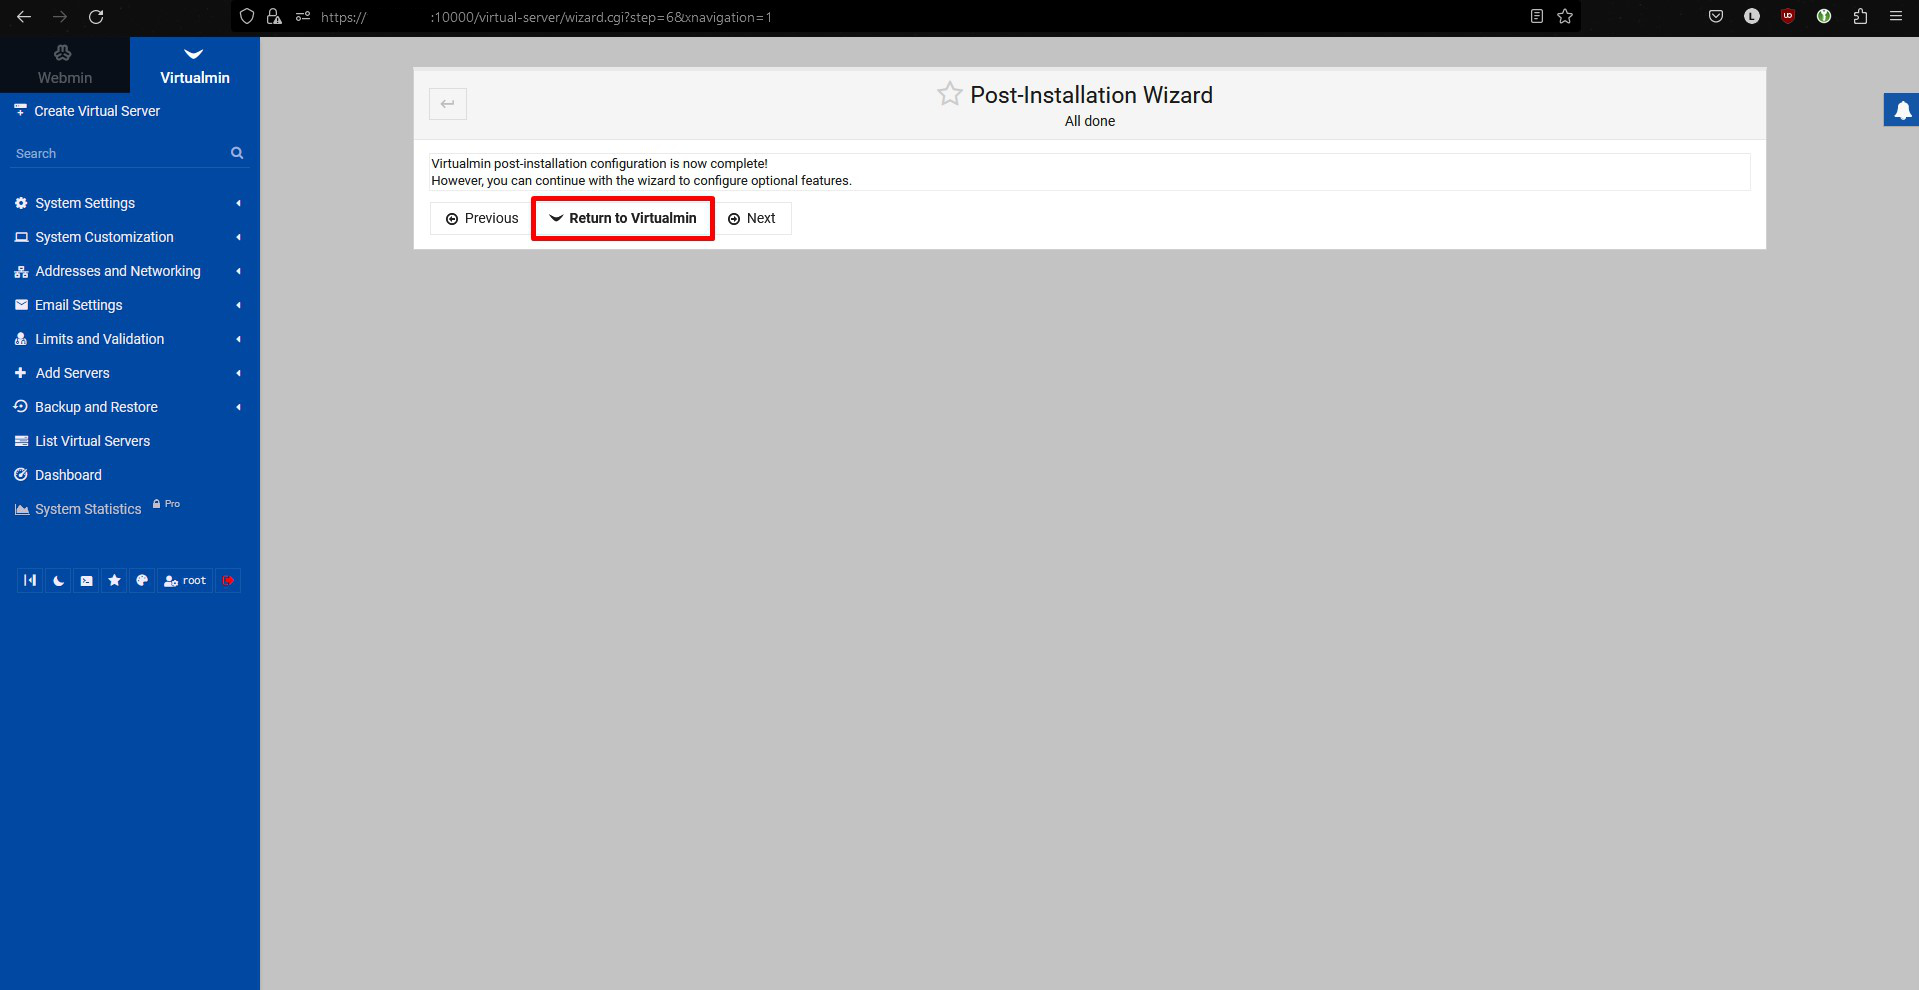
The setup wizard has finished. Click “Return to Virtualmin” and continue with further configuration on your own.
Virtualmin settings
Changing the Webmin language
Click Webmin -> Change Language and Theme.
Select Personal choice and set it to Russian by choosing it from the dropdown list. Then click “Make Changes” and refresh the page
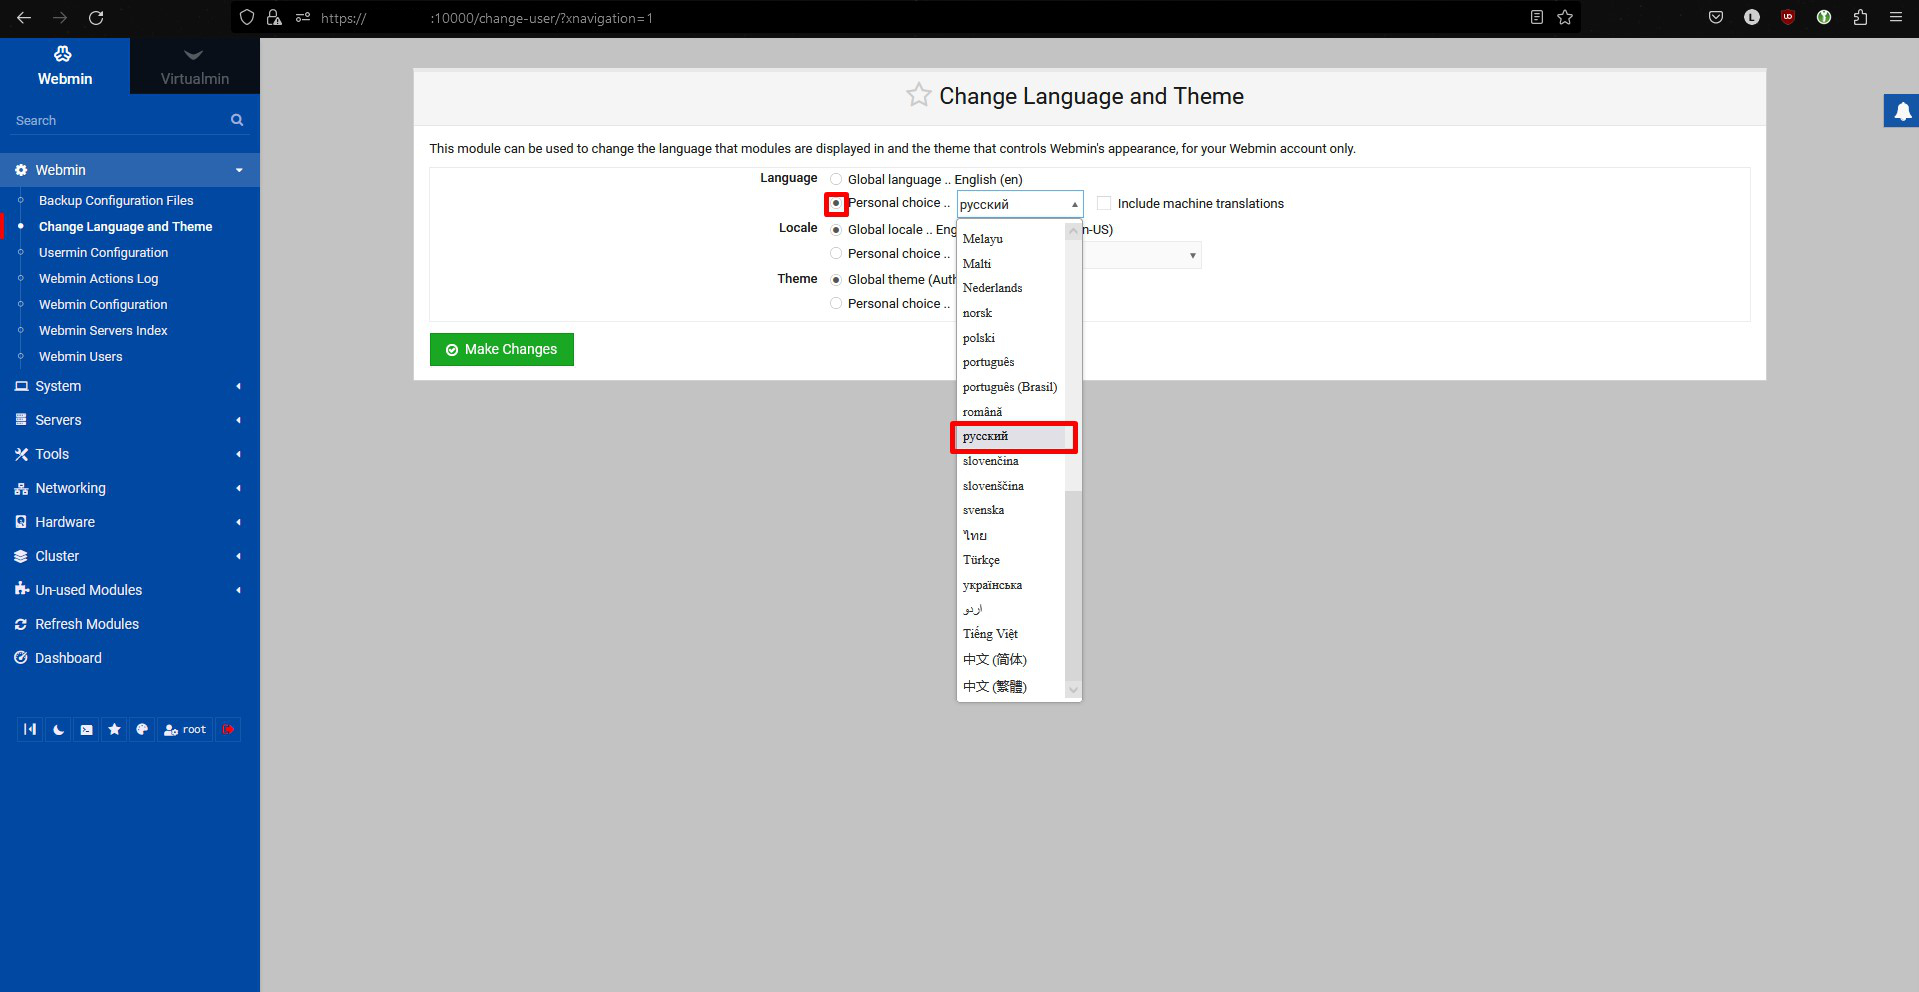
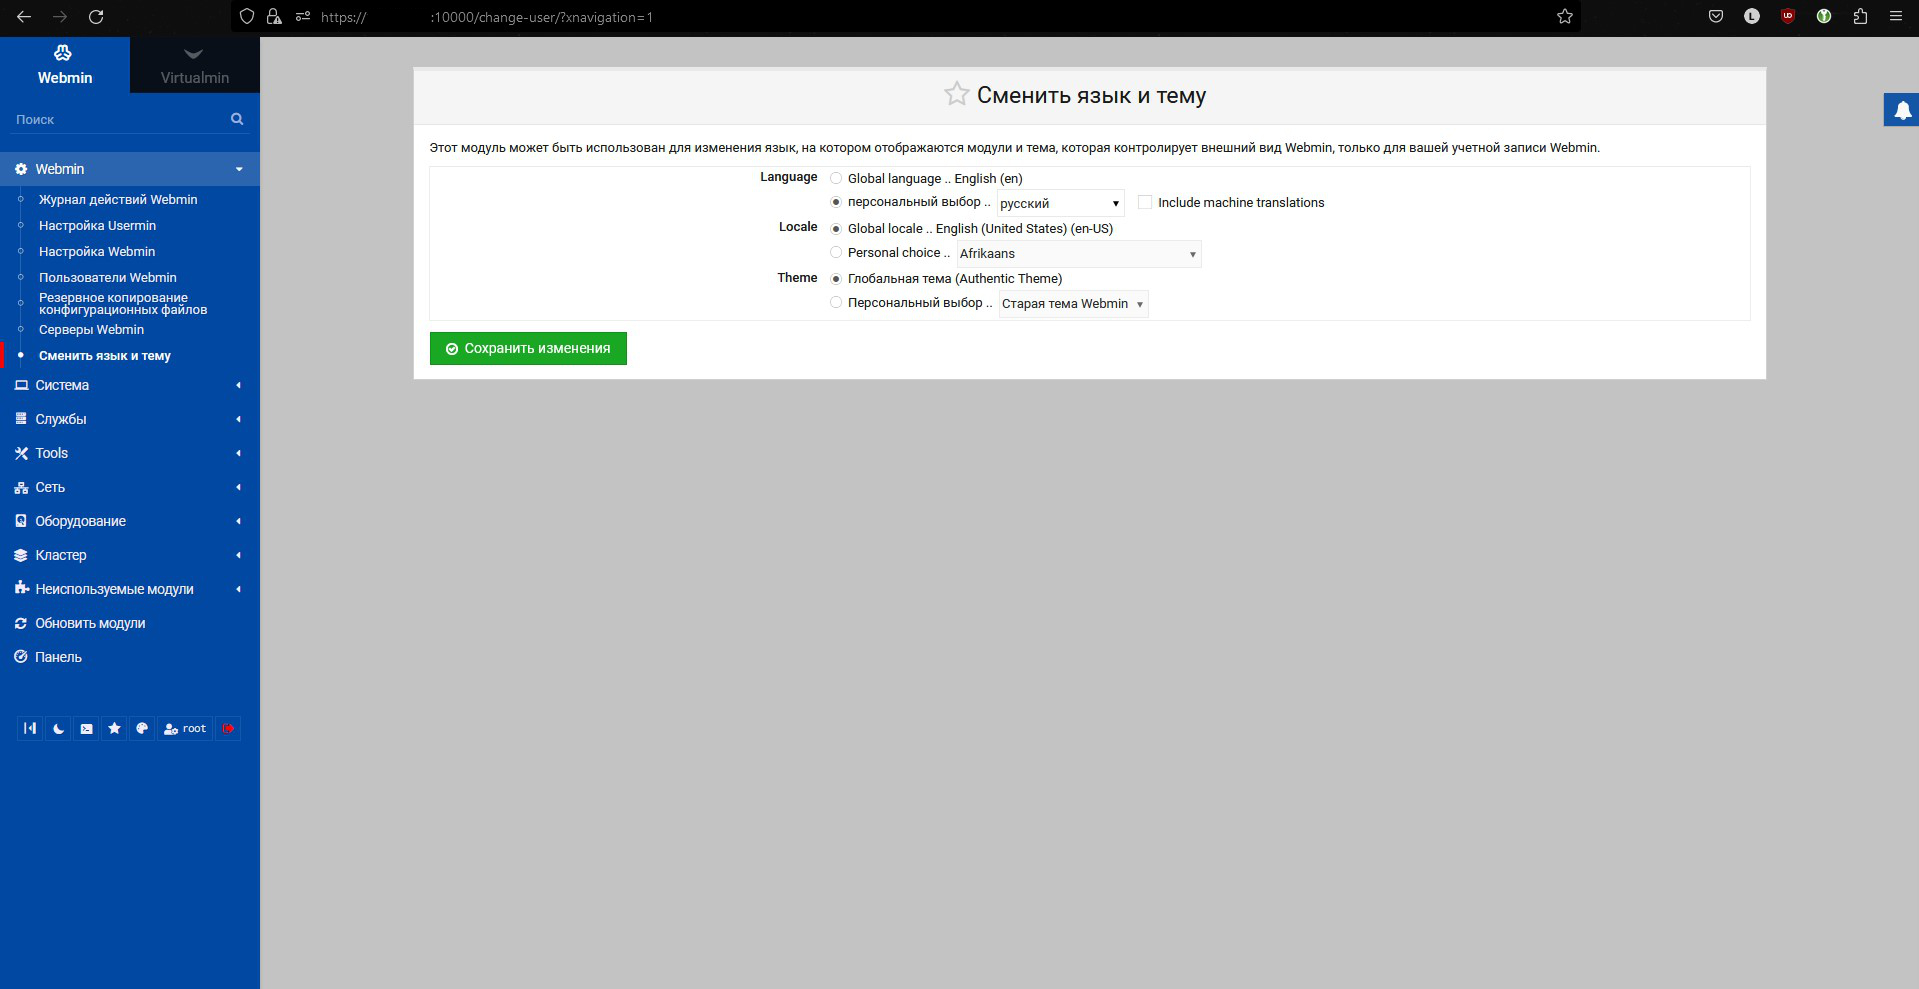
Only a partial localization will be applied, because only the Webmin part is translated, while Virtualmin has no translation.
Adding a site
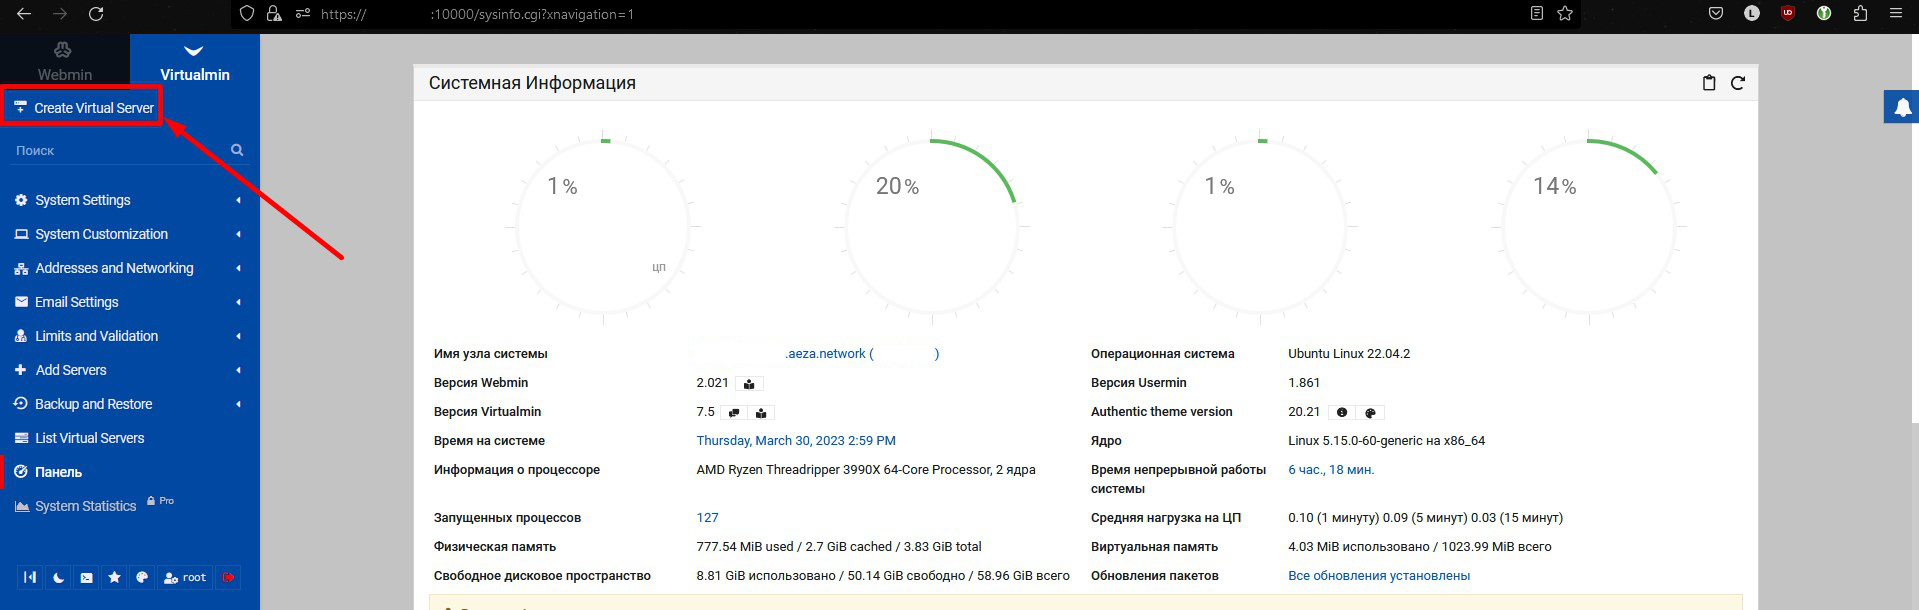
Click the “Create Virtual Server” button in the left Virtualmin panel
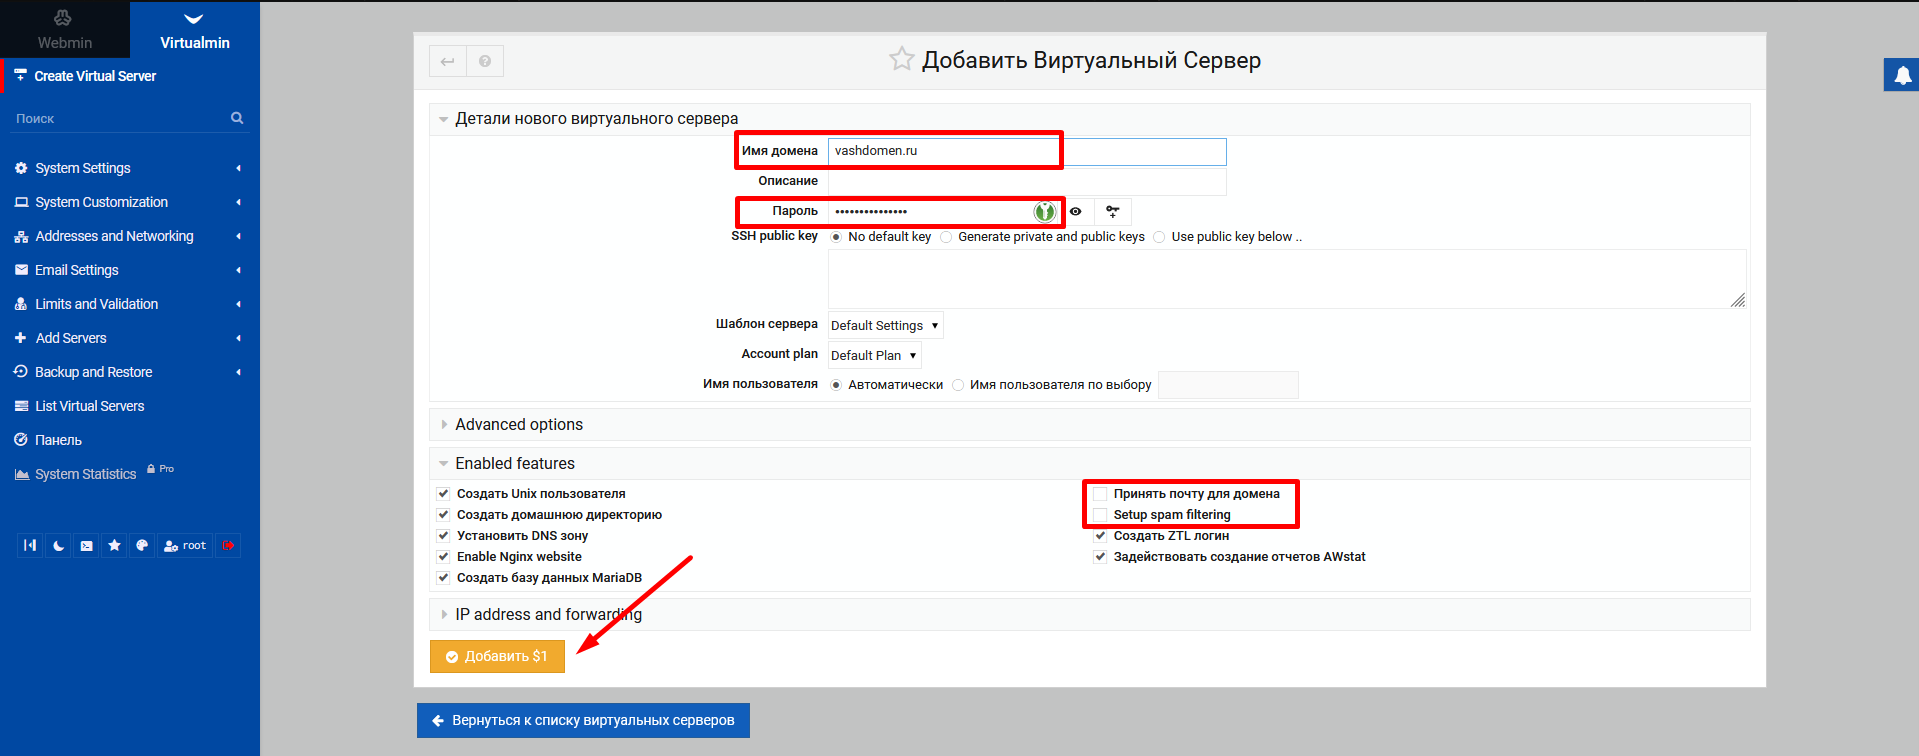
Enter your domain name and a password for FTP access to the site folder. If you do not need mail for the site on your server, uncheck “Accept mail for domain” and “Setup spam filtering”
Then click the “Create $1” button ($1 on the button — I do not know what it is for; it does not affect anything)
Wait for the settings to be applied.
Deleting a site
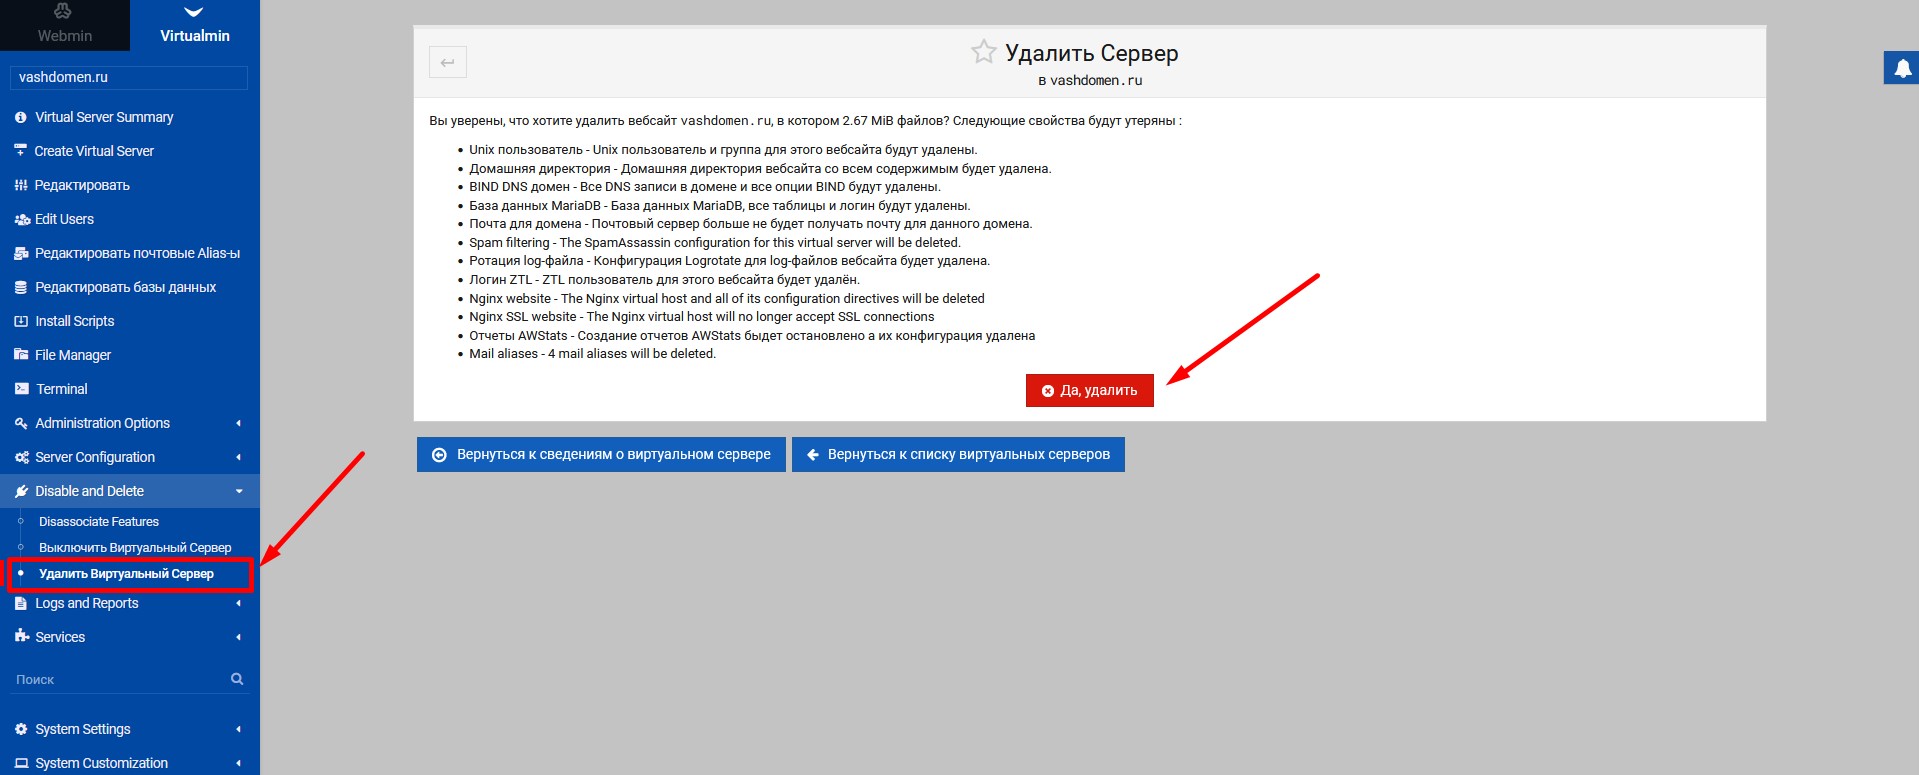
Click the “Disable and Delete” button in the left Virtualmin panel
Then confirm deletion by clicking “Yes, Delete” in the center of the dialog that appears.
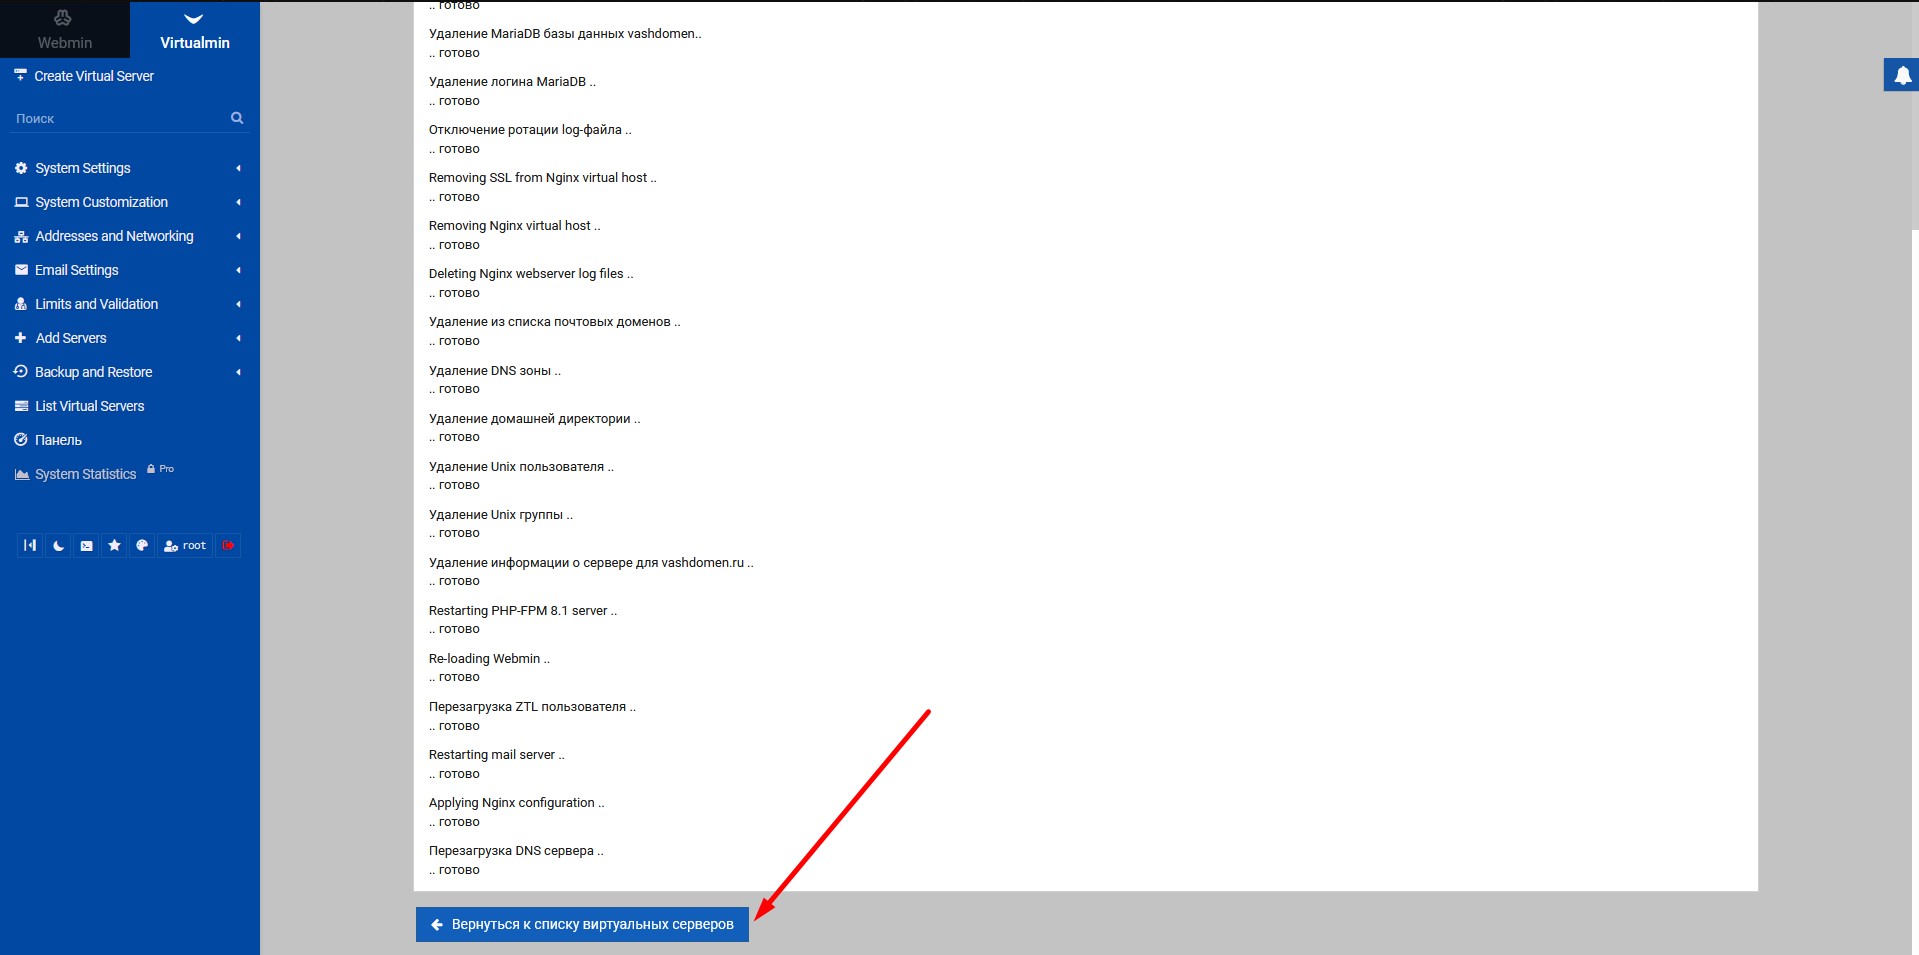
Wait for deletion to finish and click “Return to virtual servers list”
Changing the PHP version
https://www.virtualmin.com/documentation/web/multiplephp/
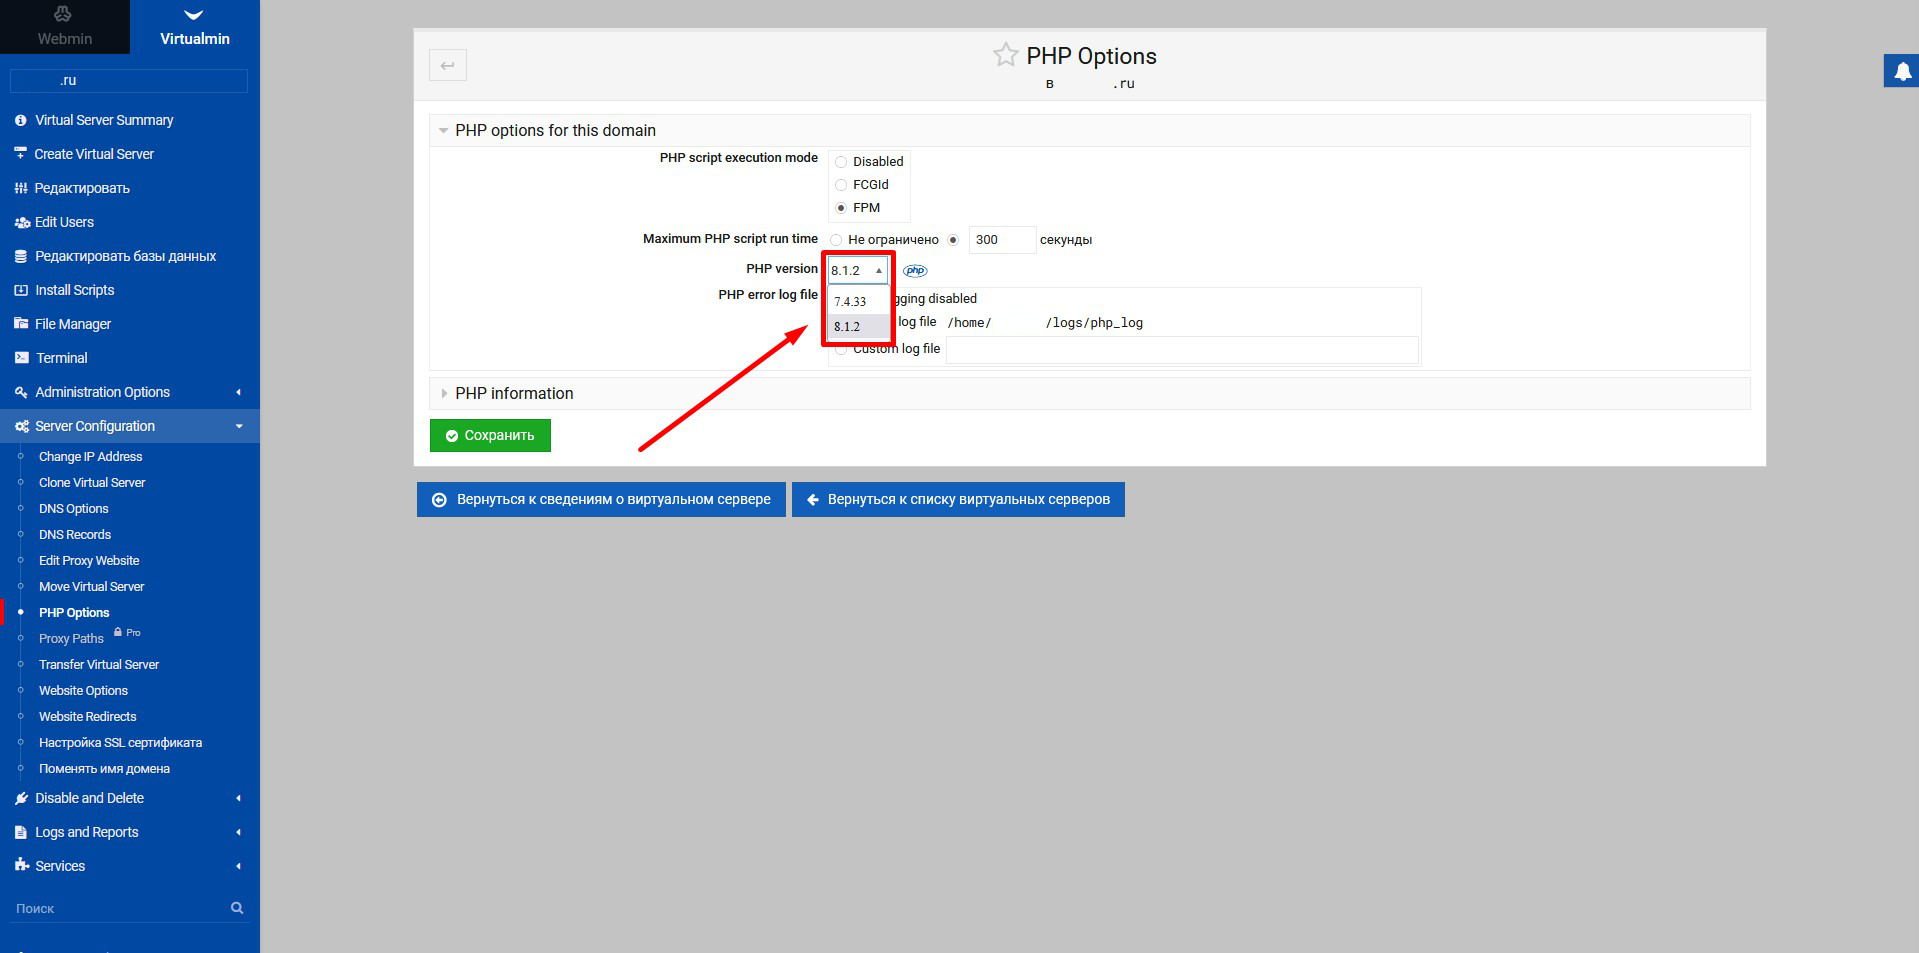
If you have multiple PHP versions installed, Virtualmin lets you choose the execution mode and PHP version used for a given domain. Available execution modes are FPM (recommended) and CGI/FCGId. The latter mode lets you set different PHP versions for each directory.
That means you need to additionally install the required PHP version.
For Ubuntu
Add the repository from ondrej/php:
LC_ALL=C.UTF-8 add-apt-repository -y ppa:ondrej/php && apt-get updateInstall the required PHP version and additional packages; replace php7.4 with the version you need:
apt-get install php7.4-{cgi,cli,fpm,pdo,gd,mbstring,mysqlnd,opcache,xml,zip}For Debian
Add the repository from sury/php:
apt-get -y install apt-transport-https lsb-release ca-certificates curl && curl -sSL -o /etc/apt/trusted.gpg.d/php.gpg https://packages.sury.org/php/apt.gpg && sh -c 'echo "deb https://packages.sury.org/php/ $(lsb_release -sc) main" > /etc/apt/sources.list.d/sury-debian-php-$(lsb_release -sc).list' && apt-get updateInstall the required PHP version and additional packages; replace php7.4 with the version you need:
apt-get install php7.4-{cgi,cli,fpm,pdo,gd,mbstring,mysqlnd,opcache,xml,zip}You can find PHP version install instructions for other OSes here https://www.virtualmin.com/documentation/web/multiplephp/
Configuring a second PHP version in Virtualmin
Configuring a second PHP version in Virtualmin
After you have finished installing a second PHP version on your server, you can verify that Virtualmin sees it by signing in to Virtualmin and clicking «System Settings» → «Re-Check Configuration» in the left panel. You should see something like this:
The following PHP versions are available : 7.4.33 (/bin/php-cgi7.4), 8.1.2 (/bin/php-cgi8.1)

The following PHP-FPM versions are available : 7.4.33 (php7.4-fpm) 8.1.2 (php8.1-fpm)
You can configure which of these PHP versions will be used by default on new virtual servers. By default, the newest available version is used. You can change this default under «System Settings» → «Server Templates» → «Default Settings» → «PHP Options».
Configuring PHP for individual sites (virtual servers)
You can configure the PHP version used for a specific virtual server by selecting «Server Configuration» → «PHP Options».
Installing phpMyAdmin
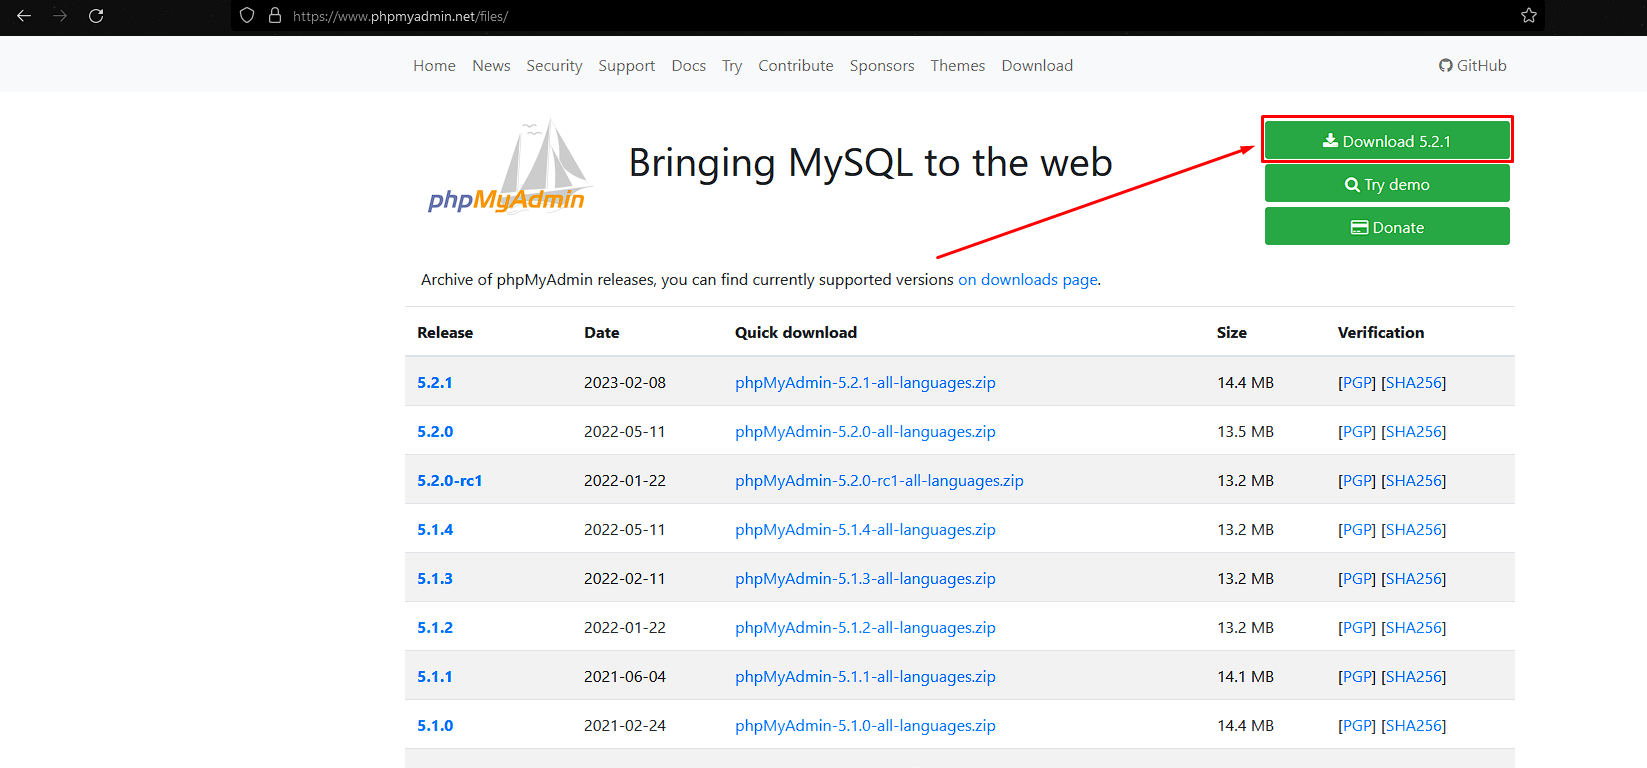
Download the archive with the install files from the official phpmyadmin.net site
Extract the downloaded archive into the /var/www/pma folder
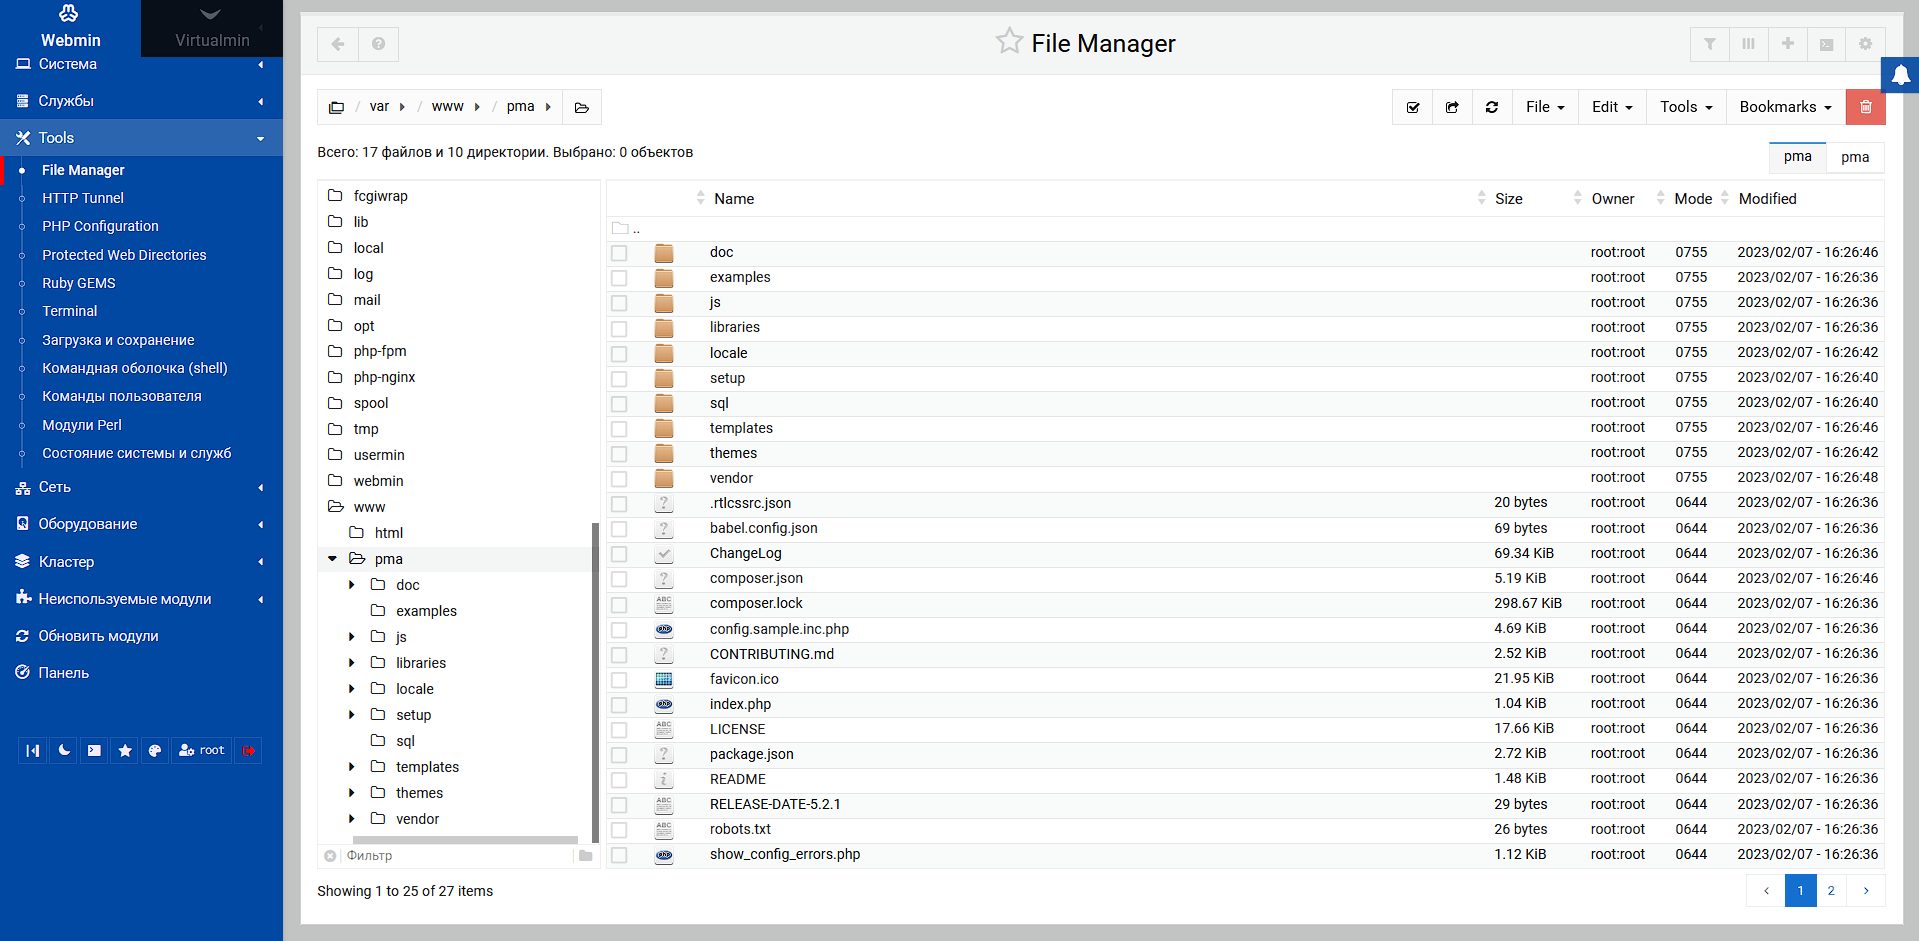
Create /etc/nginx/sites-available/pma.conf for the new nginx virtual host
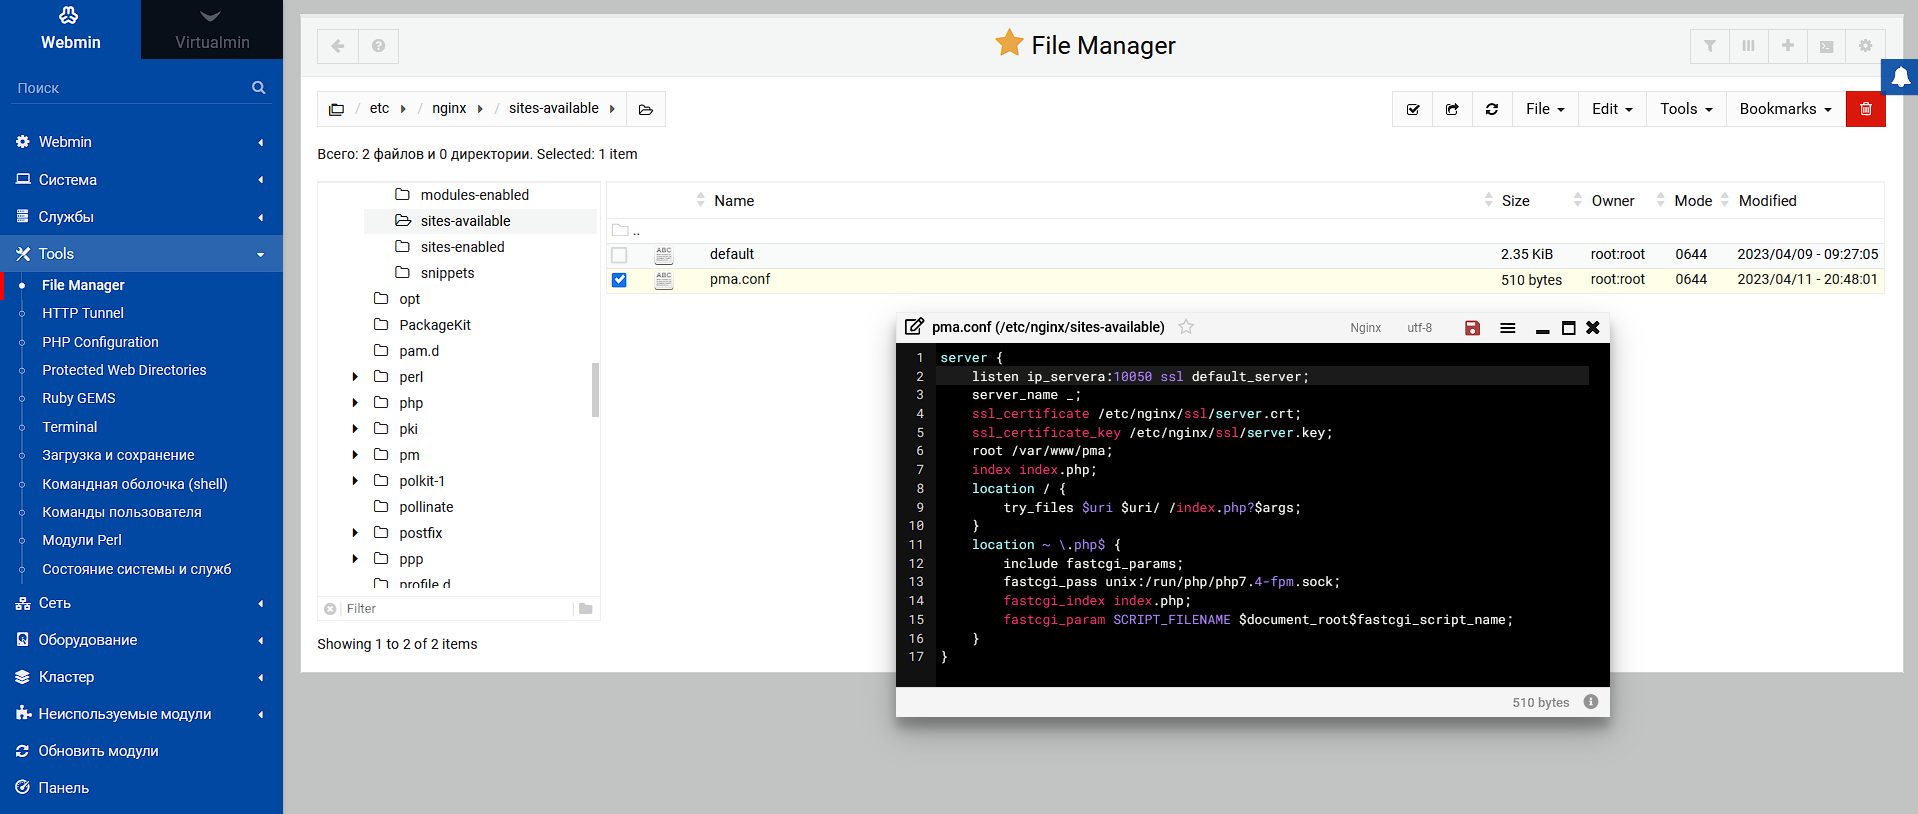
The contents of /etc/nginx/sites-available/pma.conf should be as follows:
server {
    listen ip_servera:10050 ssl default_server;
    server_name _;
    ssl_certificate /etc/nginx/ssl/server.crt;
    ssl_certificate_key /etc/nginx/ssl/server.key;
    root /var/www/pma;
    index index.php;
    location / {
        try_files $uri $uri/ /index.php?$args;
    }
    location ~ .php$ {
        include fastcgi_params;
        fastcgi_pass unix:/run/php/php7.4-fpm.sock;
        fastcgi_index index.php;
        fastcgi_param SCRIPT_FILENAME $document_root$fastcgi_script_name;
    }
}
Instead of ip_servera, specify the external IP of your VPS server.
Create self-signed certificates in /etc/nginx/ssl/:
mkdir /etc/nginx/ssl && cd /etc/nginx/ssl && openssl req -newkey rsa:2048 -nodes -keyout server.key -x509 -days 365 -out server.crtCheck the nginx configuration for errors:
nginx -tIf there are no errors, reload nginx:
systemctl reload nginxPhpMyAdmin should be available at: https://ip_servera:10050/
Instead of ip_servera, specify the external IP of your VPS server.
Updating Virtualmin
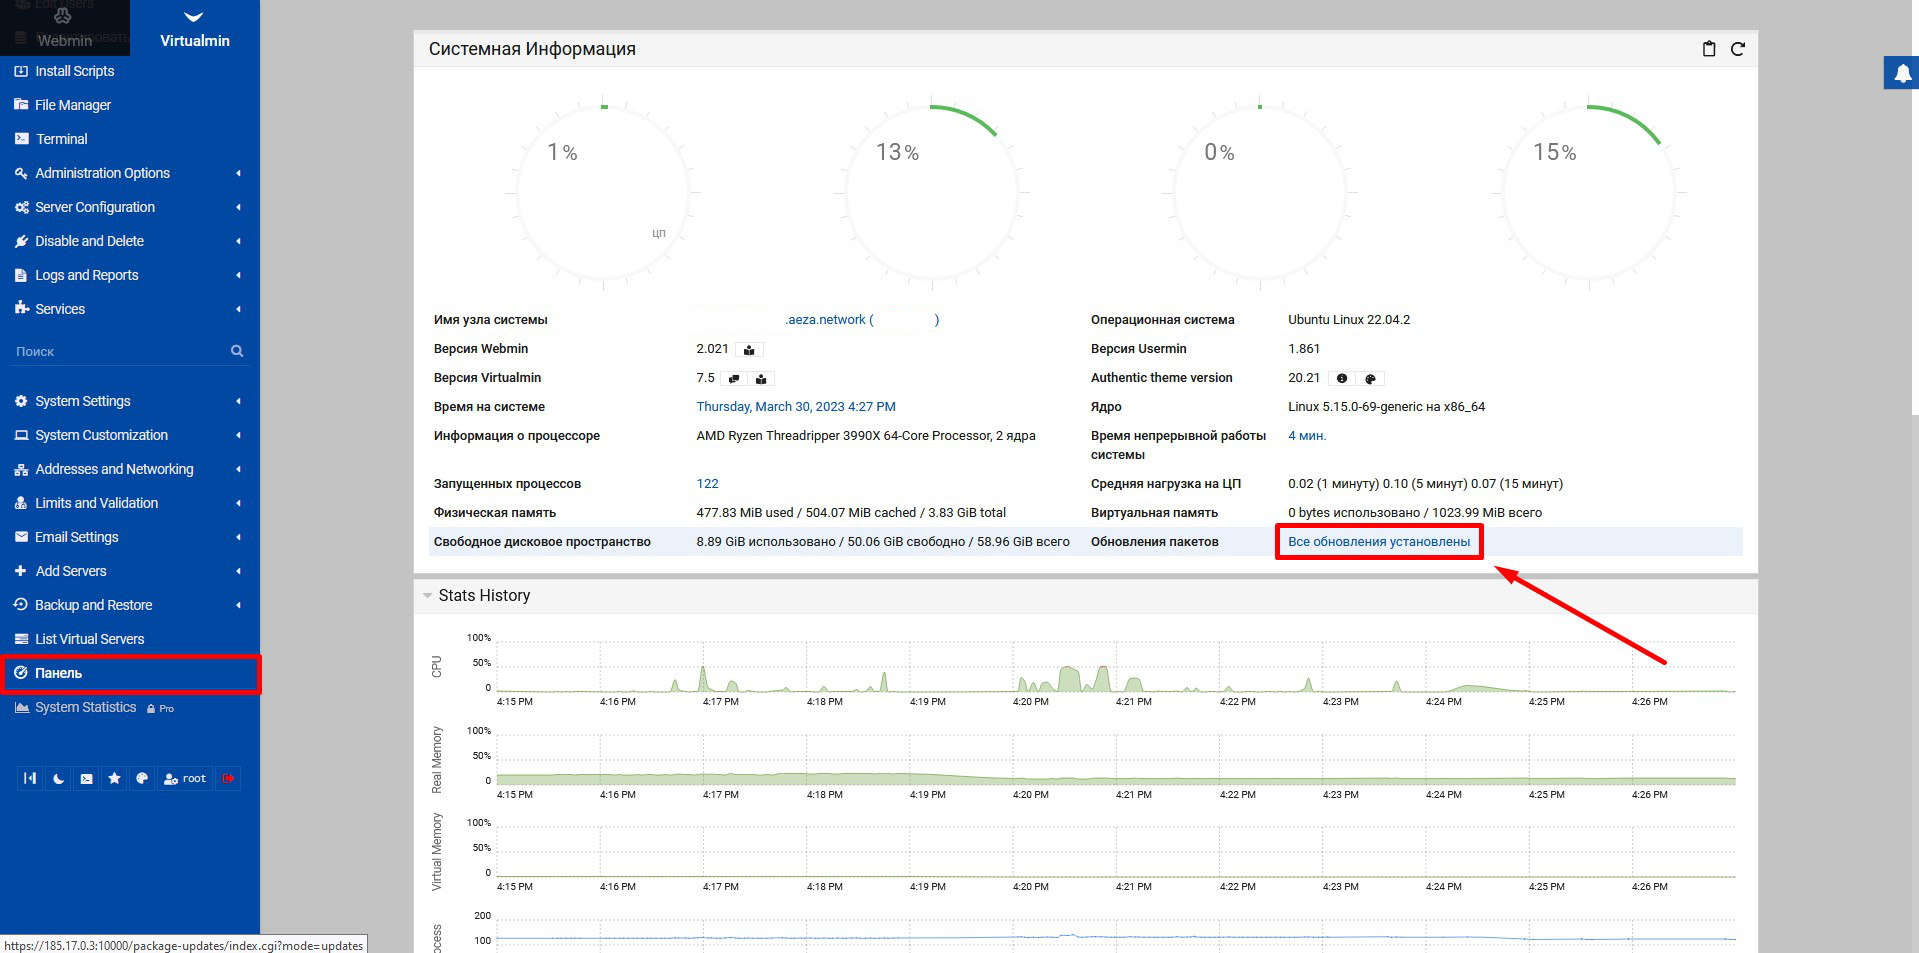
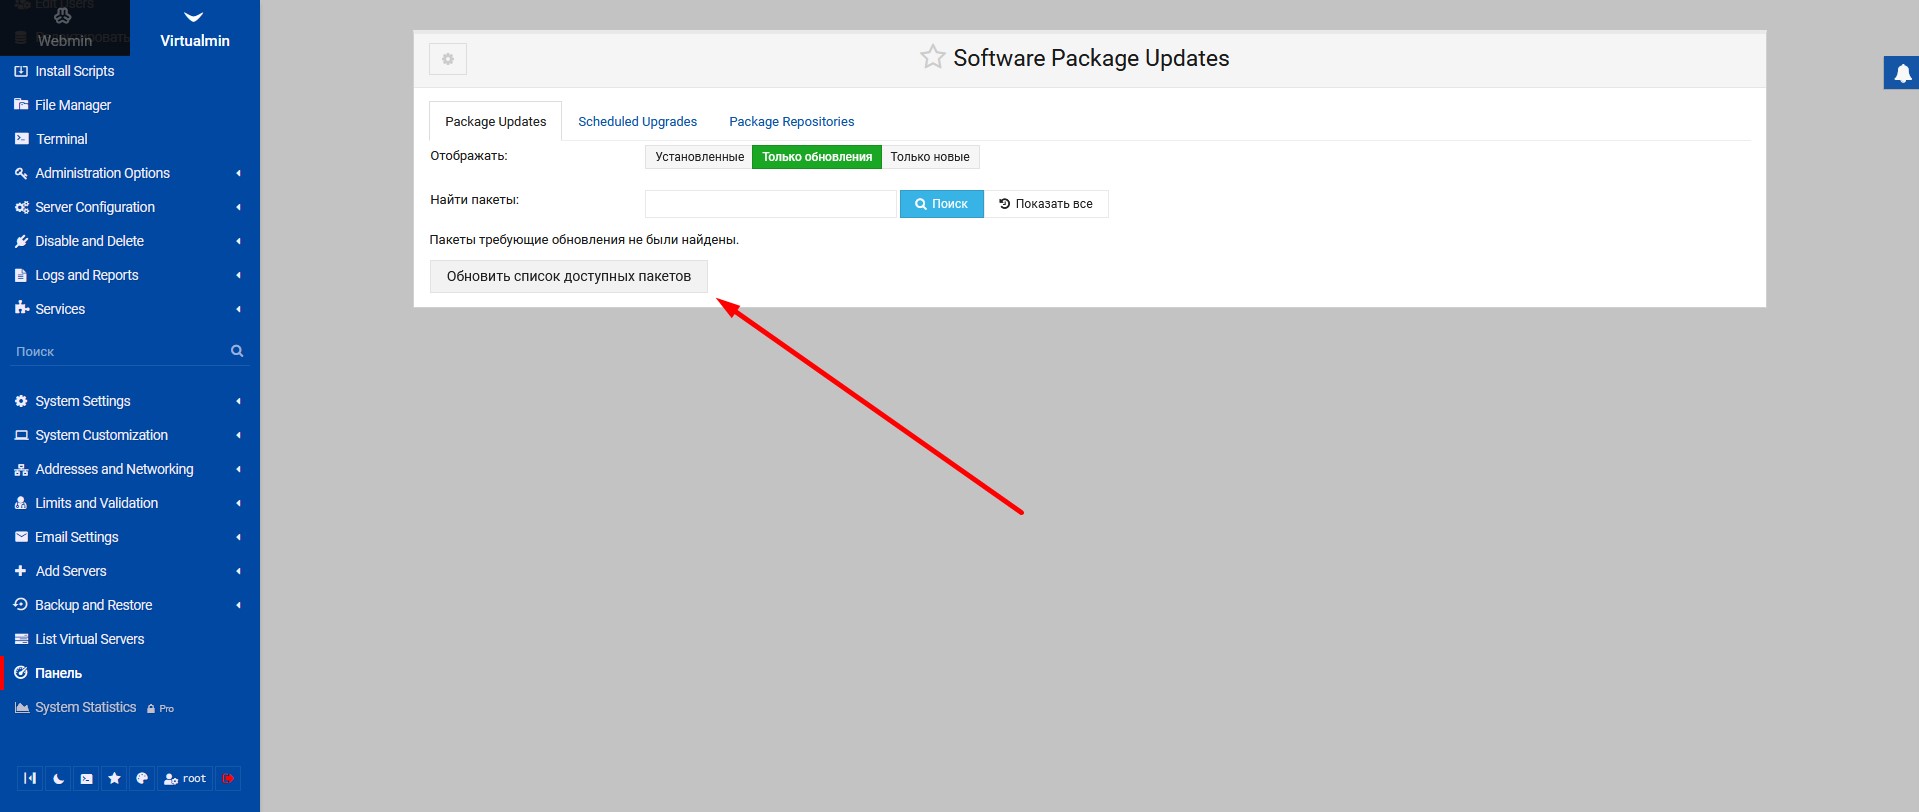
Click the “Dashboard” button in the left Virtualmin panel, then click next to “Package Updates”
Webmin and phpMyAdmin security settings
Security settings for Webmin, phpMyAdmin, and Nginx may vary depending on the requirements of a specific project, but here are some general recommendations:
- Webmin
- Change the default port 10000 to your own port to avoid automated attacks
- Do not use the root account to sign in to Webmin; create a separate user with limited privileges;
- Configure the firewall so that Webmin is accessible only from specific IP addresses;
- Set up two-factor authentication to improve security.
- phpMyAdmin
- Change the login name to something other than “admin” or “root”;
- Set a strong password for signing in to phpMyAdmin;
- Block external access to phpMyAdmin, for example with a firewall;
- Use HTTPS to encrypt traffic between the browser and the server;
- Restrict access to phpMyAdmin to specific IP addresses only;
- Keep phpMyAdmin updated to the latest version and watch for security updates.
These recommendations can be expanded depending on the specific security requirements of your project.
Changing the default Webmin port
To change the Webmin port via the web interface, follow these steps:
- Sign in with an account that has administrator privileges and open Webmin in your web browser.
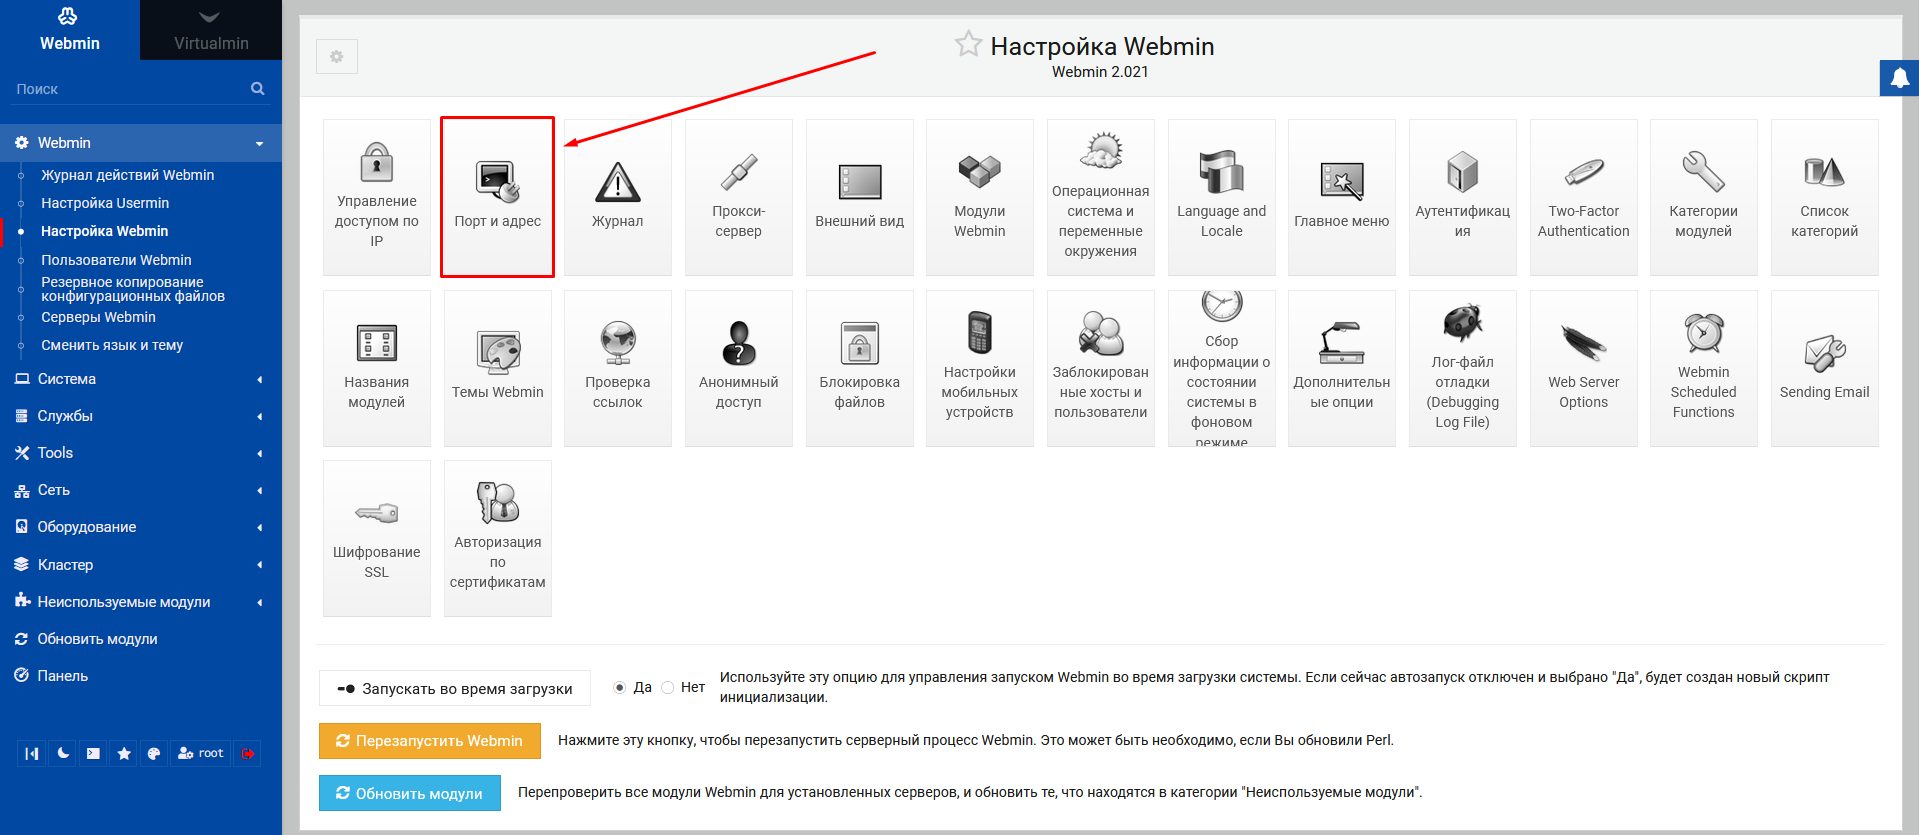
- In the left panel, select the “Webmin” section and then select “Webmin Configuration”.
- In the “Webmin Configuration” menu, select “Ports and Addresses”.
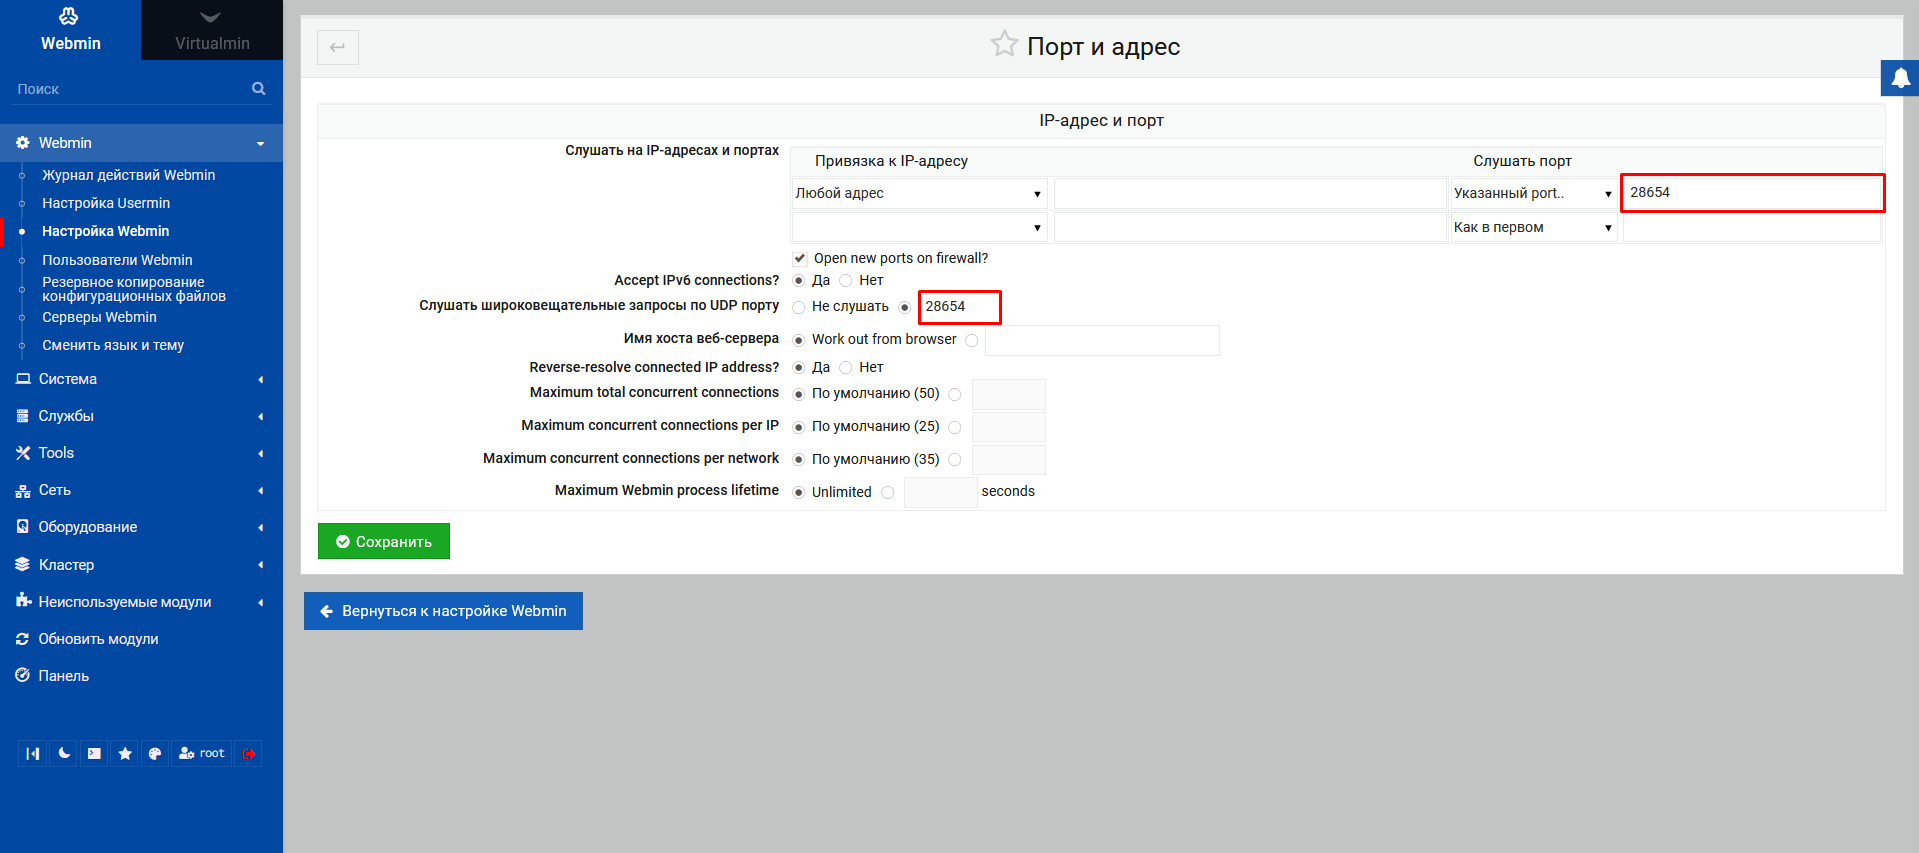
- Find the “Listen on IP addresses and ports” option and select “Specific port..” (if it is not already selected).
- Enter the new port number in the “Specific port..” field, for example “8080”.
- Also change the port to the new one in the “Listen for broadcasts on UDP port” field
- Click “Save” to save the changes.
- Restart the Webmin service to apply the changes. To do this, select “Webmin” in the left panel, then “Webmin Configuration”, and click “Restart Webmin”.
After completing these steps, the Webmin port will be changed to the one you selected. Note that the new port must be open in your system’s firewall and accessible from outside if you want remote access to Webmin.
Changing the root user
To change the root user to a new one in Webmin, follow these steps:
- Sign in to Webmin with an account that has administrator privileges.
- In the left panel, select the “Webmin” section and then select “Webmin Users”.
- Find the “root” account in the user list and click its name.
- In the “root” account settings, select “Copy”.
- Enter the new username in the “Username” field.
- Set a new password for the new user in the “Password” field.
- Set the required permissions for the new user by selecting the appropriate options in the “Available Webmin modules” list.
- Click “Create” to create the new account.
- Sign out of Webmin and sign in again with the new user account to make sure everything works correctly.
- Return to the “Webmin Users” section from step 2 and delete the “root” user.
After completing these steps, you will be able to use the new account instead of the “root” account to access Webmin. Note that the new user must have sufficient privileges to manage your system.
Installing Fail2Ban in Webmin
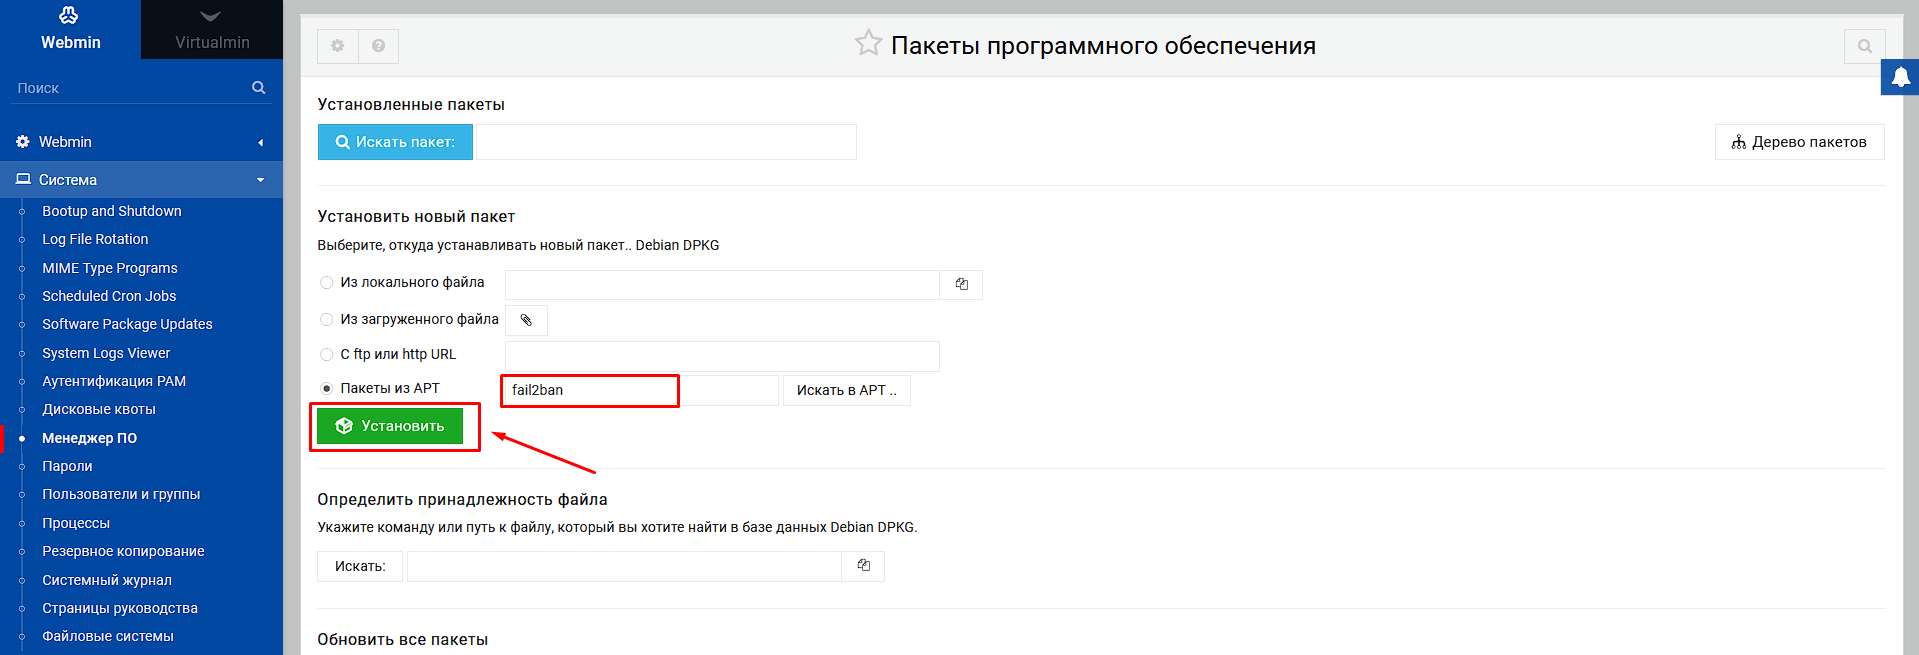
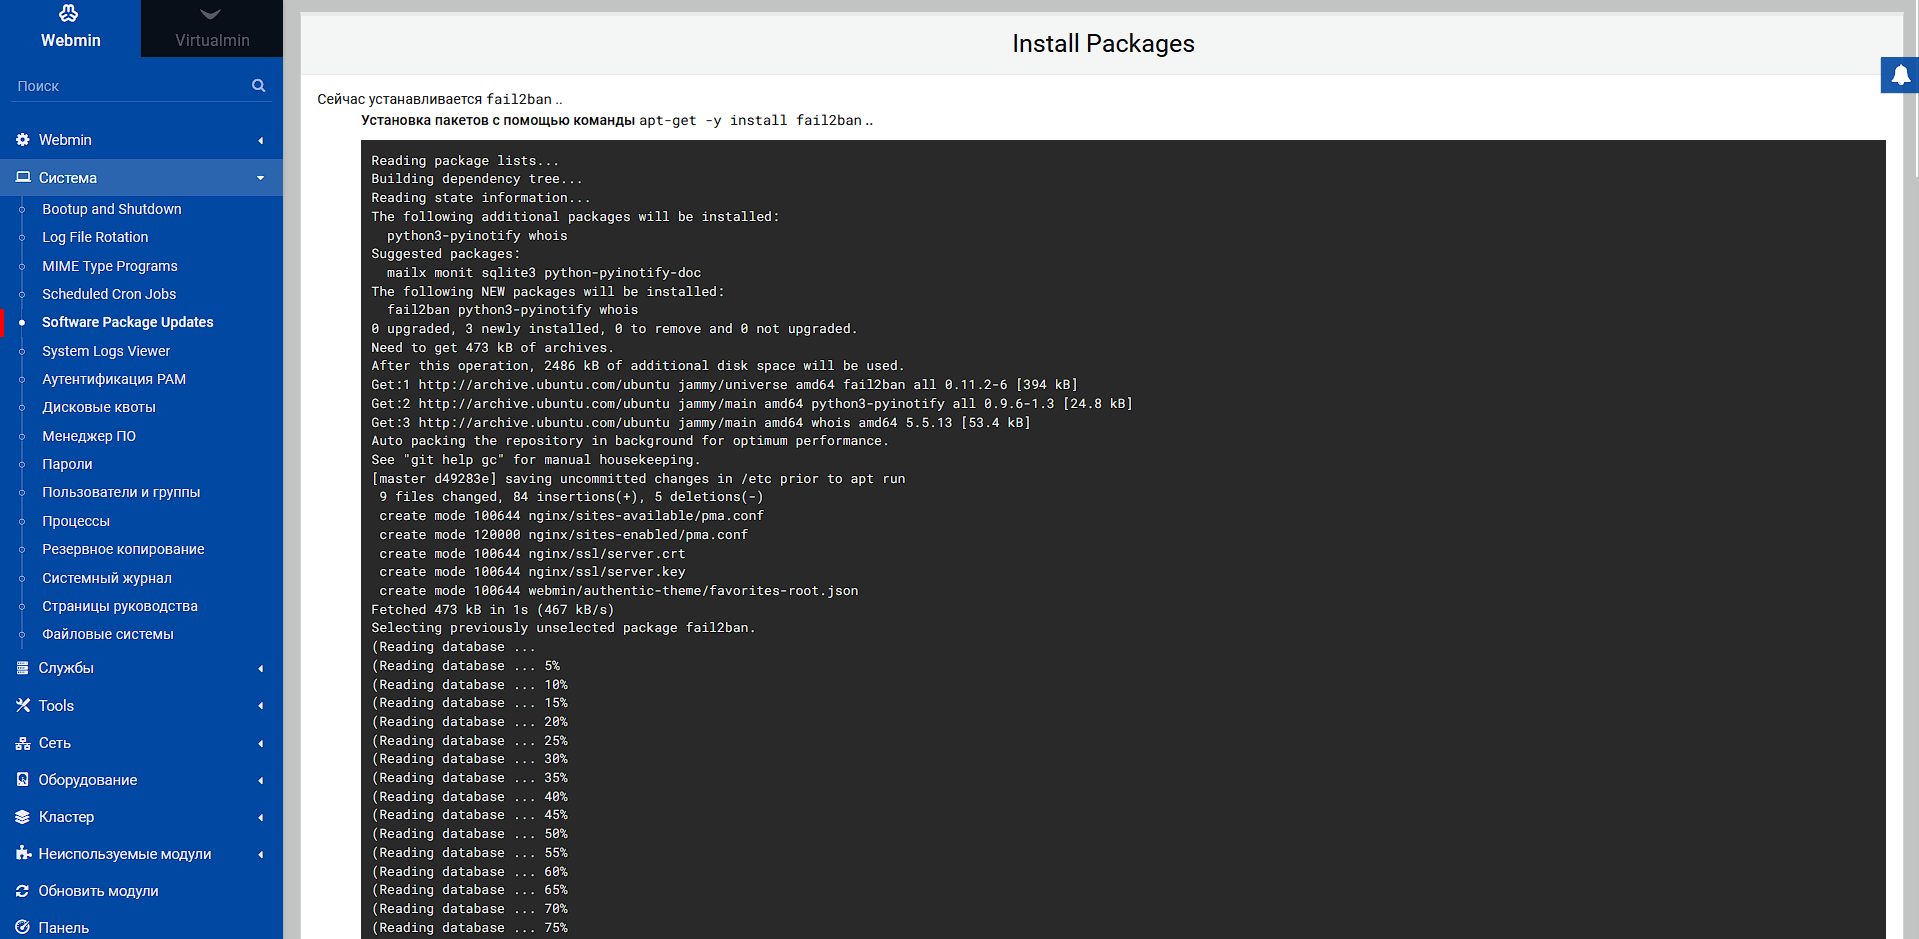
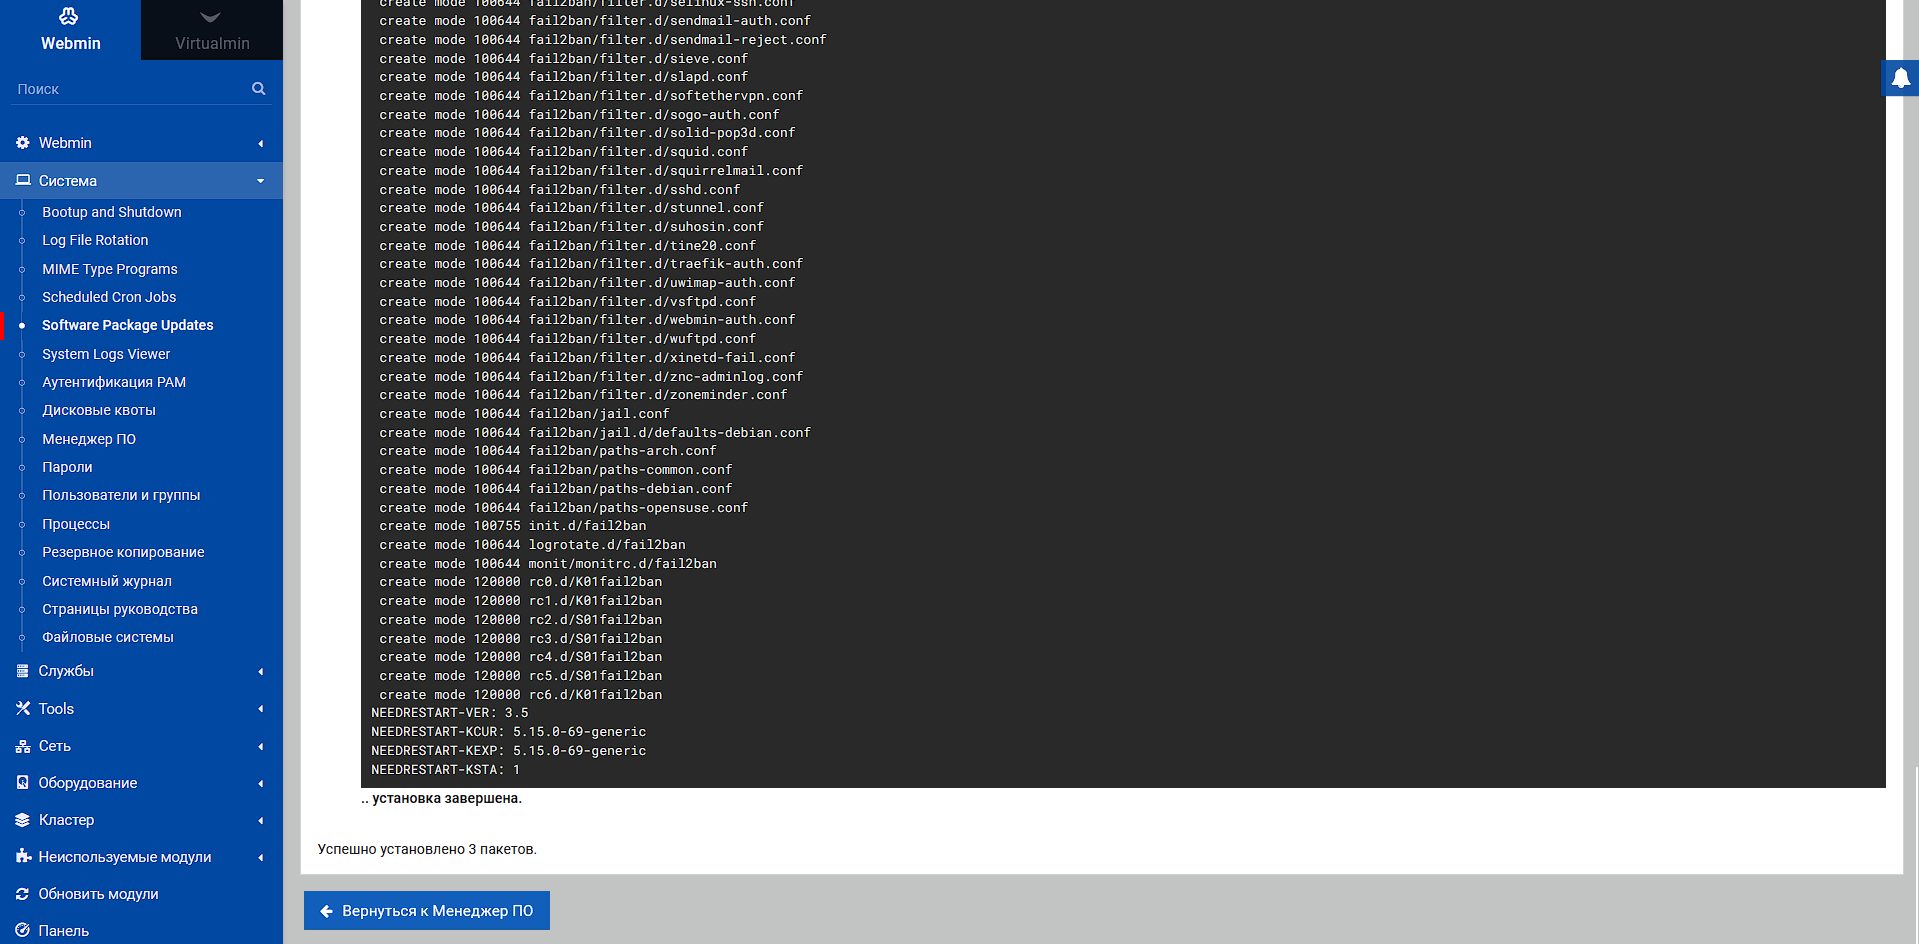
To install fail2ban, you can use the Webmin interface by going to System → Software Packages, then enter Fail2Ban in the Packages from APT field and click Install.
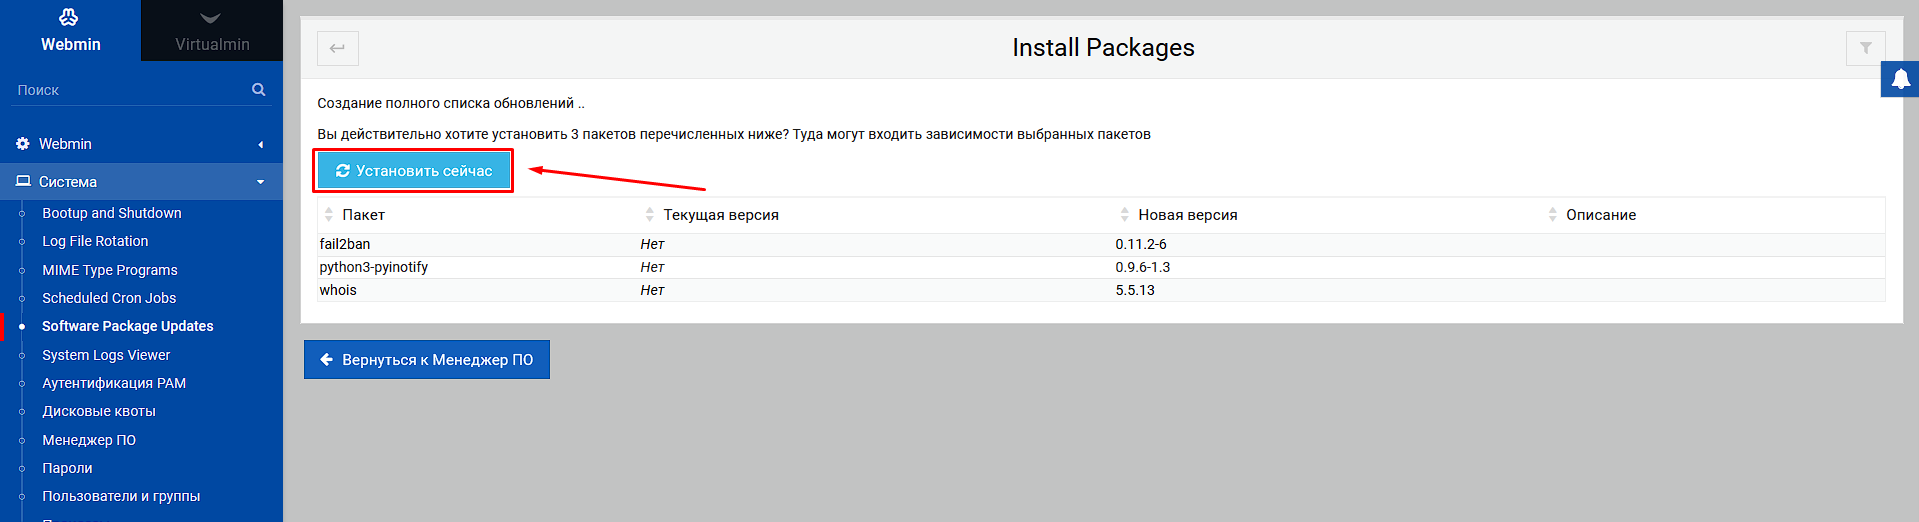
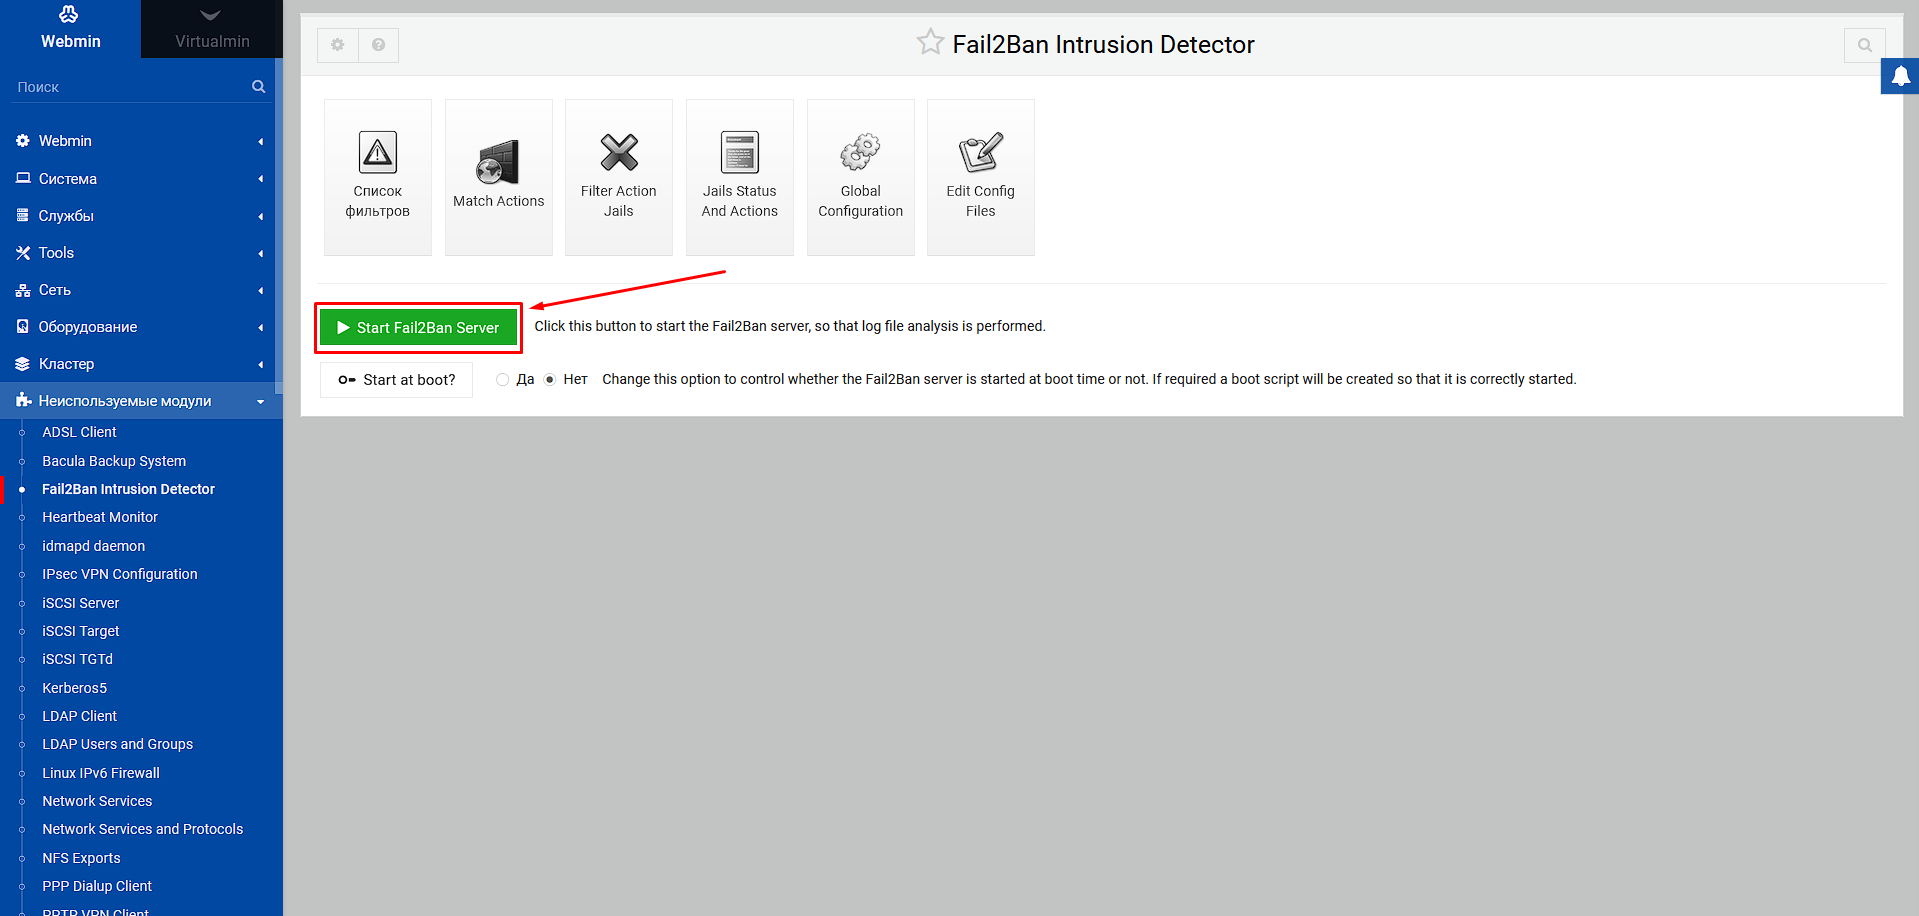
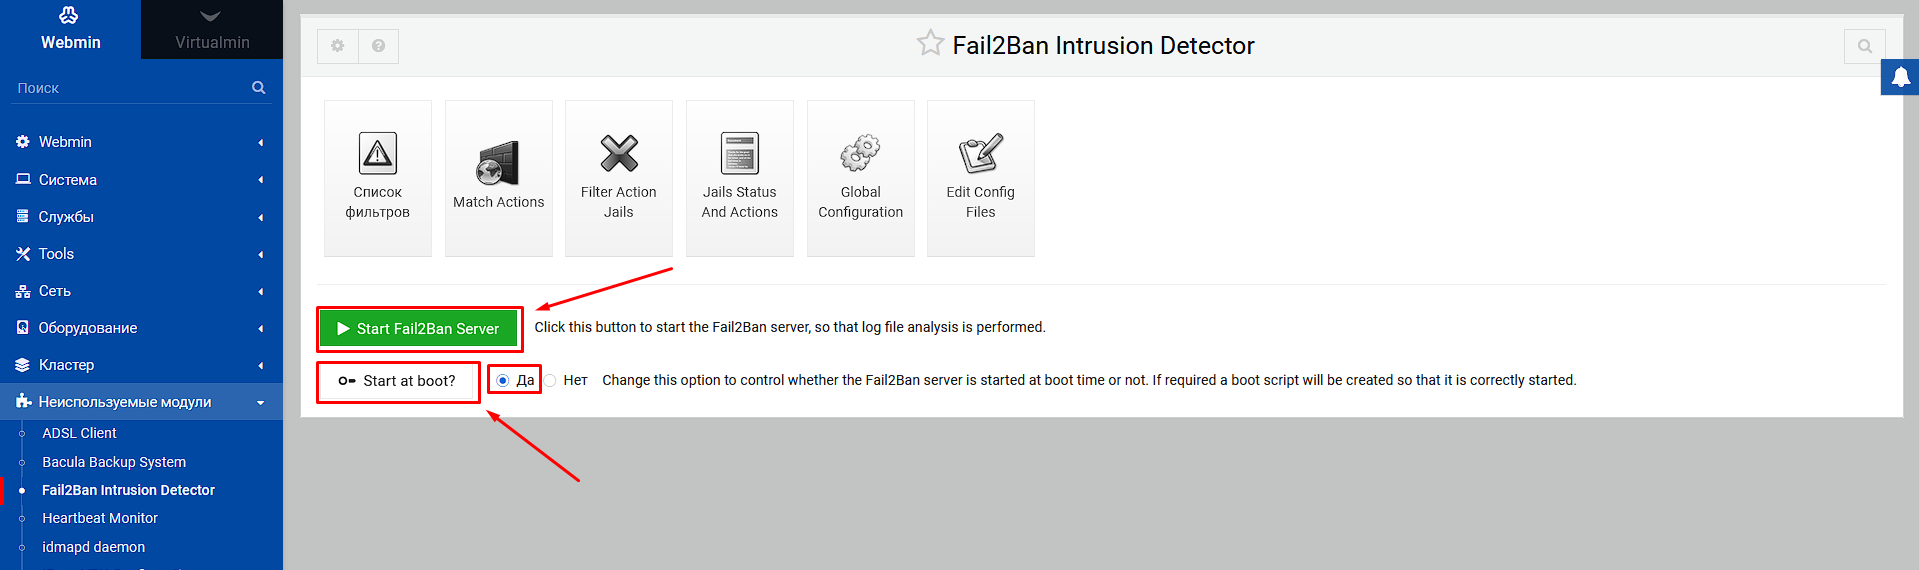
Webmin has a web interface for Fail2Ban. You can find the Fail2Ban control panel under Unused Modules → Fail2Ban Intrusion Detector.
Right after installation, you can start Fail2Ban in that panel and configure it to start on system boot
You can also install Fail2Ban using this command:
apt-get install fail2banTo start the Fail2Ban service, run the following commands (for reference, since Fail2Ban should start automatically):
systemctl enable fail2ban
systemctl start fail2ban
To check that the Fail2Ban service is running:
systemctl status fail2banYou can also copy ready-made Fail2Ban settings into the /etc/fail2ban/jail.local file:
nano /etc/fail2ban/jail.localDelete all old lines from the file and paste this content into it:
[sshd]

enabled = true
port    = ssh
maxretry = 3
findtime = 10800
bantime = 86400
action = ufw

[ssh-ddos]

enabled = true
port    = ssh,sftp
filter  = sshd-ddos
maxretry = 3
findtime = 10800
bantime = 86400
action = ufw

[webmin-auth]

enabled = true
port    = 10000
maxretry = 3
findtime = 10800
bantime = 86400
action = ufw

[proftpd]

enabled  = true
port     = ftp,ftp-data,ftps,ftps-data
maxretry = 3
findtime = 10800
bantime = 86400
action = ufw

[postfix]

enabled  = true
port     = smtp,465,submission
logpath  = /var/log/mail.log
maxretry = 5
findtime = 10800
bantime = 86400
action = ufw

[dovecot]

enabled = true
port    = pop3,pop3s,imap,imaps,submission,465,sieve
logpath  = /var/log/mail.log
maxretry = 5
findtime = 10800
bantime = 86400
action = ufw

[postfix-sasl]

enabled  = true
port     = smtp,465,submission,imap3,imaps,pop3,pop3s
logpath  = /var/log/mail.log
maxretry = 5
findtime = 10800
bantime = 86400
action = ufw
This configuration protects the SSH server, FTP server, and mail server from bot attacks. If we take the first section (sshd) as an example, the additional lines tell Fail2Ban to look for failed login attempts over the last 3 hours, and if someone exceeds 3 failed login attempts, it will block the attacker’s IP for 24 hours using UFW.
You can experiment with these settings yourself and configure Fail2Ban however you need. And when you finish configuring the jails, activate them by restarting Fail2Ban.
service fail2ban restartConfiguring the firewall in Webmin. Disabling FirewallD and installing UFW
You can make the Virtualmin, Webmin, and phpMyAdmin panels available only from specific IP addresses or specific subnets using ufw firewall rules (in my case, from a WireGuard VPN subnet)
Virtualmin uses the FirewallD nftables firewall by default, and it is strongly not recommended to use iptables and ufw together with Virtualmin while FirewallD is enabled. Using two firewalls at once can lead to conflicts and lock you out of your server.
I consider the simplest and most effective way to configure the firewall to be disabling FirewallD and installing UFW. In my view, UFW is much easier to manage than FirewallD.
Stop FirewallD:
service firewalld stopFirewallD is configured to start on system boot. This will conflict with UFW. So let’s disable FirewallD on boot.
systemctl disable firewalldInstall UFW:
apt install ufwUFW is a program with a simple set of commands. Getting started with UFW is truly easier than with iptables. After installation, UFW is disabled by default, and before enabling it we must first add firewall rules, or at least allow connections through the SSH port, before enabling UFW. Otherwise we will lock ourselves out of our own VPS.
Let’s allow a few programs we are going to use. The following commands will open ports 22, 80, 443, 10000, and 10050 in the firewall.
The commented-out commands may be needed optionally depending on the services you use (a copy of the standard FirewallD rules)
#Main rules
ufw allow ssh
ufw allow 'Nginx Full'
ufw allow webmin
#phpmyadmin port
ufw allow 10050/tcp

#Other standard webmin ports and services
#ufw allow dhcpv6-client
#ufw allow dns
#ufw allow dns-over-tls
#ufw allow ftp
#ufw allow imap
#ufw allow imaps
#ufw allow mdns
#ufw allow pop3
#ufw allow pop3s
#ufw allow smtp
#ufw allow smtp-submission
#ufw allow smtps
#ufw allow 2222/tcp
#ufw allow 20000/tcp
#ufw allow 49152:65535/tcp
See more detailed UFW documentation here https://www.digitalocean.com/community/tutorials/how-to-set-up-a-firewall-with-ufw-on-ubuntu-20-04-ru
Access by IP
For access to the Virtualmin/Webmin interface only from specific IPs, use the following rule:
ufw allow from vash_ip to any port 10000
ufw allow from vash_ip to any port 10050
Also remember to delete the previously created rule that allows access to ports 10000 and 10050:
ufw delete allow webmin
ufw delete allow 10050/tcp
Access from a WireGuard VPN network
For access to the Virtualmin/Webmin interface only from the WireGuard local network, use the following rule:
ufw allow from 10.2.0.0/24 to any port 10000
ufw allow from 10.2.0.0/24 to any port 10050
Also remember to delete the previously created rule that allows access to ports 10000 and 10050:
ufw delete allow webmin
ufw delete allow 10050/tcp
I recommend installing WireGuard from the DWG article and using the DWG-CLI build
No email, no trackers — just the update feed.
Russian feed
https://en.kiberlis.ru/feed/