



- Preparing to set up WireGuard. Upgrading MikroTik RouterOS 6 firmware to RouterOS 7
- Configuring a WireGuard VPN client on MikroTik RouterOS
- Disabling Fasttrack
- Adding a WireGuard interface and client Peer configuration
- Creating a routing table for marked WireGuard VPN traffic packets
- Creating address lists and WireGuard VPN route marking rules
- Full WireGuard VPN traffic tunneling on MikroTik
- Selective WireGuard VPN traffic tunneling on MikroTik
- Creating a routing rule for WireGuard VPN
- Allowing the WireGuard VPN connection in Firewall-Nat
- Changing the DNS provider
- MTU fix for MikroTik WireGuard (mss clamp to pmtu)
- VPN tunnel into the local network
- For plain WireGuard
- For WireHole
- General recommendations
This guide covers setting up a WireGuard client on MikroTik RouterOS with both full and selective traffic tunneling through a WireGuard VPN. This example uses RouterOS 7.5 with factory defaults and a third-party WireGuard server on a VPS/VDS. Tested with the DWG solution
Preparing to set up WireGuard. Upgrading MikroTik RouterOS 6 firmware to RouterOS 7
WireGuard VPN is available on MikroTik starting with RouterOS version 7. If you are on RouterOS v6, update to the latest stable v6 release first, then upgrade to RouterOS v7. How to do that is described below. If you already have RouterOS v7, skip this section and go to the next one.
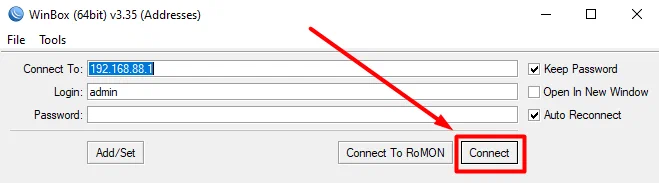
Open the MikroTik router management panel from WinBox or a browser. The default router IP is 192.168.88.1
Or connect to your MikroTik by MAC immediately to avoid losing the connection while following this guide
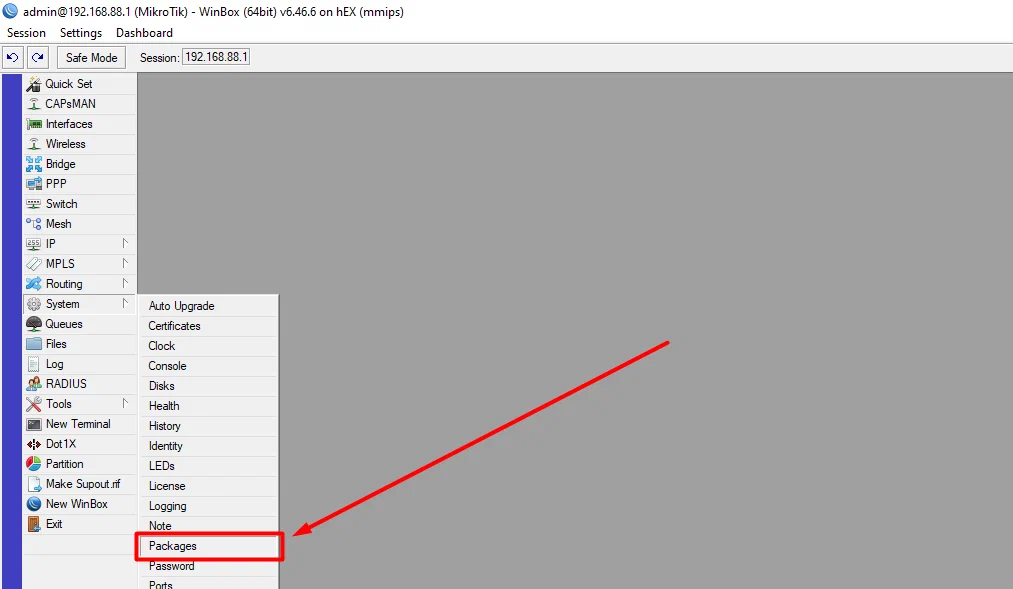
Click System, then click Packages.
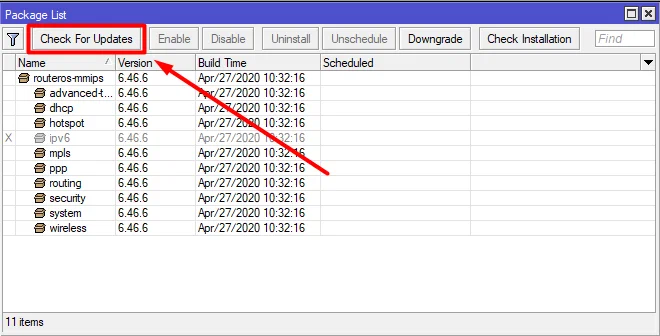
Click Check For Updates to check for available updates
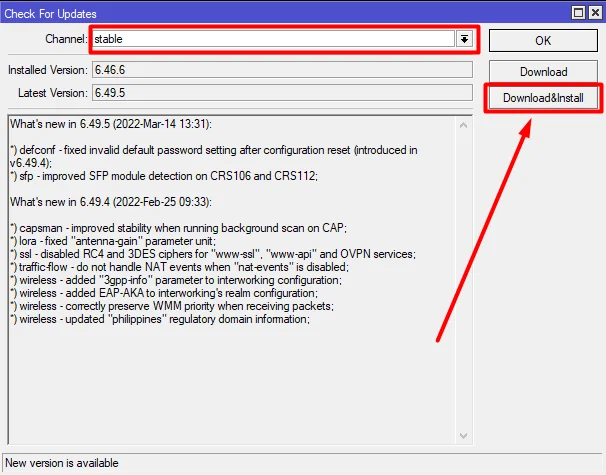
Select Channel: stable and click Download&Install
Wait for the firmware install to finish and the router to reboot. You can now upgrade RouterOS to version 7.
Select the previously unavailable Channel: upgrade and click Download&Install
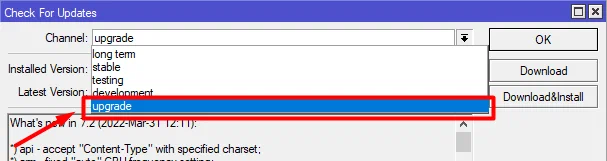
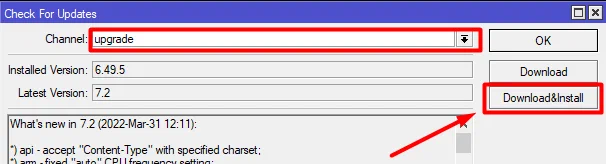
Wait for the firmware install to finish and the router to reboot.
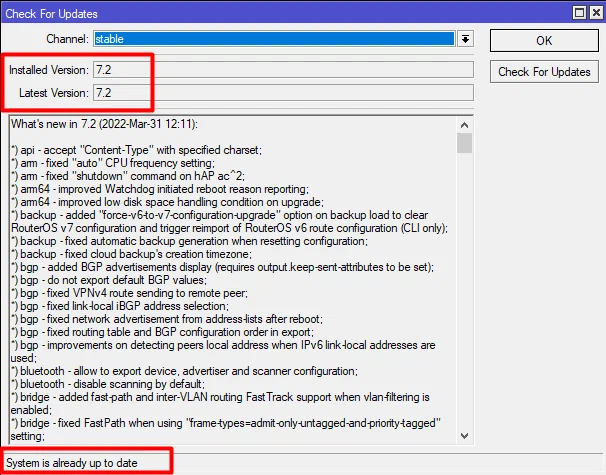
Click System-RouterBOARD

Click Upgrade
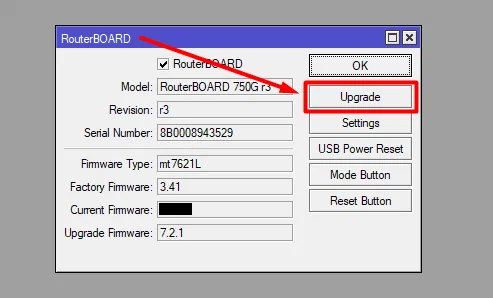
Reboot your MikroTik
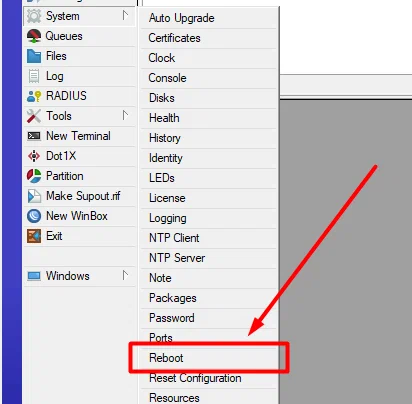

You have upgraded MikroTik RouterOS to version 7 and can proceed with WireGuard setup.
Configuring a WireGuard VPN client on MikroTik RouterOS
This guide covers configuring a WireGuard client with full traffic tunneling (section 2.4.A) and selective tunneling to bypass blocks (section 2.4.B) by marking VPN routing packets with Firewall-Mangle, Firewall-Address Lists, and a marked IP-Routes entry.
In my example the server is a VPS with DWG installed, but the guide should also work for other server setups—at least most of the steps.
Disabling Fasttrack
First, disable the default firewall Fasttrack rule, because it prevents processing and control of forwarded traffic and will cause problems with VPN packet routing. Fasttrack (literally “short path”) skips router packet processing to reduce CPU load. Use it carefully and study it separately—it removes flexible traffic control. So we will fully disable this rule.
Click IP-Firewall and on the Filter Rules tab disable the Fasttrack rule
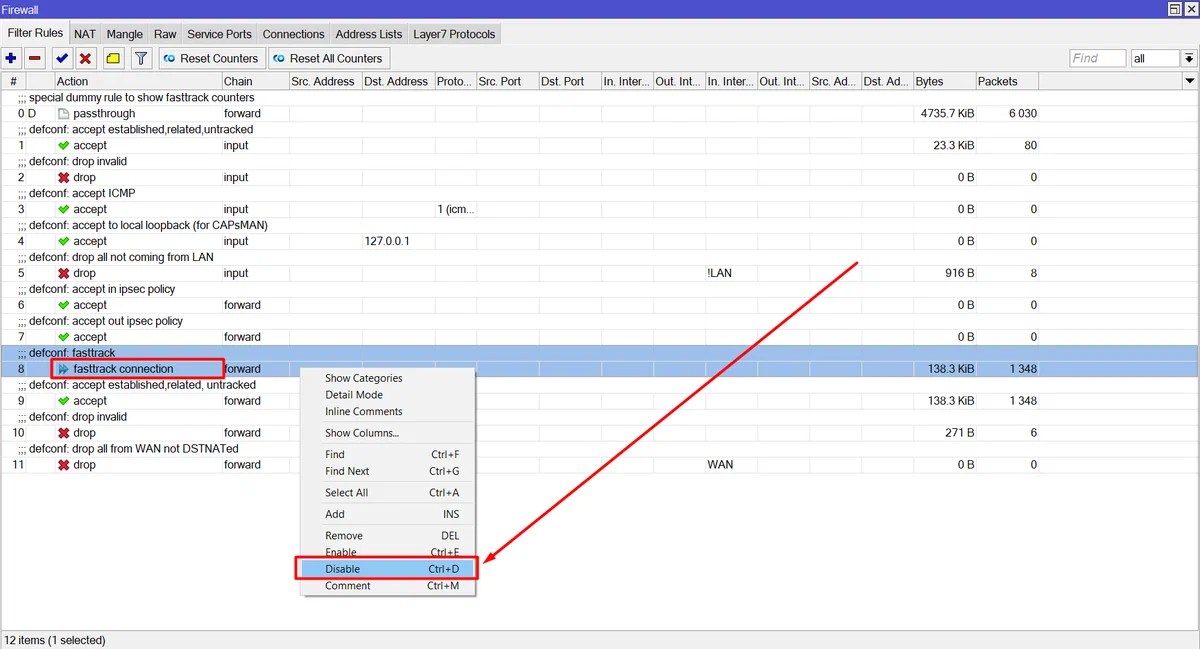
Adding a WireGuard interface and client Peer configuration
Now configure the WireGuard client using your Peer configuration to connect to the server with WireGuard VPN installed.
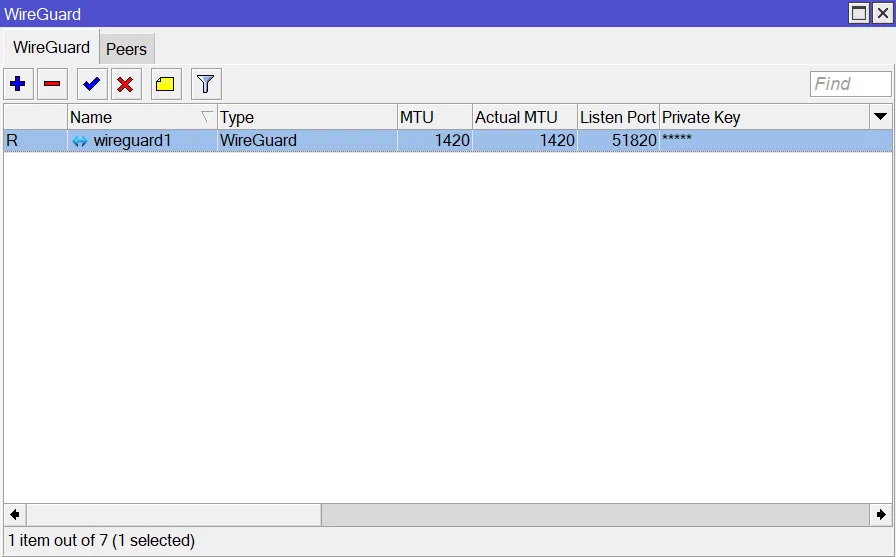
Add and configure a new WireGuard interface
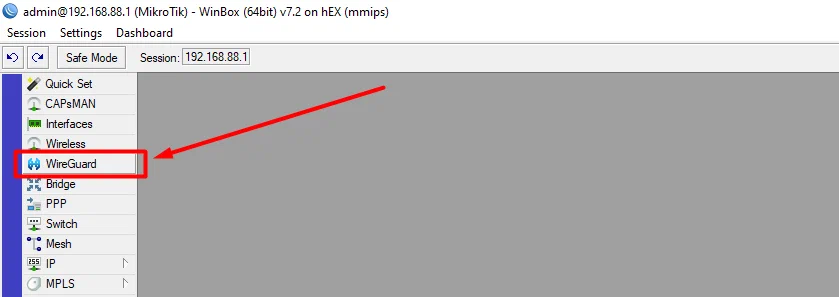
Click WireGuard in the left panel
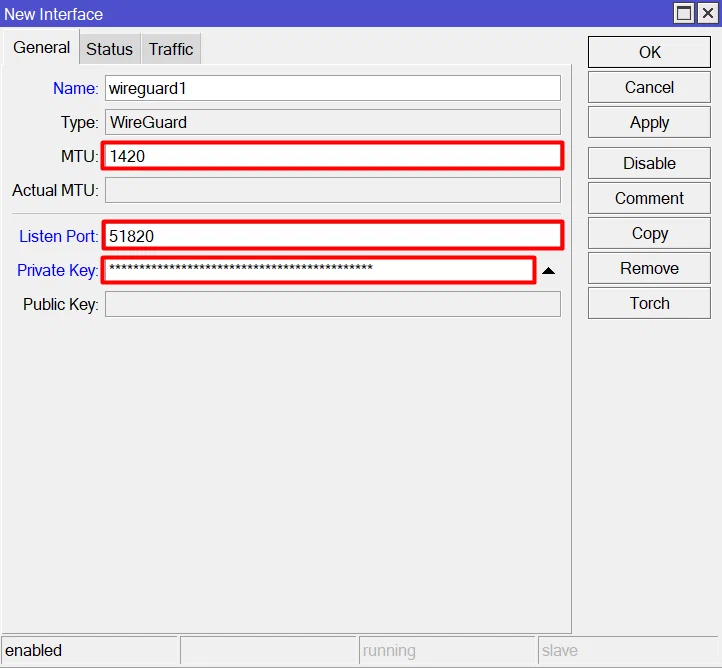
Click +, then fill in MTU (default 1420), Listen Port, and Private Key, and click OK. The Listen Port and Private Key values are in the configuration created on the WireGuard server.
The WireGuard interface has been added
Open the Peers (holds WireGuard connection configs—client and server if MikroTik is used as a server) tab, then add a new client configuration by clicking +
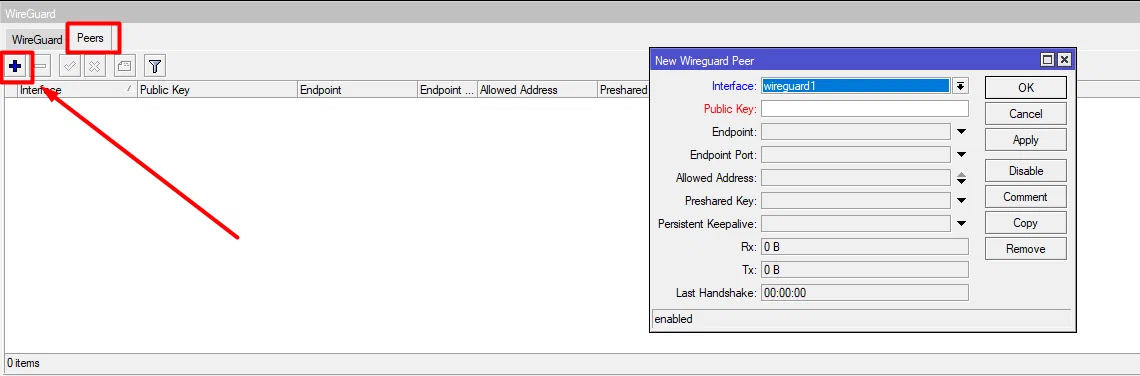
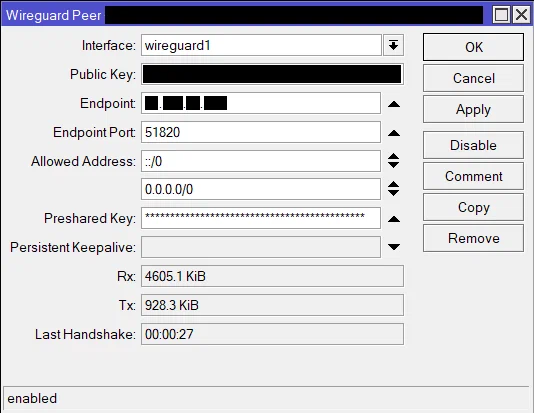
Select the previously created Interface, fill in Public Key (client public key), Endpoint (server IP), Endpoint Port (server port), and Preshared Key with the values from the client config on the server. Also required: set allowed-address=0.0.0.0/0 so the WireGuard client can reach all router subnets (you can refine this later)
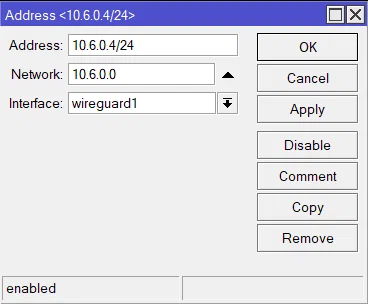
You also need to add your client’s internal IP on the WireGuard network. Go to IP-Addresses, click +, fill in Address (client internal IP from the client config), Network (same as Address but with the last octet 0), and Interface (the WireGuard interface you created)
Creating a routing table for marked WireGuard VPN traffic packets
By default RouterOS uses the “main” routing table to add routes to the FIB (Forwarding Information Base—used for packet forwarding decisions and holding a copy of the required routing information)
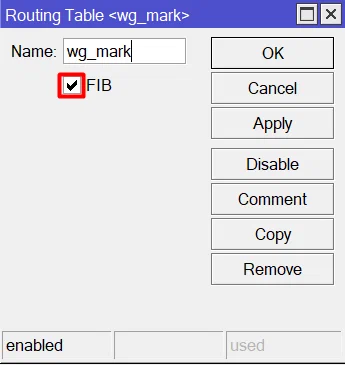
We need a custom routing table; define it under Routing-Tables so WireGuard routes can be added to the FIB
Go to Routing-Tables, click +, set Name to wg_mark and check FIB
Creating address lists and WireGuard VPN route marking rules
For a marked WireGuard interface route you need Address Lists for traffic that should use WireGuard VPN, plus a Mangle route-marking rule. They differ depending on how you want to tunnel VPN traffic:
- If you need full VPN traffic tunneling — follow section 2.4.A (all sites open through the VPN)
- If you need selective tunneling, for example to bypass access restrictions on some sites — follow section 2.4.B.
Full WireGuard VPN traffic tunneling on MikroTik
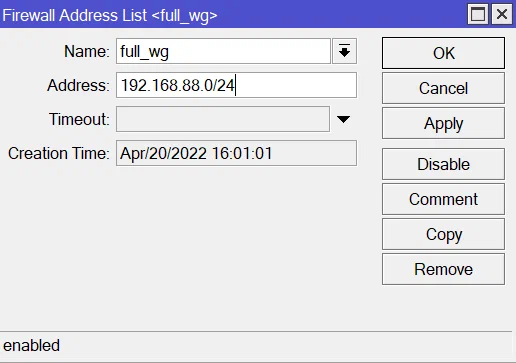
Next we prepare the address list that uses WireGuard. For full tunneling, set the router’s LAN IP range so every device on that LAN uses WireGuard VPN for web access.
Go to IP-Firewall-Address Lists and click +, then fill in Name and Address. Set Name to full_wg and Address to the router LAN subnet (default 192.168.88.0/24). Click OK.
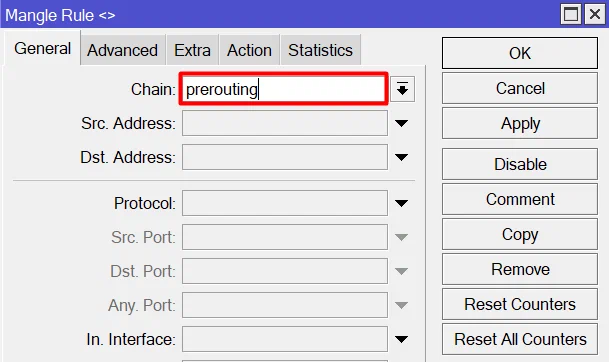
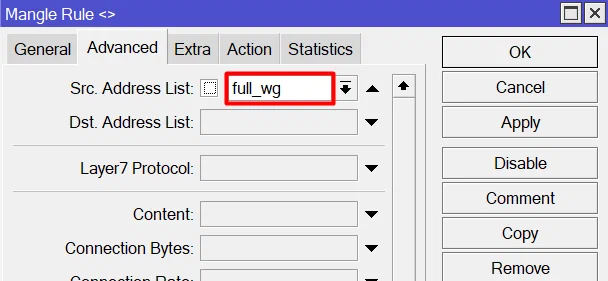
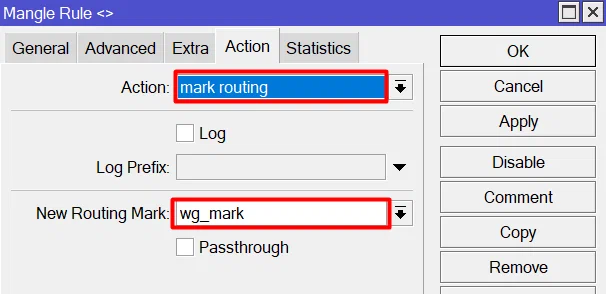
Add a route-marking rule: go to IP-Firewall-Mangle, click +, fill in Chain, Src Address List, Action, and New Routing Mark, then click OK.
Chain = prerouting (chain = prerouting)
Src Address List = full_wg (source address list = the full-tunneling list from section 2.4.A)
Action = mark routing (action = mark routing)
New Routing Mark = wg_mark (new routing mark = the routing table from section 2.3)
Selective WireGuard VPN traffic tunneling on MikroTik
For selective tunneling, create new address lists under IP-Firewall-Address Lists as in section 2.4.A. In those lists, put site names or their IP addresses that you want to reach via VPN. MikroTik resolves the site names and adds (and refreshes after TTL) their IPs to Address Lists.
I skipped BGP because of high CPU load and because large lists are unnecessary (you will not use even half of the resources from big block-list feeds, so it is better to add sites manually)
Go to IP-Firewall-Address Lists and click +, then fill in Name and Address. Set Name to rkn_wg and Address to the site name or IP you care about. Click OK.
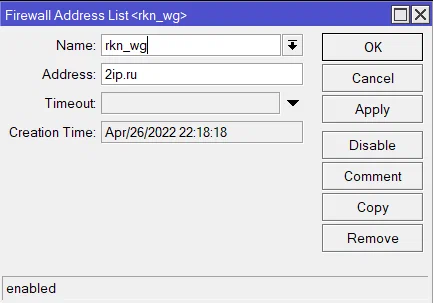

For other sites in new list entries, use the same Name as the first one, but set Address to another site name or IP.
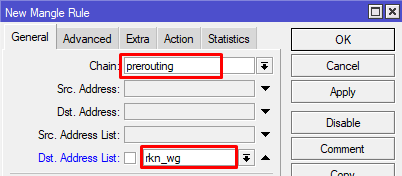
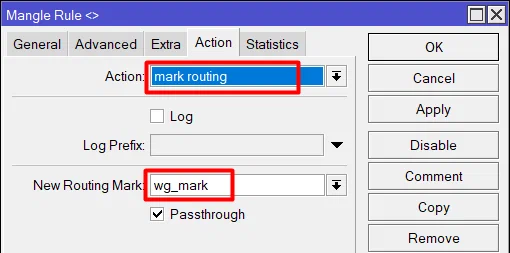
Add a route-marking rule: go to IP-Firewall-Mangle, click +, fill in Chain, Dst Address List, Action, and New Routing Mark, then click OK.
Chain = prerouting (chain = prerouting)
Dst Address List = rkn_wg (destination address list)
Action = mark routing (action = mark routing)
New Routing Mark = wg_mark (new routing mark = the routing table from section 2.3)
After finishing the guide, test your VPN specifically on https://2ip.ru/ — it should show your server IP because that site is in the list above. If you open https://whoer.net/ru, whoer will show your real IP.
If a blocked site still does not open, add two address-list entries for the same site: one with www.domain.com and one without www, just domain.com
MikroTik may also fill Address List IPs incorrectly for the given hostnames. In that case change the router DNS under IP-DNS (not client DNS under IP-DHCP Server-Network). For Wirehole, use your server DNS; for plain WireGuard, look for good DNS servers (Google DNS alone is no longer enough)
Creating a routing rule for WireGuard VPN
Create a new routing rule for the WireGuard interface using the routing table from section 2.3.
Go to IP-Routes, click +, then fill in Gateway, Distance, and Routing Table
Gateway = wireguard1 (your WireGuard interface name from section 2.2)
Distance = 1 (connection priority; lower value = higher priority)
Routing Table = wg_mark (routing table from section 2.3)
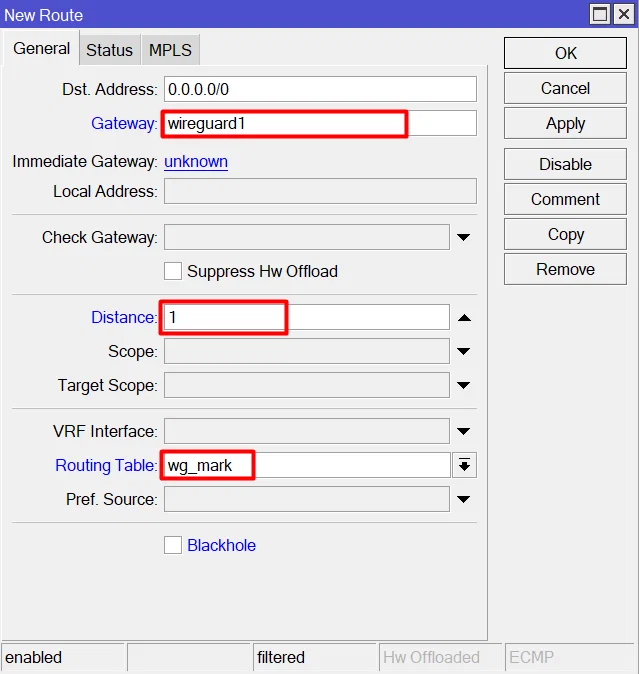
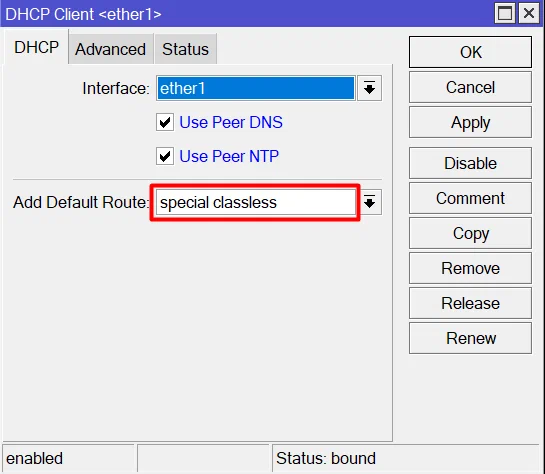
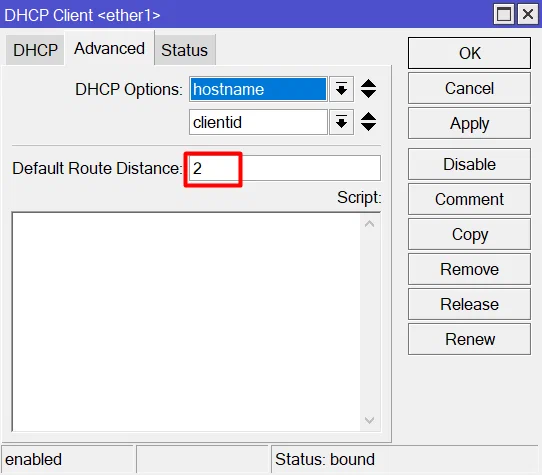
You also need to lower the priority of the default DHCP client.
Go to IP-DHCP Client, select the existing DHCP client entry, set Add Default Route to Special Classless, and set Default Route Distance = 2 on the Advanced tab
Allowing the WireGuard VPN connection in Firewall-Nat
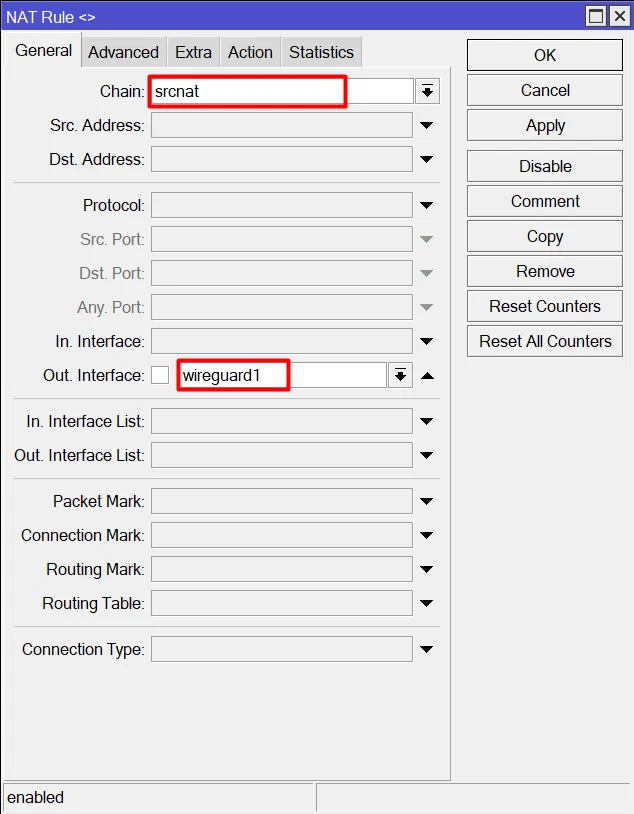
By default the firewall does not account for your WireGuard interface, so you must add a masquerade rule for it manually.
Go to IP-Firewall-Nat, click +, fill in Chain, Out. Interface, and Action, then click OK.
Chain = srcnat
Out. Interface = wireguard1 (your WireGuard interface name)
Action = masquerade
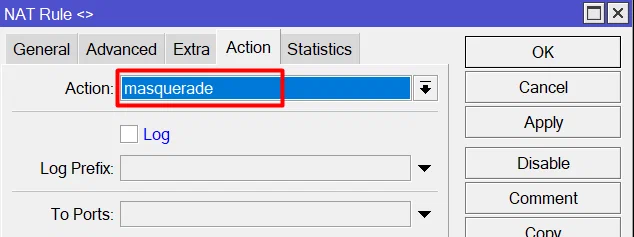
WireGuard setup on RouterOS is complete. Check your VPN connection at https://whoer.net/ru or https://2ip.ru/ (if you configured selective tunneling)
Changing the DNS provider
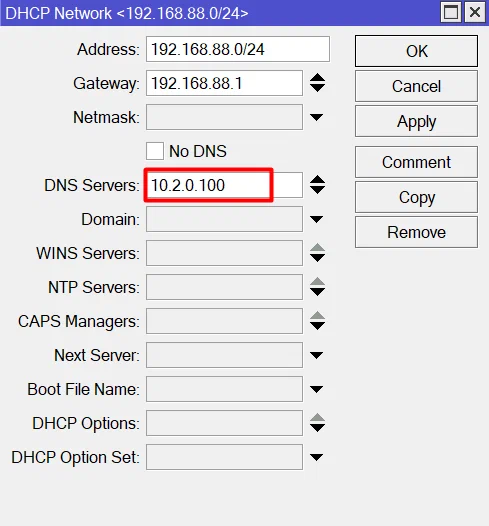
To change the DNS provider, go to IP-DHCP Server-Networks, open the existing DHCP server entry, and change the DNS Servers field.
If you use plain WireGuard without Unbound and DNSProxy, set DNS Servers to: 8.8.8.8, 8.8.4.4
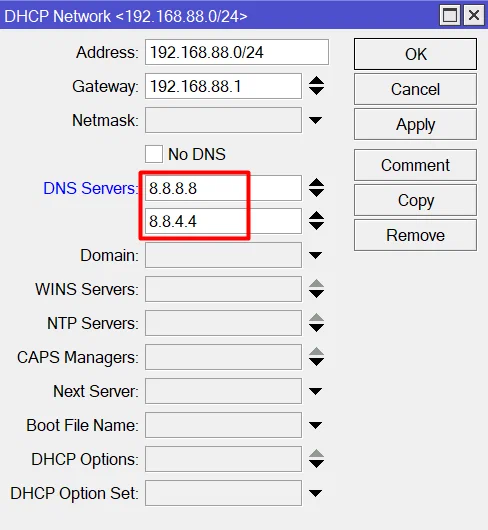
If you use Unbound or WireHole from this guide, set DNS Servers to 10.2.0.100 (sometimes 10.6.0.1). If you use DNS Proxy, enter your DNS server IP.
MTU fix for MikroTik WireGuard (mss clamp to pmtu)
If your MikroTik with WireGuard opens sites slowly or cannot open some sites at all, set a correct MTU (How to determine the optimal MTU size?), or use the MTU fix.
Use this section only if you have serious site-loading problems!
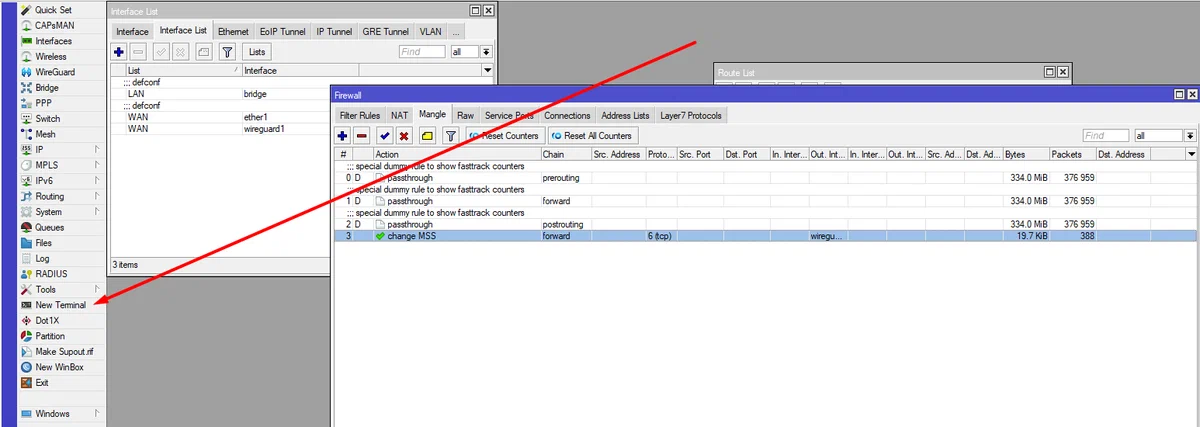
Open the MikroTik console by clicking New Terminal
Run the following command:
/ip firewall mangle
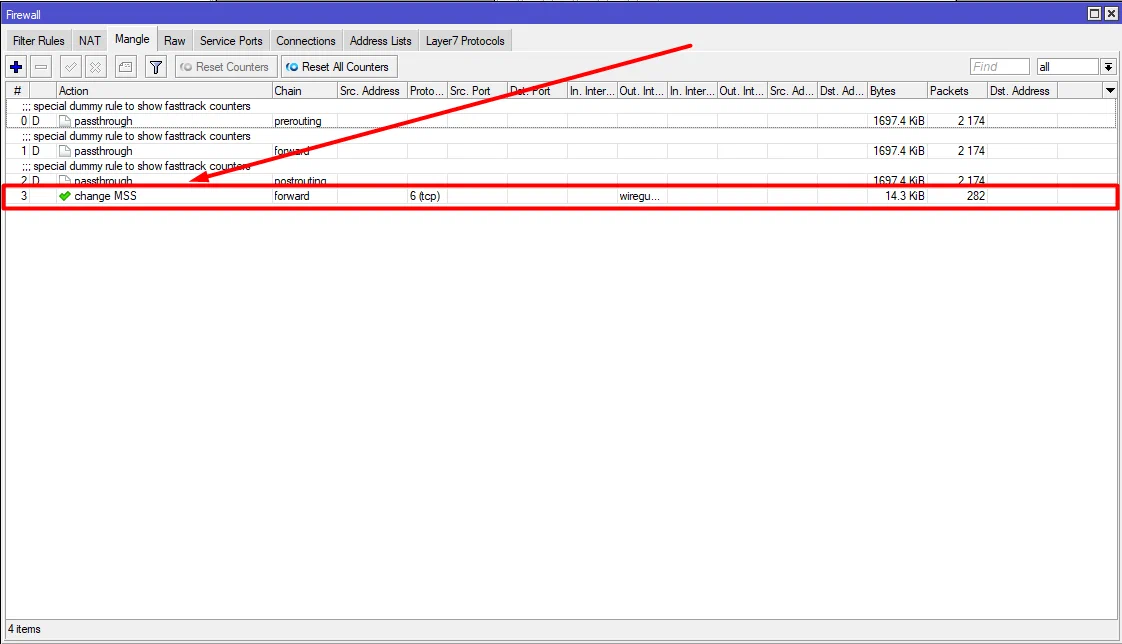
add action=change-mss chain=forward new-mss=clamp-to-pmtu out-interface=wireguard1 protocol=tcp tcp-flags=syn
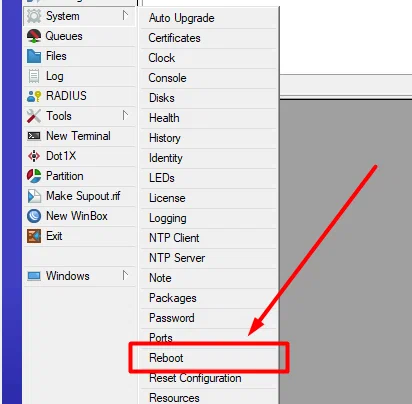
Reboot MikroTik by clicking Reboot, then Yes. Or run /system reboot in the terminal.

As a result, the following IP-Firewall-Mangle rule is added, fixing slow and unstable WireGuard behavior on MikroTik:
VPN tunnel into the local network
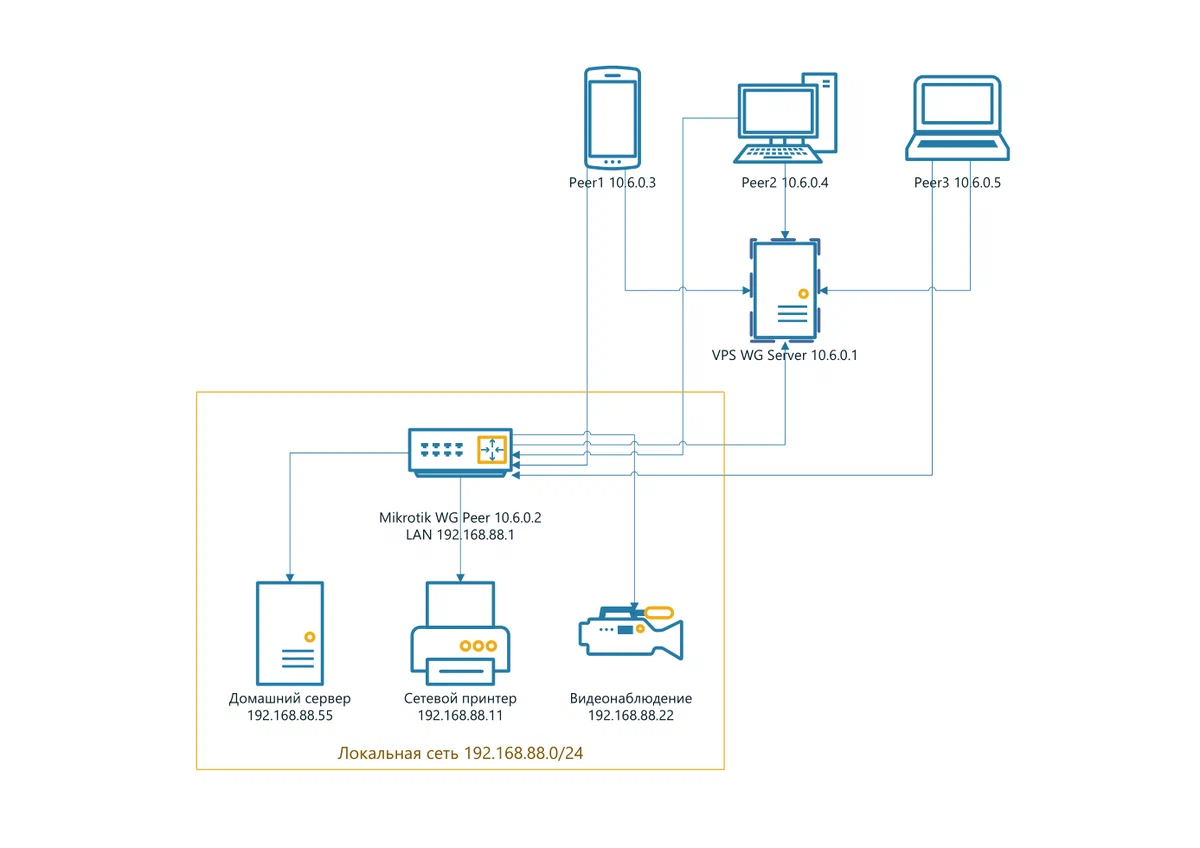
In this section we set up a VPN tunnel into the MikroTik LAN with WireGuard and provide internet access to LAN hosts from various devices. Tested together with the previous sections and with WireHole.
You will be able to freely connect to devices on the MikroTik LAN when WireGuard VPN is enabled on a device outside the LAN.
For plain WireGuard
If you use plain WireGuard (not WireHole), so that the WireGuard server and its clients can see the router LAN, edit wg0.conf on your VPS.
Find the PostUp and PostDown rules in wg0.conf and remove your server’s local interface from them (in my case -o eth0) so masquerade works for all available interfaces.
Before:

After:

Find the lines for your MikroTik Peer in wg0.conf and add your router LAN IP range to AllowedIPS (in my case 192.168.88.0/24)
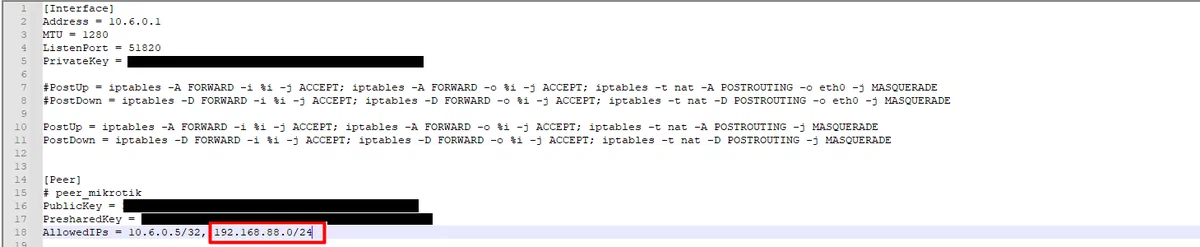
Save the changes in wg0.conf and restart WireGuard on your VPS.
For WireHole
If you use WireHole, do NOT edit wg0.conf—Docker will overwrite it anyway. Edit the WireGuard server template server.conf (in wirehole/wireguard/templates).
Only in the server.conf template can you define a static Peer config that differs from other Peer clients created by Docker (you must not put the LAN address in AllowedIPs for every peer). Also remove the static MikroTik Peer name from docker-compose.yml so Docker does not duplicate the config for your router.
Change the PostUp and PostDown rules the same way as for plain WireGuard.
Add your router Peer configuration lines at the end of server.conf; you can copy them from the Docker-generated file (wirehole/wireguard/peer_mikrotik). After that you can delete wirehole/wireguard/peer_mikrotik, since Docker will no longer generate it after removing the MikroTik config from docker-compose.yml.

Remove the MikroTik Peer name from docker-compose.yml and restart Docker.
New configs in WireHole are generated from docker-compose.yml and server.conf / peer.conf (wirehole/wireguard/templates) whenever docker-compose.yml changes and Docker is restarted (cd wirehole && docker-compose up).
I also recommend listing Peer configs in docker-compose.yml by peer names comma-separated, not by peer count (PEERS=DELL,OP8T,XXXXXXX,mikrotik)
General recommendations
If you use the default MikroTik configuration, go to Interfaces-Interface Lists and add the wireguard1 interface you created to LAN
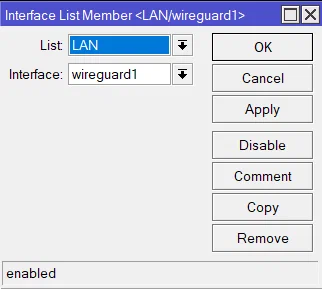
This is required for the default Firewall defconf: drop all not coming from LAN rule to work correctly; otherwise that rule will block LAN access for the wireguard1 interface

No email, no trackers — just the update feed.
Russian feed
https://en.kiberlis.ru/feed/