


- System requirements
- Renting a VPS
- Configuring DNS records for the domain
- Preparing the system
- Installing Matrix Synapse
- Downloading the installation files
- Configuring the Ansible playbook
- Loading the base configuration template
- Configuring Ansible SSH access to the server
- Generating keys for Matrix Synapse
- Configuring the main Synapse parameters
- Running the Matrix Synapse installation
- Documentation and additional Matrix Synapse Ansible settings
- Registering the first user and making them an administrator
- Installing Dimension
- Enabling calling features
- Invite-based registration
- Admin panel
- Firewall rules
- Manual Nginx configuration
- Updates and maintenance
- Removing Synapse
This guide covers a full Synapse installation on your own server (or VPS) and basic configuration of its features. Synapse is deployed with multiple Docker containers managed by the Ansible configuration system. Official documentation for this installation method is available on Github and Matrix.org.
Synapse is an open-source Matrix homeserver written and maintained by the Matrix.org Foundation. Matrix clients are listed here: https://matrix.org/clients/
I chose the Ansible + Docker Synapse deployment because it is the easiest way to install and configure additional Synapse dependencies and extensions, and it also installs nginx, SSL, and PostgreSQL automatically.
In short, Matrix is an open standard for internet communication used by messengers. It supports federation, encryption, voice and video calls, and video conferences. Integrations with Telegram, Discord, WhatsApp, and more are also possible — the full list is here: https://github.com/spantaleev/matrix-docker-ansible-deploy#bridges
Today you can use Matrix for private chats with friends and family, as a full replacement for WhatsApp/Telegram, or even for corporate communication — with one major difference from popular messengers:
- You can communicate via your own server with your own encryption keys and stronger protection against interception. Popular messengers use their own servers and keys, which may be accessible to some government agencies and attackers
- Despite using your own server, you can still communicate with users on other Matrix servers (federation)
- You can set up a bridge and chat with users of any other messenger, such as Telegram or WhatsApp
- No system-side surveillance
- High-quality, highly stable audio and video when the Synapse host has sufficient resources
- Stronger protection against personal data collection and message theft
- Minimal network verification — you do not have to use your phone number or email to register (except on some public servers, which often require email). An example of using a public Matrix server is here: https://habr.com/ru/post/665766/
In other words, Synapse lets you join the Matrix network with your own identifier @<username>:<your-domain>, all hosted on your own server or rented VPS.
All services run in Docker containers, which gives a predictable and up-to-date setup. Installation, updates, and some maintenance tasks are automated with Ansible.
System requirements
Without video conferencing (Jitsi):
4 GB RAM (or 2 GB + swap), 2 CPU cores (at least 3.4 GHz), 40 GB SSD or NVMe disk
With video conferencing (Jitsi):
6 GB RAM (or 4 GB + swap), 2 CPU cores (at least 3.4 GHz)
Supported OS:
CentOS 7
Debian (9, 10, 11)
Ubuntu (16.04 and newer)
Archlinux
I personally installed it only on Ubuntu 24.04 LTS and Debian 11–12.
A server with 2 GB RAM and no swap can also run Synapse, but only for personal voice calls (no video) and private chats (tested, with some limitations). Federated rooms with many subscriptions will completely overload such a server (you may need to reboot and urgently remove Synapse, then reinstall)
Buying a domain
Buy a domain for your Matrix server — I recommend buying from hostland.ru
Renting a VPS
For VPS rental I recommend the following providers:
alfahost.io — reliable high-speed hosting with powerful Ryzen and Xeon CPUs, recommended in the support chat, 8–13 Gbit channel. For Synapse, prefer fast CPUs such as Ryzen or High-CPU plans.
vdsina.ru — (10% discount via the link) a host with servers in multiple countries, recommended in the support chat; suitable for VPN with a 1 Gbit channel
timeweb.com — (300 RUB account credit via the link) a good host, though I have not used them for a long time. 200 Mbit channel
Configuring DNS records for the domain
After buying a domain and renting a server, immediately add the DNS records below. Do this as soon as possible, because DNS propagation can take from 3 hours to 3 days (usually less than a day).
The apex domain will not be used for Synapse itself, because it is usually reserved for the main site or blog. Synapse will use subdomains such as matrix.example.ru and element.example.ru
Replace example.ru with your domain prepared for Synapse.
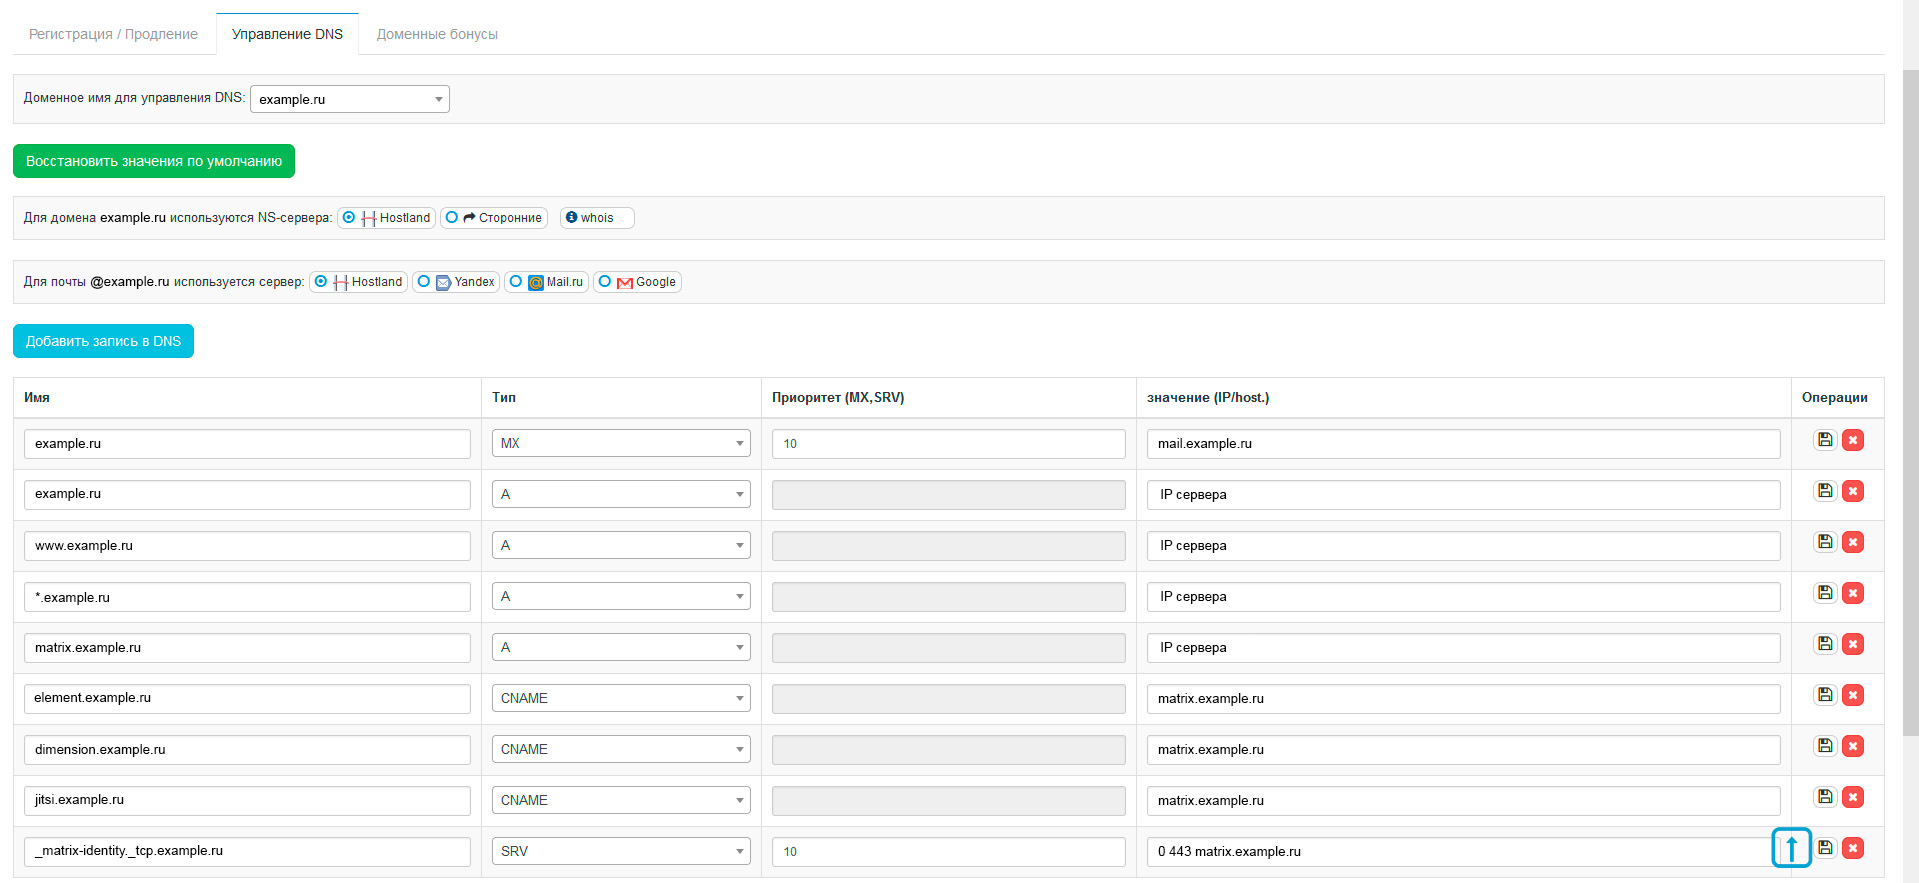
Required DNS records for the domain:
TYPE HOST PRIORITY WEIGHT PORT VALUE
A matrix – – – matrix-server-IP
CNAME element – – – matrix.example.ru
CNAME dimension – – – matrix.example.ru
CNAME jitsi – – – matrix.example.ru
SRV _matrix-identity._tcp 10 0 443 matrix.example.ru
Example DNS setup in the Hostland.ru control panel:
You can check DNS propagation here https://2ip.ru/dig/
Preparing the system
Update the system
apt update -y &&
apt upgrade -y
Harden the server and disable password login using the following checklist with an SSH key:
Install the required dependencies (Python3-pip, Ansible, and pwgen for password generation):
apt install pipx
pipx ensurepath
pipx install ansible
apt install pwgen
Reboot the server:
rebootAs an alternative way to install Ansible, you can also follow the official documentation https://docs.ansible.com/ansible/latest/installation_guide/installation_distros.html#installing-ansible-on-debian
Installing Matrix Synapse
Downloading the installation files
Download the installation files to the server
git clone https://github.com/spantaleev/matrix-docker-ansible-deploy.gitConfiguring the Ansible playbook
Loading the base configuration template
In this guide we run the Ansible playbook directly on the server, so copy the configuration template into the Synapse config directory and set the SSH connection details in matrix-docker-ansible-deploy/inventory/hosts
Enter the installation directory
cd matrix-docker-ansible-deployCreate a directory for your server configuration (replace example.ru with your domain)
mkdir -p inventory/host_vars/matrix.example.ruCopy the vars.yml and hosts configuration templates (replace example.ru with your domain)
cp examples/vars.yml inventory/host_vars/matrix.example.ru/
cp examples/hosts inventory/hosts
Configuring Ansible SSH access to the server
To edit the server connection config file, run:
nano inventory/hostsThe file contents should look like this if you followed the security checklist, because it uses an SSH key instead of a password and a non-default SSH port:
[matrix_servers]
matrix.example.ru ansible_host=IP-сервера ansible_ssh_user=root ansible_ssh_port=ПОРТ-SSH ansible_ssh_private_key_file=~/.ssh/id_rsa
Replace example.ru with the domain you purchased earlier.
In ansible_host, set your server’s public IP address.
In ansible_ssh_user, set the SSH username (default is root, which I kept; it can be a non-root user). If you use sudo, append -K to the Ansible install commands
In ansible_ssh_port, set your SSH port (default is 22, but I changed it and recommend you do the same per the security checklist)
In ansible_ssh_private_key_file, set the SSH private key path (default ~/.ssh/id_rsa; the checklist uses the same path)
If you are not using an SSH key and did not change the SSH port, the contents look like this (not our case, because we care about security):
[matrix_servers]
matrix.example.ru ansible_host=IP-сервера ansible_ssh_user=root
Generating keys for Matrix Synapse
Generate keys for the Matrix Synapse configuration in advance — you will need 10 keys. Generate them with the following command and save them in a notepad on your computer:
pwgen -s 64 1Configuring the main Synapse parameters
The main Synapse parameters are in vars.yml at matrix-docker-ansible-deploy/inventory/host_vars/matrix.example.ru
To edit vars.yml, run the following command (replace example.ru with your domain):
nano inventory/host_vars/matrix.example.ru/vars.ymlYou can use the ready-made vars.yml template below — fully replace the file contents and fill in your own values.
Replace example.ru with your domain and insert the previously generated keys instead of ‘большой ключ’.
The template uses the apex domain rather than a subdomain so you get clean addresses like @login:example.com without the matrix prefix.
#Обязательное
matrix_playbook_migration_validated_version: v2026.05.18.0
matrix_domain: example.com
matrix_homeserver_implementation: synapse
matrix_homeserver_generic_secret_key: 'большой ключ'
matrix_playbook_reverse_proxy_type: playbook-managed-traefik
devture_systemd_docker_base_ipv6_enabled: true
postgres_connection_password: 'большой ключ'


#Если у вас нет сайта на основном домене example.ru, то использовать данный параметр для автоматической настройки nginx, в противном случае закомментируйте его и настройте nginx самостоятельно
matrix_static_files_container_labels_base_domain_enabled: true
traefik_config_certificatesResolvers_acme_email: 'ssl@example.com'
#matrix_nginx_proxy_base_domain_serving_enabled : true

#Активация админ-панели
matrix_ketesa_enabled: true

#Активация звонков
#matrix_element_call_enabled: true
This configuration template includes:
- Synapse homeserver — the Matrix Synapse server
- PostgreSQL — database
- Coturn STUN/TURN — server for routing voice/video call traffic
- Let’s Encrypt SSL — free SSL certificate for the domain
- Element Web — web Matrix client at element.exapmle.ru, preconfigured for your server (replace example.ru with your domain)
- ma1sd — identity server; Exim mail server for sending notifications
- Exim — mail server for sending notifications
- Nginx — web server
- Synapse-admin — web admin UI for users and rooms
- Matrix-registration — invite-based registration for new users
- Matrix_element_call — calling features
After filling the template with your data, start the installation. If you do not need something, delete or comment out that line in the config file.
Running the Matrix Synapse installation
Install ansible-core:
pipx install ansible-coreReboot the server:
rebootInstall the Ansible roles required for Synapse:
rm -rf roles/galaxy &&
ansible-galaxy install -r requirements.yml -p roles/galaxy/ --force
Install the Ansible Galaxy collections community.general, ansible.posix, and community.docker:
ansible-galaxy collection install community.general
ansible-galaxy collection install ansible.posix
ansible-galaxy collection install community.docker
Install. If the user in hosts is not root and you need a sudo password, append -K to the command (and to all subsequent commands)
ansible-playbook -i inventory/hosts setup.yml --tags=setup-all,startNext you can run a configuration check
ansible-playbook -i inventory/hosts setup.yml --tags=self-checkIf you use an SSH password instead of a key for deploy commands, add –ask-pass
ansible-playbook -i inventory/hosts setup.yml --tags=setup-all,start --ask-passIf you hit errors, Matrix Synapse Ansible may have been updated and you may need to refresh this template against examples/vars.yml (please mention that in the comments). Always read error messages carefully to rule out simple mistakes.
Documentation and additional Matrix Synapse Ansible settings
Registering the first user and making them an administrator
To create a user with administrator rights, run:
ansible-playbook -i inventory/hosts setup.yml --extra-vars='username=логин password=пароль admin=yes' --tags=register-userInstalling Dimension
A Matrix module for adding widgets to rooms. You can use it to add a neat Jitsi video-conference button in the room header.
Register a new Dimension user without administrator rights
ansible-playbook -i inventory/hosts setup.yml --extra-vars='username=dimension password=хорошийпароль admin=no' --tags=register-userNext, get its access token so the service can run as that user. There are two ways: via curl or via the client
Via the client:
Open Element — the web client at https://element.example.ru works (replace example.ru with your domain)
Sign in as the dimension user
Click the name/avatar at the top, then click “All settings”
In settings, open “Help & About”, scroll to “Advanced”, find “Access Token”, expand it, and copy the token to a notepad.
Just close the browser — do not sign out!
Via curl
curl -X POST --header 'Content-Type: application/json' -d '{
    "identifier": { "type": "m.id.user", "user": "YourDimensionUsername" },
    "password": "YourDimensionPassword",
    "type": "m.login.password"
}' 'https://matrix.example.com/_matrix/client/r0/login'
In the command, replace “YourDimensionUser/Pass” and the URL with your values.
Add configuration lines to enable Dimension
nano inventory/host_vars/matrix.example.ru/vars.ymlAdd the lines:
matrix_dimension_enabled: true
matrix_dimension_admins: '@логин:example.com'
matrix_dimension_access_token: "ВАШ ТОКЕН который копировали"
For matrix_dimension_admins, set the first administrator account you created.
Re-run the Ansible build with:
ansible-playbook -i inventory/hosts setup.yml --tags=setup-all,startEnabling calling features
Invite-based registration
This feature is already enabled in your configuration template. To create an invite link, use:
ansible-playbook -i inventory/hosts setup.yml
--tags=generate-matrix-registration-token
--extra-vars="one_time=yes ex_date=2022-12-31"
Set one_time=”no” if you need an invite without an expiration date. I recommend “yes” and setting ex_date= in the same format as in the sample command
After running the command above, you will get a registration link for your friends.
Admin panel
Available at (trailing / is required):
https://matrix.example.ru/synapse-admin/
Firewall rules
Firewall rules used (align them with rules already on the system — see the security checklist, section 5):
sudo ufw default deny incoming
sudo ufw default allow outgoing
sudo ufw allow 80/tcp
sudo ufw allow 443/tcp
sudo ufw allow ВАШ-SSH-ПОРТ/tcp
sudo ufw allow 5349/tcp
sudo ufw allow 5349/udp
sudo ufw allow 3478/tcp
sudo ufw allow 3478/udp
sudo ufw allow 8448/tcp
sudo ufw allow 49152:49172/udp
sudo ufw allow 4443/tcp
sudo ufw allow 10000/udp
sudo ufw enable
Check the status:
sudo ufw status verboseManual Nginx configuration
If the apex domain is used by your website, you need to finish nginx configuration manually.
Add an nginx setting that tells everyone this domain is served by the Matrix server at matrix.example.ru, so both clients and federation work transparently when you use example.ru as the server address
location /.well-known/matrix {
proxy_pass https://matrix.example.ru/.well-known/matrix;
proxy_set_header X-Forwarded-For $remote_addr;
}
Verify that federation works:
https://federationtester.matrix.org/
You can also check that TURN/STUN is configured correctly for video and audio calls — you can supply a token or temporary Matrix account credentials, and enter matrix.example.com as the URL:
https://test.voip.librepush.net/
Updates and maintenance
With Ansible you can not only install Synapse but also update Synapse and its modules.
Channel for new version announcements #homeowners:matrix.org.
To update, enter the directory with the previously downloaded Matrix Synapse files and pull fresh files with:
cd matrix-docker-ansible-deploy
git pull
Re-run the Ansible build with:
ansible-playbook -i inventory/hosts setup.yml --tags=setup-all,startThe PostgreSQL database version can only be upgraded manually.
Removing Synapse
To remove Synapse, run:
sh /matrix/bin/remove-allthen copy and paste the confirmation text “Yes, I really want to remove everything!”
No email, no trackers — just the update feed.
Russian feed
https://en.kiberlis.ru/feed/