


- Why HAOS in a VM rather than Docker or Supervised
- What you need
- How Home Assistant on Proxmox is set up
- Install HAOS with community-scripts
- Which settings to pick in Advanced mode
- Check the disk cache after the script
- Manual HAOS install without the script
- If the server cannot reach GitHub
- First boot and onboarding
- A fixed IP address for Home Assistant
- Passing through a Zigbee or Thread USB dongle
- Snapshots and backups
- If a virtual OpenWrt is your router
- Common errors and how to fix them
- Accessing Home Assistant from the internet
- FAQ
- Read also
Home Assistant OS (HAOS) is a ready-made operating system for your smart home: Home Assistant itself, the app (add-on) store, backups and one-click updates. You don’t have to put it on bare metal: inside a Proxmox virtual machine it works exactly the same, and the same mini PC can also run your router, media server and everything else.
Below is a step-by-step guide to installing Home Assistant on Proxmox two ways: with the community-scripts helper and manually, without third-party scripts. Then the first boot, a fixed IP, Zigbee dongle passthrough, snapshots before updates and common errors. Tested in October 2026 on Proxmox VE 9, HAOS 18.3 and Home Assistant 2026.9; Proxmox VE 8 works the same way.
Why HAOS in a VM rather than Docker or Supervised
- HAOS is the only full-featured option. In 2025 the developers deprecated the Supervised and Core installation methods. Apps (add-ons), built-in backups and OS updates from the UI exist only in HAOS.
- A Docker container is simpler but limited. Home Assistant itself runs fine, but there is no app store: Zigbee2MQTT, Mosquitto and ESPHome have to be installed and updated separately.
- HAOS does not run in an LXC container. It is a complete operating system with its own kernel, so it needs a real virtual machine.
- Proxmox is your safety net. A snapshot before a major update takes seconds, and rolling back takes a minute. Nightly backups of the whole VM are a built-in feature.
What you need
Running Home Assistant on Proxmox does not take much:
- An x86-64 machine running Proxmox VE 8.0–8.9 or 9.0–9.2 — the versions the script supports at the time of writing. The script does not work on Raspberry Pi or other ARM boards.
- Free resources for the VM: 2 cores, 4 GB of RAM and 32 GB on a local SSD. Proxmox itself needs another 1–2 GB of RAM.
- A wired network connection for Proxmox. Bridging over Wi-Fi does not really work in Proxmox.
- Optionally, a Zigbee, Thread or Z-Wave USB dongle: Home Assistant Connect ZBT-1, Sonoff ZBDongle and similar.
How much to allocate depends on what you will run in Home Assistant:
| Scenario | vCPU | RAM | Disk |
|---|---|---|---|
| Typical smart home: sensors, lights, automations | 2 | 4 GB | 32 GB |
| Plus Zigbee2MQTT, Node-RED, years of history | 2–4 | 4–6 GB | 64 GB |
| Cameras and Frigate with object detection | 4 | 8 GB | 64 GB or more |
| Local voice assistant (Whisper and Piper) | 4 | 8 GB | 64 GB |
It makes more sense to run the language model for a voice assistant outside HAOS — where and on what hardware is covered in the article on local AI models.
How Home Assistant on Proxmox is set up
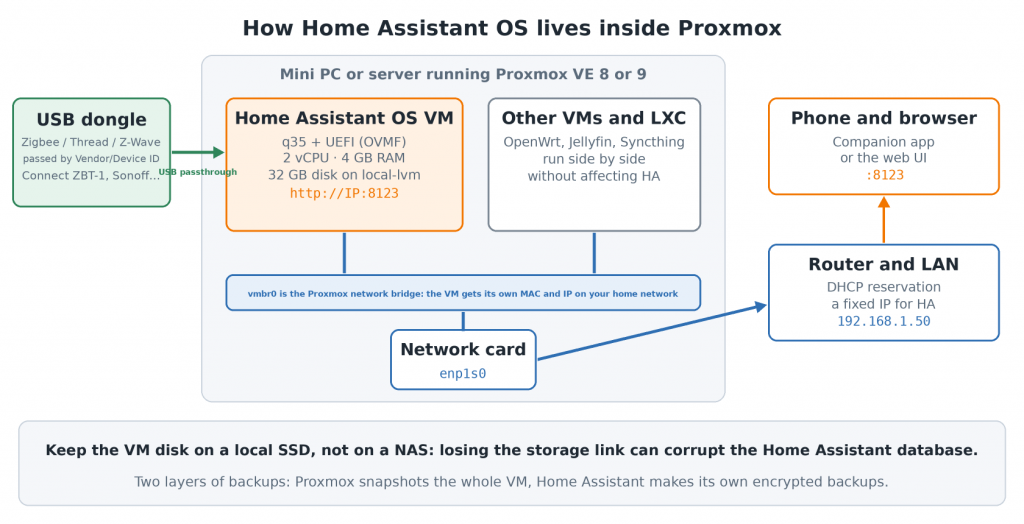
To your router the VM looks like just another device with its own MAC address. Your phone and browser reach Home Assistant at its IP on port 8123, and Proxmox is not involved. Both the script and the manual method below create the same VM: q35 machine type, UEFI boot, a disk on the VirtIO SCSI controller and the QEMU Guest Agent enabled — it is already built into HAOS.
Install HAOS with community-scripts
Community-scripts is a large collection of Proxmox scripts formerly known as the tteck scripts, now maintained by the community. The HAOS script looks up the latest stable version, downloads the official image from the Home Assistant GitHub, then creates and starts the VM.
- Open the Proxmox web UI, select your node in the tree on the left (for example,
pve) and click Shell at the top right. - Paste the command and press Enter.
bash -c "$(curl -fsSL https://raw.githubusercontent.com/community-scripts/ProxmoxVE/main/vm/haos-vm.sh)"- The script asks Use Default Settings? Yes creates the VM with defaults, Advanced lets you choose every parameter. I recommend Advanced — what to pick is shown below.
- If you have several storages, pick a local one:
local-lvmorlocal-zfs. Select it with Space, then press Tab and Enter. - Wait a few minutes while the script downloads and unpacks the image, imports the disk and starts the VM. It ends with Completed successfully.
A word on security. The command runs a script from the internet as root. That is common practice in a homelab, but you can open the link and read the code first — it is short. The script sends anonymous statistics only if you opt in; the choice is stored in /usr/local/community-scripts/diagnostics. If you prefer not to run scripts like this, use the manual method below.
Run the script from the built-in Proxmox shell rather than over SSH: over SSH it warns that gathering variables may fail.
Which settings to pick in Advanced mode

- Disk Size. 32 GB is enough, but the history database and backups grow over time. If your SSD has room, use 64 GB. You can also grow the disk later — see the troubleshooting section.
- Disk Cache. Write Through is safer during a sudden power loss: a write only counts as done once the data reaches the disk. You pay with write speed, but for Home Assistant it is barely noticeable. If the server is on a UPS, None is fine.
- CPU Model. Host passes every CPU instruction to the VM, which speeds up Frigate, Whisper and encryption. KVM64 is only needed for live migration between different cluster nodes.
- Bridge. Usually vmbr0. If a virtual OpenWrt is your router, pick its LAN bridge — details below.
Check the disk cache after the script
An easy detail to miss. In the current version of the script, the Disk Cache choice appears in the final summary but is not applied to the disk: the disk is attached with the default cache, which is None. Checking and fixing it takes a minute.
- Shut down the VM with Shutdown at the top right.
- Open the VM → Hardware → Hard Disk (scsi0) → Edit.
- Set Cache to Write through. Keep Discard and SSD emulation enabled.
- Click OK and start the VM.
The same from the Proxmox shell. Take the VM ID and disk name from the output of the first command:
qm config 100 | grep scsi0
# scsi0: local-lvm:vm-100-disk-1,discard=on,size=32G,ssd=1
qm shutdown 100
qm set 100 --scsi0 local-lvm:vm-100-disk-1,discard=on,ssd=1,cache=writethrough
qm start 100
Manual HAOS install without the script
This uses the official HAOS image for KVM (the .qcow2 file), the same one offered on the official Home Assistant installation page. Proxmox runs on KVM, so the image works, but the official site has no Proxmox-specific guide: it only covers VirtualBox, Unraid and plain KVM with virt-manager.
The manual method produces the same VM, but you see and understand every command. Check the current version on the HAOS releases page and put it in the first line. Replace local-lvm with your storage.
VER=18.3
VMID=100
STORAGE=local-lvm

cd /var/tmp
wget https://github.com/home-assistant/operating-system/releases/download/$VER/haos_ova-$VER.qcow2.xz
xz -d haos_ova-$VER.qcow2.xz

qm create $VMID --name homeassistant --machine q35 --bios ovmf \
  --cores 2 --memory 4096 --cpu host --ostype l26 \
  --net0 virtio,bridge=vmbr0 --scsihw virtio-scsi-pci \
  --agent enabled=1 --onboot 1 --tablet 0
qm set $VMID --efidisk0 $STORAGE:0,efitype=4m,pre-enrolled-keys=0
qm disk import $VMID haos_ova-$VER.qcow2 $STORAGE --format raw
The last command prints the name of the imported disk, for example local-lvm:vm-100-disk-1. Attach it, make it the boot disk, grow it to the size you want and start the VM:
qm set $VMID --scsi0 $STORAGE:vm-$VMID-disk-1,discard=on,ssd=1,cache=writethrough
qm set $VMID --boot order=scsi0
qm resize $VMID scsi0 32G
qm start $VMID
rm haos_ova-$VER.qcow2
The pre-enrolled-keys=0 option matters: it creates UEFI without Secure Boot keys, and HAOS will not boot with Secure Boot on. If you create the VM with the web UI wizard, untick Pre-Enroll keys on the System tab.
If the server cannot reach GitHub
Both the image and the script come from GitHub, and there is no official mirror: even os-artifacts.home-assistant.io redirects there. If the Proxmox host has no direct access, download haos_ova-18.3.qcow2.xz (about 490 MB) on another computer, compare its SHA256 with the one shown next to the file on the release page, copy it to /var/tmp on the host with WinSCP or scp, and run the commands above without the wget line.
Keep in mind that this covers only the image. On first boot the Supervisor downloads the Home Assistant container from ghcr.io, and updates come from there too. Without access to ghcr.io the setup stops at the preparation screen; supervisor logs in the VM console shows the download errors.
First boot and onboarding
- Open the VM → Console. Once HAOS boots, it shows a banner with an address like
http://192.168.1.50:8123. The same IP appears on the Summary tab, reported by the Guest Agent. - Open that address in a browser. For the first 5–20 minutes Home Assistant prepares itself and downloads components, showing a preparation screen. That is normal — do not restart the VM.
- Create the owner account. If you are moving, for example from a Raspberry Pi, choose restore from backup — HAOS brings back all settings, integrations and history.
- Set your home location on the map, time zone, units and decide whether to share anonymous analytics. Location drives presence automations and sunrise/sunset triggers.
- Finally, Home Assistant shows devices it found on the network. You don’t have to add them now — you can do it later under Settings → Devices & services.
A fixed IP address for Home Assistant
The Home Assistant address should never change: the phone app, integrations and remote access depend on it. There are two ways:
- A DHCP reservation on the router — recommended. The VM’s MAC address is in Proxmox under Hardware → Network Device (net0). Pin the IP you want to it in your router settings. All network settings stay in one place.
- A static IP in Home Assistant itself. Settings → System → Network, IPv4 → Static. Enter the address, mask, gateway and DNS. Pick an address outside the router’s DHCP range to avoid conflicts.
Passing through a Zigbee or Thread USB dongle
For Home Assistant to see a Zigbee dongle plugged into the server, you need to pass it to the VM.
- Plug the dongle into a USB port on the server.
- Open the VM → Hardware → Add → USB Device.
- Choose Use USB Vendor/Device ID and find the dongle in the list.
- Shut down the VM and start it again. A reboot from inside HAOS is sometimes not enough.
- Home Assistant discovers the dongle and offers to set up ZHA. If you prefer Zigbee2MQTT, install it as an app.
Passthrough by Vendor/Device ID survives moving the dongle to another port. The exception is two identical dongles: then pass them by port. Ethernet coordinators such as the SLZB-06 need no passthrough at all — Home Assistant connects to them over IP. You can pass a Bluetooth adapter the same way, and a mini PC’s built-in Bluetooth usually sits on USB too.
Snapshots and backups
The main benefit of Home Assistant on Proxmox is a safety net against failed updates and disk problems. Use it from day one:
- A snapshot before a major update. VM → Snapshots → Take Snapshot. If something breaks after the update, Rollback restores everything in a minute. Snapshots work on
local-lvm(LVM-thin) and ZFS. Don’t keep them for months: old snapshots take space and slow the disk down. - Nightly backups of the whole VM. Datacenter → Backup → Add: pick the VM, a schedule and Snapshot mode. Thanks to the Guest Agent the file system is frozen before copying, so the backup is consistent. Store backups on another disk or a NAS.
- Home Assistant’s own backups. You need them to move to other hardware or restore individual settings. Sending them to the cloud is convenient — see the article on Home Assistant backups to Google Drive.
Update HAOS and Home Assistant as usual from the UI: Settings → System → Updates. There is no need to recreate the VM or swap the image by hand.
If a virtual OpenWrt is your router
If Proxmox also works as your router, as in the article on OpenWrt in Proxmox, the Home Assistant VM must face the local network, not your ISP. In that setup vmbr0 is the WAN and the local network is vmbr1. So enter vmbr1 in the script’s Bridge field, or change the bridge of an existing VM under Hardware → Network Device (net0). Otherwise Home Assistant ends up outside and cannot see your devices.
Common errors and how to fix them
- “This version of Proxmox VE is not supported”. The script checks the Proxmox version and refuses releases that are too new. Wait for a script update or install HAOS manually — the method above does not depend on the version.
- The VM does not boot, the console shows “Access Denied” or “Failed to load Boot0001”. Secure Boot is on. Restart the VM, press Esc during boot, open Device Manager → Secure Boot Configuration, untick it and save. Alternatively, recreate the EFI disk with
pre-enrolled-keys=0. - The VM gets no IP. Make sure the right bridge is selected and Proxmox itself is wired. In the HAOS console,
network infoshows the network state. - homeassistant.local:8123 does not open. That name relies on mDNS, which not every router or device supports. Use the IP instead.
- Out of disk space. Grow the disk with
qm resize 100 scsi0 +32Gor Disk Action → Resize. HAOS expands its partition on the next boot. - The UI lags with several cameras. Add cores and RAM under Hardware. For Frigate, add an accelerator: a Coral TPU or Intel integrated graphics.
Accessing Home Assistant from the internet
Don’t forward port 8123 on your router directly: the UI would be open to the whole internet. A tunnel or Zero Trust access is safer. Options that work without a public IP are covered in the articles on CloudPub for Home Assistant and OpenZiti. To put a video doorbell on your dashboard, see the guide on Aqara G4 and go2rtc.
FAQ
How is HAOS different from Home Assistant in Docker?
HAOS has the app store, built-in backups and OS updates from the UI. In Docker you get only Home Assistant itself, and Zigbee2MQTT, the MQTT broker and the rest must be installed and updated separately.
Can I install HAOS in an LXC container?
No. HAOS is a full operating system with its own kernel, so it needs a virtual machine. In LXC you can only run Home Assistant in Docker, without apps.
How much RAM should Home Assistant get on Proxmox?
4 GB is enough for a typical smart home. With cameras, Frigate or a local voice assistant, 8 GB is better.
Is the community-scripts script safe to run?
It is open source, used by thousands of people, and downloads the HAOS image from the official Home Assistant GitHub. You can read the code before running it. If you would rather not run third-party scripts as root, use the manual install — it produces the same VM.
Should I enable Write Through?
It protects the database from corruption during a sudden power loss. If the server has no UPS, enable it. Note that the current script does not apply this choice to the disk — check the Hardware tab.
How do I move Home Assistant from a Raspberry Pi to Proxmox?
Make a full backup on the Raspberry Pi and download it. Install HAOS in Proxmox and choose restore from backup on the first screen. Move the Zigbee dongle to the server and pass it through to the VM.
How do I update Home Assistant on Proxmox?
As usual, from the Home Assistant UI: Settings → System → Updates. Take a VM snapshot in Proxmox before a major update.
Does this work on Proxmox VE 9?
Yes. Both the script and the manual method work on Proxmox VE 8 and 9. The script checks the version and may refuse a very new release — then use the manual install.
Read also
- OpenWrt in Proxmox VE: a virtual router on a mini PC
- SMB in a Proxmox LXC container for Jellyfin
- Home Assistant backups to Google Drive
- CloudPub: remote access to Home Assistant without a public IP
- Syncthing: file sync without the cloud
In short: Home Assistant on Proxmox installs with one command or a dozen of your own, behaves like a separate computer on your home network and is protected by Proxmox snapshots and backups. After installing, check the disk cache, pin the IP and pass through your Zigbee dongle. If something does not work, describe your setup in the comments.
No email, no trackers — just the update feed.